Saturday, 29 September 2012

October Afternoon - here & now Album

Hi again,

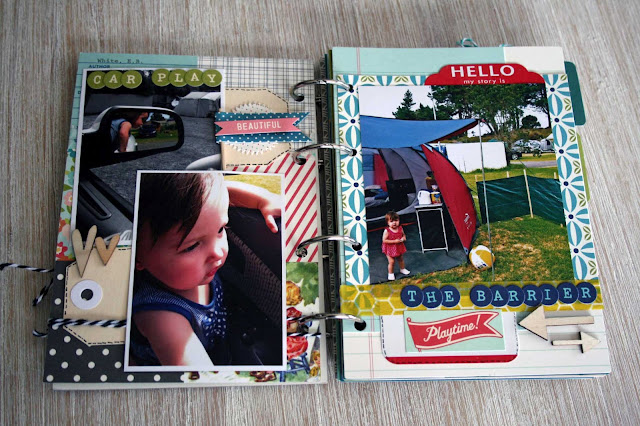
It is time for me to share with you the finished pages of my mini album I have been working on over the last few weeks.  I am not a big mini album fan usually but can I say WOW... I think I may have been converted by the October Afternoon Here & Now Mini Album (OA MA).

It was so easy to pull together but today I wanted to share with you how I go about creating an album like this from it's conception to the finish project.  Not a blow by blow way of 'doing it' but more of what sort of things I think about when I am creating a mini album. 

Album Concept 

Sometimes I get layout or project inspiration from the photos themselves but other times creativity flows from the product itself which definitely happened with the OA MA.  I specifically, loved the 'word' themes that are on the front cover 'today' and 'play' and liked how these words worked in with capturing the moment.  

I also loved the colours in the October Afternoon Woodland Chapters that accompany the OA MA.  The colours in this collection were perfect for outdoorsey themes and specifically in this case for 'the beach'.   When I am creating a mini album - I like to use a specific event such as a family holiday where I usually take lots of photos that tell a story rather than beautiful portraits which I may prefer to highlight on a layout.  

A mini album is the perfect way to 'document' an event and a mini album provides the perfect backdrop to tell stories and traditions which is why I chose to document our last family holiday in Hahei.

The goal of the MA 

Next step in the process is to think about what I want to achieve in creating the MA.  Firstly, it is to hold all those photos but secondly as we travel and spend a week camping at the same spot each year, I wanted to document what happened on this specific year.  This year we had four members of our family on holiday so I thought that the chapter dividers would be perfect to record the favourite aspects of our holiday.  The lined pages of the mini album were perfect to use as a journalling page for each family member.  I used alphabet stamp to write the journalling prompts.


Organising Supplies

Next, I gathered all the supplies I thought would work with the album colours.  I really liked the OA Here & Now Chapters as they had really cool patterns and designs which I thought could be used as embellishments as well as background papers.  This makes the chapters and the OA MA good value for money as I had a lot to create with.   Some of them had beautiful detail on them, like the butterfly page above which I decided to leave blank to create white space and I felt it didn't need anything else on that page at all.   Other pages I fussy cut out pieces of them to use as embellishments on other pages.

Once I have my supplies, my photos and everything in one place then this is sometimes where I have trouble taking the plunge... but honestly, just get started.. there is no wrong way to put together the album.  To create flow and a story I have grouped my photos into different mini themes - like getting there and camp set up,  different aspects of general camp life and beach scenes.  In fact, one of the telling aspects of the whole holiday which was highlighted when I put together the OA MA is that there were less photos of Liam in general because the main thing he did on holiday was hang out with friends and not with us... slightly awkward!  But another important aspect for me is to create balance of pages between the different family members that were on holiday.  Something I need to work on for next  time is taking more photos of ME!  

Putting the Album Together

Right, now the fun part, I have used a mix of photo sizes in my OA MA from teeny tiny to 6 x 4 inches.  I wanted to create lots of texture, layering and interest on my album pages.  To do this, I have layered some of the busier patterned papers with the ruled lined paper and incorporated little plain tags to create pockets of interest and depth.  A lot of the time, it was working the colours in the papers in with the colours in my photos.  The bluey tones were perfect for the beach shots and I just loved the greens and pops of colour with the greenery of the campsite and our tent colours.  The sunshiney yellows remind me of the lovely weather we had and also worked well with the shots of the beach too.  

I also used a lot of 'word' embellishments instead of journalling throughout the album.  I love how you can buy sticker sheets with lots of different words and phrases which make summarising my thoughts super easy without having to actually journal on the pages.  This is super fast and of course great for someone who doesn't like to write a lot on their pages.

So that is pretty much how I created it!  Here are the rest of the pages...


Thanks for stopping by today, I hope you have enjoyed seeing the last of the OA MA as much as I have enjoyed creating it.  

Thanks
//Michelle


Friday, 28 September 2012

New in Stock...

New in stock.......Chipboard Album, papers, alphas, ephemera, tags and more.  Beautiful subtle colours!!!


Thursday, 27 September 2012

OTP Inspiration

Hi Everyone!

Its the end of the month, and has'nt September just flown out the window?! I cannot believe its nearly October already, which means only thirteen weeks til Christmas!! Sorry, had to mention it :)

Ok, so my inspiration is quite different this time.  I decided to play with a few products in the shop - you know the ones; the ones you just had to have but have'nt really used yet!  For me that would be Distress Inks, Stains and crackle paint.
Ive been dabbling in adhering things to glass for awhile with limited success.  Besides using glossy accents or double sided tape to adhere things, I was pretty limited in what my brain was wanting me to do and what I ended up with.  Then I stumbled across Rangers Glue n Seal, and this would be, in  my humble opinion, the best thing ever!!  It looks like a gooey curdled mess in the jar, but goes on like a dream.  It paints easily onto glass, leaving it white while wet, so you can see where you're going and then dries clear.  You can leave it to dry, or if you're wanting everything yesterday like me lol, then a heat gun works well too.  Once your item is dry you can then paint over the top, or ink, apply rubons or whatever you like with no problem at all.

So, I had these two bottles that I'd kept for some reason or another.  For the first one I kept it simple.  I applied glue n seal, and then clear rock candy distress crackle paint and left it over night to dry.  Then I used my spiced marmalade distress ink pad to adhere my colour and left it to dry.  You can't quite see all the crackles in the photo but you can when you see it in real life.


The second bottle I painted white after using glue n seal, and then ran over it with weathered wood distress stain, and then sealed it again, before decorating it with some left over bits from my En Francais kit.


The doily behind the butterfly is an old glittered rubon from K&Co, and the rear butterfly is diecut from a Spellbinders die, layered with a Prima butterfly.
So, come on!, break out those products you just had to have and have'nt used yet and give them a go!  You might surprise yourself, just like I did :)

Oh! These will be in shop on Saturday for you to have a close up look at if you wish - its all day crop at the Patch and Im hoping on getting some Christmas presents done!

Thanks for popping by!
Megan

Wednesday, 26 September 2012

October Afternoon Inspiration from Trace...

I had fun this week with one of my favourite dies. It's always fun playing with the Tim Holtz Rosette Die. I think these October Afternoon papers look great as flowers!

I was rapt to find that Scrappin Patch had sent me a few of the Prima Resist Canvas flowers to play with. It's like being a child again as you watch the patterns come through the glimmermist.
To add interest to my chipboard frame, I painted it antique white and then used gold Glimmerglaze on the bottom half. Before this dried I added dimensional magic to it, and when that was dry I lightly stamped over the top. My favourite Pinecone ink came in handy for this.
Products used on this layout were:
Meeting minutes
Italics
Dimensional magic
Tim Holtz Rosette die
Tim Holtz Stamp
K & Co pearls.

Happy Scrapping....
Trace

Monday, 24 September 2012

My Minds Eye page kit

It is Jessica T back for you today, and today I am showcasing another new Page Kit offered by Scrappin' Patch.
This page kit is based on My Minds Eye "My Sweetest Thing" Tangerine. If that sounds like a mouthful, it's because every time MME releases a new collection, they release it in four different colourways - The Sweetest Thing is released in Bluebell, Honey, Lavender and Tangerine.
The page kit has MME double sided patterned cardstock, co-ordinating plain cardstock, journal card, buttons, three different types of trim and some mist. I made three layouts with it, with plenty of product left over for more projects if you use your own cardstock base.
The only things I have included on this layout that weren't included in the kit (other than adhesive and pen), are the alphas I used to mask the title.

Rounded corners, a masked title (I used chipboard alphas, you could also use letter stickers), mist splatters, twisted trim, and foam tape under the button and 'sun'.


The only things I have included on this layout that weren't included in the kit (other than adhesive and pen) are the chipboard & sticker alphas and black ink.

Inked edges, layered paper, buttons threaded with trim and adhered with foam tape, journalling around the edge of the photo mats, chipboard title coloured with the mist.

Photos by Manawatu photographer Amanda McErlich. Here is a link to all the photos taken by Mandy on that day.


Journalling card cut up to use as a title, foam tape under elements, two layers of the same trim.

Tags handcut from the reverse side of patterned paper, foam tape under the buttons that were also threaded with trim, mist and ink splatters.

This Page Kit, along with others, are available for purchase from the Scrappin' Patch shop here. If they aren't available yet, they will be soon.

On my blog I have photos of the contents of the kit.

Friday, 21 September 2012

I love American Crafts...

Hello.. hello... Hayley here...

I have a couple of pages to share today using American Crafts Freshly Squeezed and Gardenia.

Starting off with the Gardenia..

These colours make me feel totally springy, how darn cheerful are they. I loved this polka dot paper, the dots have a glazed finish and these colours will pretty much work with anything. I used another couple of retails strips for borders across the page and I added some sewing and buttons for a little texture.

I had already popped my title up with foam adhesive and didn't want my little flower embellishment to be at the same height and get lost, so I took the 3d sticker apart, don't be afraid to do this, used is better than unused! I actually used the yellow backing piece from the sticker on another layout so it was quite versatile really.


 Supplies: Gardenia Paper - Breezy GardenBlossom Greenhouse, Perennial Gardens, Vine Nursery
Gardenia Embellishments - Dimensional Stickers - Thyme


Another Gardenia page, this time I left the embellishments as is ...

I really liked how this turned out.. super simple... I cut the cardstock circle background on my Silhouette. It is an amazing machine. Then I basically just filled the gaps.


Gardenia Embellishments - Dimensional Stickers - Thyme


Next is a page using the Freshly Squeezed Collection, oh I love these colours, the brown, aqua and yellow. Love them!

A bonus with this collection is some of these papers are quadrant papers, so on the B side they have four co-ordinating patterns measuring 6x6. These are a great way to stretch out your supplies and give you more options. For example this aqua paper is a piece of a quadrant, you got 6x6 of red dot, aqua dot, pink dot and green dot, that is right up my alley. You can't always tell that they are quadrant by the image online but in case you are interested, I know this one and this one are. I again used those adorable recipe cards for my journaling.


 Supplies: Freshly Squeezed Papers: Apple Butter, Cherry Syrup, Strawberry Spread
Patterned Paper for Titles : Amy Tangerine Here and There


And then lastly with my scraps... I whipped up a couple of cards. 
I try and do this while I still have all the bits and pieces out.


 Gardenia Embellishments - Dimensional Stickers - Thyme
Sticker:  Crate Paper Neighbourhood - Journal Stickers

So thanks for coming on by... 

I hope this encourages you to do those chores a little faster so you can get crafting, or in fact just leave the chores... they will be there tomorrow.
Have a blessed day
Hayley

Thursday, 20 September 2012

My Mind's Eye - School Daze

Hi everyone

I'm back to show you a little inspiration using the School Daze paper pad from My Mind's Eye. This pad is super-CUTE! I love the colour palette and pretty much every pattern - as is the case with most MME collections :)

Education and schooling has been a hot topic in the Canterbury region this past week so I thought I'd make a card to say thanks for all the hard work our wonderful teachers do at all levels.


I love the way it's turned out. Bright and colourful with some texture, dimension and a hint of gloss using Glossy Accents on the little hand-cut arrow details. I used some Thickers from the Amy Tangerine range to say 'THANKS'.  I love how the letters aren't perfect so they have a handwritten effect - perfect for this sort of card! I used Doodlebug Design Inc Teensy Type to say 'teacher'. I love these alphas too. So darn cute and a fantastic price.


My second card is a 5th birthday card. I've used green and yellow as my 2 main colours which I think can suit both a boy and a girl. I made a polaroid to frame 'Happy birthday!' and I left a space on the polaroid to include the name of the birthday boy or girl. The stars are from FabScraps and I just covered them with cardstock to give them some quick colour. This card also has a lot of dimension as all of my cards do! I don't think I've ever made a flat card. I just love how the dimensional stickers just give that instant pop.


Thanks for stopping by. Don't forget to check out the Scrappin' Online store for these goodies and so much more including some gorgeous new product from Teresa Collins, Prima, Bo Bunny and more!

x Lana

Products used: My Mind's Eye School Daze Paper Pad, FabScraps Chipboard Stars, Doodlebug Design Inc. Teensy Type Alphas White, Amy Tangerine Journal Thickers White, Glossy Accents.

Tuesday, 18 September 2012

9 to 5 by October Afternoon with Trace...

I can never resist buying October Afternoon products! Look at the fabulous colours in this range, it works just as well with modern and funky as it does with shabby chic and vintage.
I find the label stickers that OA produce, such handy embellishments to have on hand. While more often than not, I use them for their intended purpose of journalling, they also work well if I think I need something a bit extra when wanting to add depth and layers to a layout.
Scrappin Patch make it really easy by having bakers twine and buttons that work beautifully with this range, along with many others.
To do this layout I started with a Crafters Workshop Template, while I chose a chevron pattern, there are many to choose from that would work just as well. I mixed a bit of Glimmermist with gel medium, as I love the texture that this adds to a layout.
Products I used on this layout were:
Steno Pad
Italics
Meeting Minutes
Label Stickers
Pink Paislee Alphas
Buttons and Bakers twine
XX Trace

Monday, 17 September 2012

6 x 6 paper pads

Hi Everyone,

Please be aware this is post is very photo heavy! :)

My Dt kit included a 6 x 6 paper pad.  Usually I use these to make cards, they're really easy and quick to use for cards but I wanted to do something different.  This time I decided to make a mini album out of paper bags, and use the paper pad as my starting point.
My paper bags are 10.5in x 5in when folded flat; to make the pages just layer the flattened bags on top of each other and fold in half, and you have pages that are 5 x 5inches. To make the cover just take a piece of cardstock 12 x 6inches and find the point in the middle where you can score two vertical lines 1/4 of an inch apart - this creates the spine of the album.

This is the first of my examples - yes I have two for you, but each quite different.
The first album uses MME Lost and Found range.  I focused on  my friends OE, making this a mini album for one of her trips during her time in the UK. Ive left the bags open and added tags for journaling or photos.


The second album came out of the blue from Adrienne ;)- its a new range from Fancy Pants called Boutique Garden. Its quite different and not my usual taste, shall we say :) but is'nt that half the challenge?  This pad has two possibilities either masculine with ranges of greys and  beige or feminine with ranges of lavendar and white.  So what to do?!!
I came up both lol!  I made an album that could cater to both and a card that was distinctly feminine.
After a weekend at retreat I came home and made the cover for this album and channelled my inner Cindy Porter :))  using paint, texture paste, inking, and stamping.


And this is the card...................


So there you have it :) Thanks for popping by!
Megan

LinkWithin

Related Posts Plugin for WordPress, Blogger...