Showing posts with label Glitz Designs. Show all posts

Sunday, 22 April 2012

OTP Inspiration : Rebecca

I have two cards to share with you today for my Scrappin Patch Inspiration post. I thought I had run out of time and could only make one, but somehow the second card manage to squeeze itself into the time I had set aside. I love it when that happens! I was even more productive than I had planned ;)

I'm still playing with these gorgeous stickers and papers from my last kit. I can't believe how far you can stretch a kit when you need too. Originally I looked at all the things Adrienne and sent and thought "theres no way I can get 7 projects from this!" but I managed 8, and still have some left overs. Hurrah!

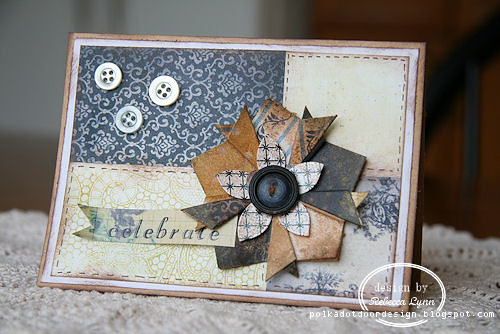
I used the technique from this post I created a matching flower with my little scrap bits and adhered it to a card that pretty well used up the rest of my larger scrap bits :) I love making cards for that reason, there always seems to be enough paper even when its just little bits and pieces. Once again I was able to use the gorgeous Glitz Vintage Blue "Titles" stickers for the sentiment/banner.

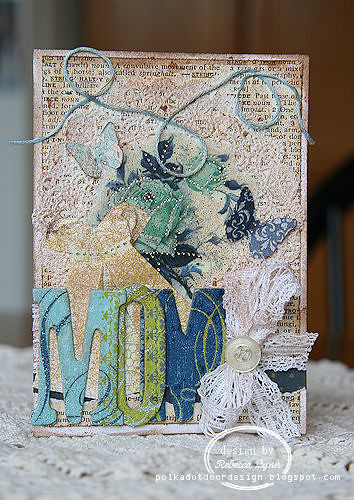
For my next card, I dug into my own stash a little more to accent the great Scrappin Patch product. I had a a really hard time photographing this card, no matter what angle/lighting/setting I was using, the layers just aren't coming through like they do in person. I think it might be because I was a bit generous with the glimmer mist once I had adhered it all together! I loved these roses from Glitz's Vintage Blue line, they worked as the perfect backdrop for the rest of the card. Its hard to see, but I created an origami dress behind the "MOM", a technique I just recently discovered but will be sharing with you all in my next technique post. They are so much fun, and so cute!

 I'm off to enjoy the gorgeous spring weather, and hope its just as beautiful where you are! Thanks for stopping in.

Monday, 26 March 2012

OTP Inspiration : Rebecca

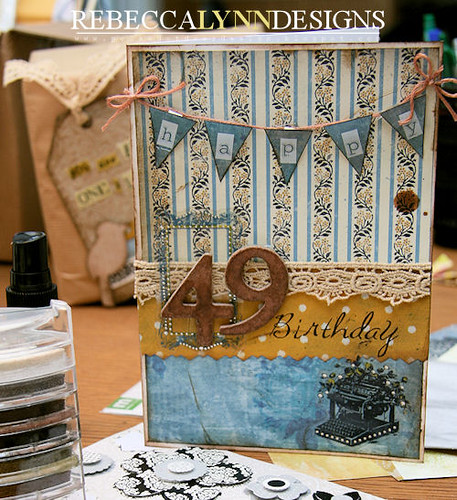
Birthday cards are always fun to make and one of the greatest reasons that I started making cards in the first place because it enabled me to create something that was geared specifically for that person. What better way to let someone know they are special, than with a one of a kind birthday card created just for them? The birthday in this case is my special Dad who turns 49 this year. Being recently married, this will be the first one of his birthdays that I won't be around for (for the past 25 years anyways ... ) It was a little odd writing this card and sending it in the mail already, but not being there for birthdays is certainly a new experience that I am going to have to get used too.


Most of the materials for this card came out of my DT kit from Scrappin Patch. I am thoroughly enjoying this kit that Adrienne sent from New Zealand for me. So many fun patterns and textures to be working with. Again, I used the Glitz stickers to embellish various portions of the card and admit I raided my (huge) stash of alphas for the various fonts used. I noticed when I made this card that my Chatterbox Alpha rub ons are running out! I have used them so much I'm almost all used up. I've browsed around the Scrappin Patch online store though and have some replacements picked out! There are so many fun goodies in the store, have you looked recently? The girls are always updating with new stock.

I wish I knew exactly what the supplies I was using were, but the supply list never made it into my kit, so if you know what the papers are, be sure to let me know and I'll update the supply list. The April newsletter is almost ready to be released as well, if you haven't already signed up for it, you really need to get on the list. The DT girls have been given a bit of a sneak and its not an issue you want to miss. There is all sorts of great inspiration coming to an inbox near you!

Until next time, 


Saturday, 17 March 2012

OTP Tutorial : Rebecca


I wanted to share a fun embellishment with you all today. I first saw it at another blog and decided that I could make it too. After a little bit of folding and refolding and a few light bulb moments it all came together. I used the embellishement on my recent OTP project, but today am going to give you the step-by-step instructions so you can recreate this on your own. Ready? :)


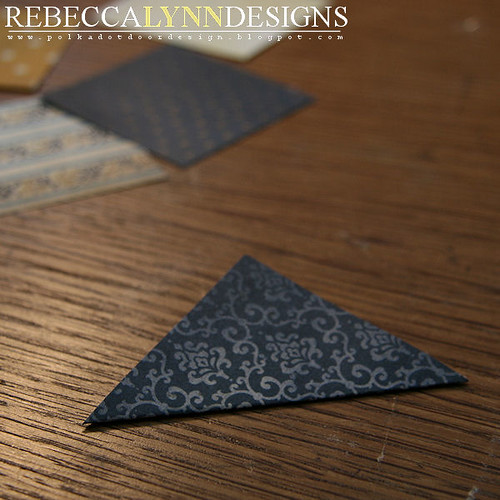
The first step is to cut (5) 2 x 2 inch squares. You can use all the same paper if you like, but I really like how it turned out using 5 seperate patterns.


 Fold the papers once diagonally across the center.


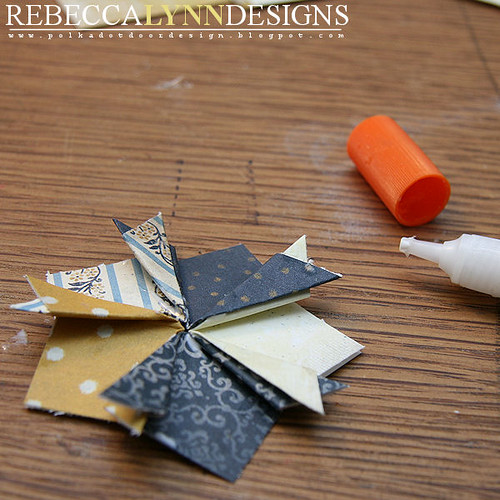
Fold the two sides inwards to meet the centre 'corner' of the triangle, (when you hold it flat it will be square).


 This step took me a few tries to get the fold correct.... Where the two folds meet in the middle, fold them back on them selves once.


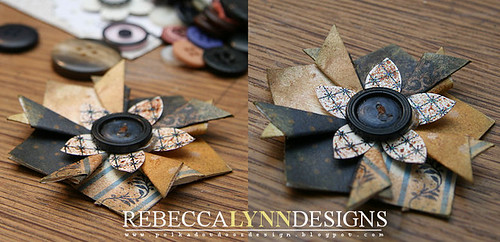
Using a wet glue or strong adhesive, slot the folded pieces together and glue each 'petal' in place to create the flower shape. Then embellish the center as you like! I added a small paper flower and button as well as misting the entire flower with glimmer mist.


Thanks for looking!


Thursday, 8 March 2012

OTP Inspiration : Rebecca

This months design kit presented itself with a beautiful challenge in the form of products that I have never really worked with. When I first opened my envelope, my first thought was "What am I going to do with these?" but only because I never have ever tried to. What was the mystery product? The gorgeous new line of Vintage Blue from Glitz, both Cardstock and Transparent stickers. Beautiful in their design, construction, and appeal and as I found out, far more versatile than I at first thought. I have initially stayed away from using stickers in my projects because they were so .... complete already. So I challenged myself to use the stickers in a way that I could not only highlighted them, but placed them in a bit of a different scenario than simple adoring an empty corner of my project (that's what I thought stickers were for in the past, space fillers!) But as I discovered, they have a great potential to be the main attraction.


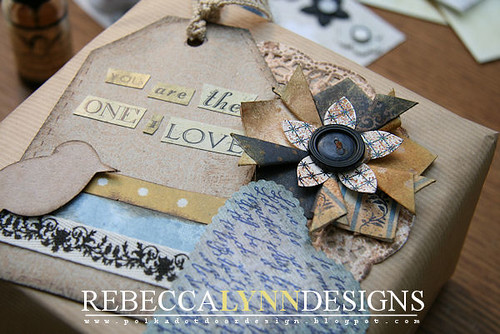
 I am having a ton of fun with the endless creative possibilities that the "Off the Page" team has offered me. For my first project of the month I created an incredibly fun approach to gift wrapping. My husband didn't notice the absence of a birthday card because he was to impressed with the way I had decorated his gift. I started with kraft paper and worked from there ... This was the perfect project to use some of the Glizters Vintage Blue Cardstock stickers. The heart and the font are both from the fun set.


This month I've been inspired to think outside of the products that are usually finding their way into my craft pile. Thanks to the girls at Scrappin Patch I'm finding all sorts of new inspiration. What kinds of things to do you never use in your projects? I encourage you to try something new!


Thursday, 10 November 2011

Product Focus- Putting on the Glitz with Glitz Glitzers

Hi Everyone. This week i wanted to share a layout that i did recently using the gorgeous Glitz Designs- Glitzers. They are truly gorgeous and would be lovely not only on layouts but cards also...They are transparent with diamond bling on the pictures or around the words and each new range of Glitz designs has their own matching embeliishments. They would be very easy to mix and match with other ranges of papers too - particualrly if you like the shabby vintage style.

Sadly my mojo has been terribly lacking over the last few weeks- i think that i am in a bit of a rut with my scrapbooking so i was delighted to find MIss Arts Papercrafting school. If you haven't checked them out yet- then you must! What a fabulous fabulous site! They run classes online- 3 at a intermediate level per month and three at a more advanced level for only $5-10 US per month. each class is taught by an internationally renowned tutor- and has a series of videos for you to follow to create with them. They are very technique based and they create their layout in front of you!

Every few months they have a free class- i recently did a Stacey Cohen class and last weekend they ran another free class by Julie Winks- wow was this class chocka full of technique - 12 videos!!! Anyhoo- since i was feeling that my layouts were abit samey i decided to give this a go- mine still looks very average next to hers but i loved trying some new techniques- masking- painting, chipboard distressing- using a Tim Holtz die that i hadn't used yet and her fabulous "nests:. Please check out Julie's blog for more of her wonderful work
Julie Winks Blog and also
Miss Arts Papercrafting School

Anyhoo this is the layout that i did based on this class


A close up of one of the Glitzers

Close up showing some of the masking and all those layers and textures

Tim Holtz dies

Using my new banner punch - love it!

 I hope that you will try the Glitzers- they are perfect for that extra special touch and so versatile no matter what paper ranges that you are using..

Also have a peek at the Miss Arts site for learning lots of new techniques

Happy Scrapping

Francine

Products Used
Glitz Designs- Vintage Blue- Glitzers
Glitz Designs- Vintage Blue paper- Floral
Kraft Bazzill
Book paper
Twine
Prima Canvas
Prima Pixie Glen flowers
Prima packaging
Stampin Up punch - banners
Tim Holtz die- keys and locks
White paint
Tim Holtz distress ink
Glimmermist
Cheery Lyn flourish die
Cardboard
Alphas
Buttons
Glitz - Beautiful Dreamer- Whatnots

Wednesday, 2 November 2011

Inspiration Wednesday with Francine- Crate Paper

Hi Ladies and welcome to Inspiration Wednesday. This week Adrienne gave me some of the Crate Paper- Portrait collection to create with. This range comes in a variety of colours from black and grey to yellow and soft green and reds- so it covers almost the whole colour spectrum! I designed 2 layouts with my kit - one that i will share today and one next week.

This first layout i decided to step out of my comfort zone a little and focus on the reds and greens- not colours that i traditionally would use but i was happy with the end result! I layered lots of the paper and by cutting out various squares and using the back sides of the papers too- you can get a multi' layered effect from just a couple of pieces of paper. I handcut some of the flowers from the flowery paper to use on my layout too and only added a few smaller flowers to bulk it up a little.


By adding some punched edges and some punched butterflies ( how do i love thee Martha Stewart) and a few other embellishments it added to the texture and visuals of the  layout. I hope that you will give this range a try - it would be great for both boy and girl layouts- vintage layouts too- something for everyone!
I'll be back with yellow- a colour that most people avoid and black next week- to show you how you can create something simple and striking with these colours and this range.

Happy Scrapping
Francine

Products Used

                                              Martha Stewart Punch- Large Monarch Butterfly
                                         Jillibean Soup- Chipboard Alphabeans- Newsprint
                                                   Elements Pearl Brads - Metallic
                                                        Pink Paislee Brown Paper
                                              Martha Stewart Deep edge heart punch
                                                           Prima Red Flowers
                                                   Kaisercraft Chipboard Hinge
                                                         Crate paper Diecuts
                                                                     Ticket

Tuesday, 23 August 2011

Step by Step

Hi Gals, today is my official post as a Design Team member :wow: .... so I am going to show you how I created this layout

Image

Products used:-
White Bazzill Cardstock
Glimmermist - Mustard Seed & Pumkin
Prima Mask
Echo Park Victoria Gardens Range ,Cheerful words & Botanical Ballad
Echo Park Victoria Gardens Range - Sticker Sheet
Hambly Studio - Transparency
Glitz Hoopla sticker
Cosmo Cricket Doillies 7 Butterflies

Place the Prima Mask down on the left hand side of the paper, and the using some spare cardstock or sheets, cover around the mask, so you only have the mask area exposed, spray some Pumpkin Glimmermist over the mask, and then remove the mask. Secondly, using the Mustard Seed Yellow Glimmermist spray a couple of squirts on the top right hand side of the page.

Image

Next cut the Echo Park Victoria Gardens Range ,Cheerful words (7inc x 5.5inc) and Botanical Ballad (6inc x 10.5inc). Place the Botanical Ballad piece down first, and then your Fancy Hambly Flourish as shown in the photo below

Image.

Place your Cheerful Words piece down over the flourish and approximately 1 inch from the bottom of the Botanical Ballad piece, and then place your photo on top of the Cheerful Word PP.

Image

Lastly I have used some the stickers from the Sticker Sheet, and a Tim Holtz Filmstrip diecut, to accent the page as well as the Cosmo Cricket Doillies 7 Butterflies to embellish the page.

Image

Tip : To give the layout a little dimension I used some Double Sided Foam tape under the Cosmo Cricket Doillies 7 Butterflies and added some Kaisercraft Bling to the centres.

There you go girls, a nice easy page to create.

HAPPY SCRAPPING :J: :J: :J:

LinkWithin

Related Posts Plugin for WordPress, Blogger...