Thursday 29 March 2012

Technique Thursday!

Today I am going to share with you how to I created an effective but simple background using your masks and mists.  

As you all know I just love to layer on my layouts and I usually start off by adding a layer of colour to my layout using my mists and some masking templates.  It is a perfect way of adding extra dimension to your layouts without bulk and adding interest via colour to make your photos and any patterned papers really POP!   

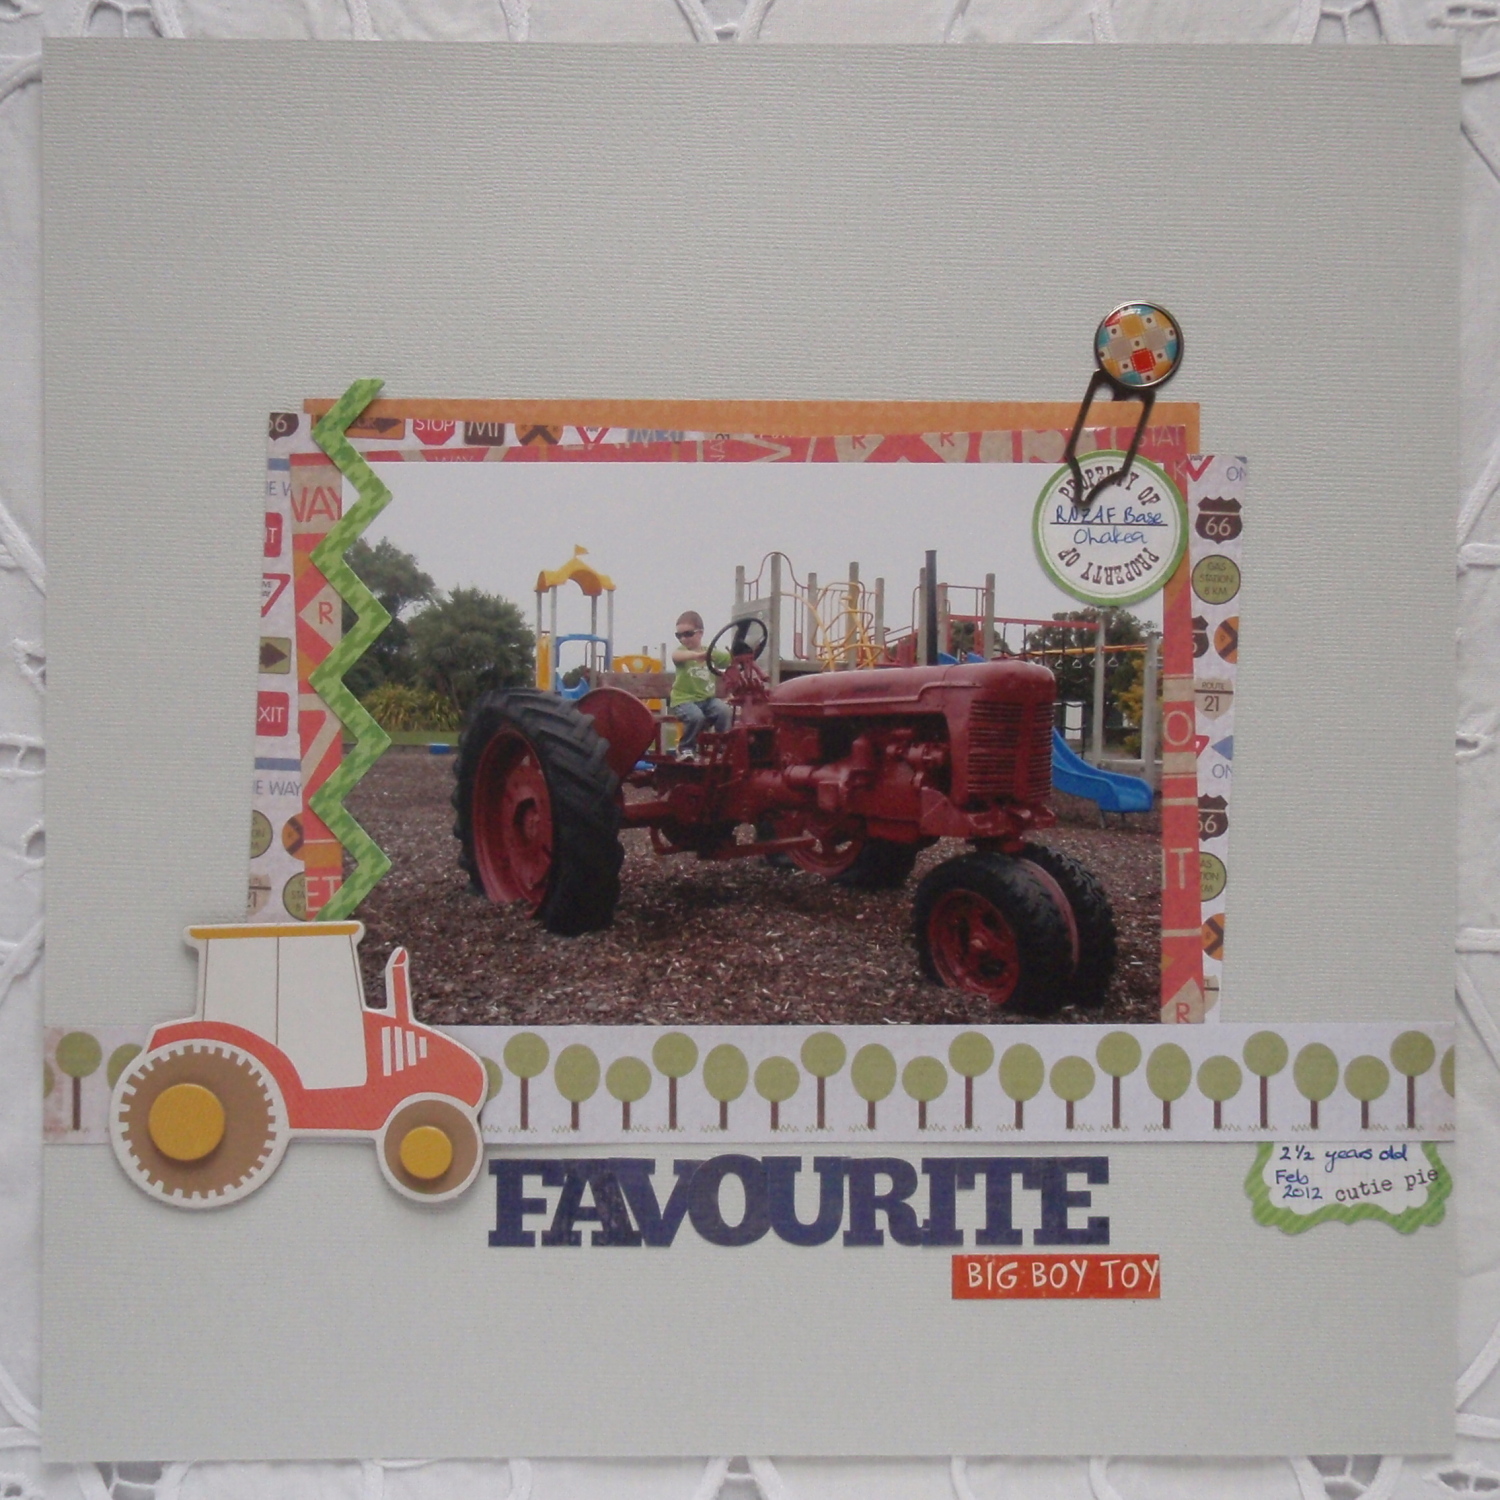
There are so many cool templates out there at the moment and really the opportunities are endless... this is a layout I created using the last of my MME Miss Caroline papers from my design kit.  But first, I created the background using some glimmermist, The Crafter's Workshop Chicken Wire mask and butterflies masks by Studio Calico.   The chicken wire mask is my favourite mask at the moment as it provides subtle background interest without being too over the top!  I know that Adrienne is getting more stock of these in the shop so if you want one just let her know and she can put one aside for you!  


To create this background:

Firstly, set up a misting station, I generally use an old pizza box as this tends to contain the mist.  I grabbed a piece of plain white cardstock and thinking about where I wanted the focus of my layout to be I then added some pink glimmermist (Strawberry Shortcake).


Then I added my butterfly masks to the top left hand corner and sprayed over them with Slate Glimmermist.


To balance out the butterflies, I then added the Crafter's Workshop Chicken Wire template to the bottom right hand corner and resprayed with the Slate Glimmermist. 


That's it!  Super easy.. the hardest part is choosing which colours to use,   making sure you build up lightly with your mists and adding the elements in a complementary way.  As you can see in my layout, I have used a triangle shape to my design which is a great way of achieving balance on your layout as well as drawing your eyes into the focal point of my layout which is of course is my photo!

I hope you have enjoyed my little technique for Thursday and thanks for stopping by!

//Michelle

Monday 26 March 2012

OTP Inspiration : Rebecca

Birthday cards are always fun to make and one of the greatest reasons that I started making cards in the first place because it enabled me to create something that was geared specifically for that person. What better way to let someone know they are special, than with a one of a kind birthday card created just for them? The birthday in this case is my special Dad who turns 49 this year. Being recently married, this will be the first one of his birthdays that I won't be around for (for the past 25 years anyways ... ) It was a little odd writing this card and sending it in the mail already, but not being there for birthdays is certainly a new experience that I am going to have to get used too.


Most of the materials for this card came out of my DT kit from Scrappin Patch. I am thoroughly enjoying this kit that Adrienne sent from New Zealand for me. So many fun patterns and textures to be working with. Again, I used the Glitz stickers to embellish various portions of the card and admit I raided my (huge) stash of alphas for the various fonts used. I noticed when I made this card that my Chatterbox Alpha rub ons are running out! I have used them so much I'm almost all used up. I've browsed around the Scrappin Patch online store though and have some replacements picked out! There are so many fun goodies in the store, have you looked recently? The girls are always updating with new stock.

I wish I knew exactly what the supplies I was using were, but the supply list never made it into my kit, so if you know what the papers are, be sure to let me know and I'll update the supply list. The April newsletter is almost ready to be released as well, if you haven't already signed up for it, you really need to get on the list. The DT girls have been given a bit of a sneak and its not an issue you want to miss. There is all sorts of great inspiration coming to an inbox near you!

Until next time, 


Saturday 24 March 2012

DT Inspiration

Hi everyone,

Here is my last full layout using the MME Miss Caroline range -- this range has just about sold out in the shop and only the products linked below are available now.  So make sure you get some of this lovely range before it all sells out!  

If you look closely, I have done a little masking with texture paste and the Crafter's Workshop Chicken Wire Mask. Again, the very popular banners are such an easy way to add embellishments to your layouts and so versatile as they can be made out of any piece of patterned paper.  The little chipboard cogs are by Imaginarium Designs are the perfect addition to any boyish layout.  Here  I  wound around some red twine around the cogs to give them a mechnical feel and tie the cogs into the theme of my layout about Liam and his creations.  There are lots of new chipboard in the shop and it is such an easy item to add to your layout and here I have just inked them up with a little grey ink and glue dotted them to my page.  

Products used:

Thanks for following along with my posts this month!  I hope you have enjoyed what I have had to show you using the MME range of products.

//Michelle

Thursday 22 March 2012

Step by Step with My Minds Eye

Hi there, I´ve got some cute new My Minds Eye "miss caroline" stuff in my Scrappin´ Patch box and I want to show you a layout with it step by step.

At first I layered my picture with the sandwich paper and some paper from MME. I cut 2 different pieces in the same hight but different width. The middle paper is 1 inch larger than the cute wood diecut.

  
I add the sweet MME doilie sticker on the diecut, put everything on the white cardstock and sew with my sewing machine over paper and wooden diecut. Thats no problem if you take care and turn the wheel at first by hand.    

 
The orange button is fixed with a large glue dot. On it I add the MME banner. Love the little ones on the sticker sheet

Next I cut little pennants and a stripe (layering under my picture) out of the sticker sheet.
It´s in a wooden design and I want to use it with the orange paper. So it´s a great contrast...

At least the title (cutting with the Silhouette CAMEO) some ink splatters and a sewing stripe of patterned paper. So my layout is finished. Hope you enjoy to see it "step by step"......

Have a nice day,
Nina


Wednesday 21 March 2012

Kaisercraft: Little Toot

Jessica Toulmin here again for you today. This is my second and last post using the Kaisercraft: Little Toot range (sorry I can't link to the first one because for some reason it isn't there anymore).

I have thoroughly enjoyed being able to play with this line. It is full of red, orange, green and blue – but they’re not really bright and crisp colours, they are more muted which means they match so many more photos. And the vehicle images are adorable!

Today I have for you a layout, and four cards made using some of the scraps.

Stop and Wonder

To replicate this layout you will need:
white textured cardstock; Kaisercraft: Little Toot - Bang, Cruise, Honk and Road Trip (specialty) papers; Kaisercraft: Little Toot - chipboard elements; Echo Park: A Boy’s Life - alpha cardstock stickers; May Arts: celery and scarlet 3/8 grosgrain ribbons; clear and light blue rhinestones, like these ones from Melissa Frances; double sided tape, foam dots/ tape, white and blue ink pens.


To make the caravan journaling spot:

 
1. Take the car and caravan from the chipboard set.
2. Remove the strip from the caravan with a craft knife.
3. Trace around the caravan, and cut inside the line – so the paper is slightly smaller than the caravan. Then cut a half circle for the wheel well.
4. After writing on the journaling spot, attach it to the caravan with foam dots/ tape. Finally, add a rhinestone for the wheel. Attach to the layout with double sided tape.

Now for the cards.


All four of these cards were made with left-overs after making the layouts.

To replicate this cards you will need:
one sheet of 12x12, textured, white cardstock; Kaisercraft: Little Toot Bang, Honk and Road Trip (specialty) left over paper strips; Echo Park: A Boy’s Life - alpha cardstock stickers; Fancy Pants: Tradition buttons; Green Tara: gold fringeribbon; double sided and foam tape/ dots, thread.

Next month I will have projects for you using Echo Park and 7 Gypsies.

Until then, take care.

Monday 19 March 2012

More My Mind's Eye Inspiration

Hi everyone,

I just wanted to share with you another layout I have made using papers from the gorgeous MME Miss Caroline line.  I just love the wood grain effect papers which are so popular right now in the scrapbooking world.  These types of papers provide an almost organic backdrop in which to showcase your photos and of course some of the lovely embellishments that go along with these collections.  Without causing your layout to be too busy!  Again, doilies are featured heavily in this collection and I just wanted to showcase this aspect of my background paper so I fussy cutted around the doily and along the edge of the pattern which allowed me to then slip  my photo, a couple of strips of patterned paper and another circle under this pattern.  I then used this wood shaped banner die cut as a template to create the little banner off to the side as well.  


Products used:
Crate Paper - Neighbourhood Chipboard Stickers


Detailed shot showing the rubons

Detailed shot showing the fussy cutting

That's all from me for now  but I will have another post soon.  Until then, I hope I have inspired you to check out all the cool wood grained papers in the shop!

//Michelle


Saturday 17 March 2012

OTP Tutorial : Rebecca


I wanted to share a fun embellishment with you all today. I first saw it at another blog and decided that I could make it too. After a little bit of folding and refolding and a few light bulb moments it all came together. I used the embellishement on my recent OTP project, but today am going to give you the step-by-step instructions so you can recreate this on your own. Ready? :)


The first step is to cut (5) 2 x 2 inch squares. You can use all the same paper if you like, but I really like how it turned out using 5 seperate patterns.


 Fold the papers once diagonally across the center.


Fold the two sides inwards to meet the centre 'corner' of the triangle, (when you hold it flat it will be square).


 This step took me a few tries to get the fold correct.... Where the two folds meet in the middle, fold them back on them selves once.


Using a wet glue or strong adhesive, slot the folded pieces together and glue each 'petal' in place to create the flower shape. Then embellish the center as you like! I added a small paper flower and button as well as misting the entire flower with glimmer mist.


Thanks for looking!


Thursday 15 March 2012

Product focus "Webster´s Pages Bloomers"

Hi, Nina here. Today I want to show you two layouts using Webster´s Pages bloomers.
It´s a great pleasure to find some bloomers in my package. I love also being a WP "Clean and Simple Design team Member" and bloomers are such great details to complete layouts...

On my work I love the simple style with a lot of "white space ". The bloomers are the eye-catcher and with the simple layout the focus is only on it and the double layered picture.


On this layout I have made three banners using the Pink Paislee Nantucket 6x6 paper pad. For the dimensional touch layered together with the white silk paper (always the same procedure *hehe*)
The soft yellow bloomers fits really well with the Nantucket collection, so I add little strips on the right and left banner.


Products:

Webster´s Pages Bloomers
Pink Paislee Nantucket

Thanks for watching....
Nina

Tuesday 13 March 2012

A little Easter inspiration from Imaginisce

I have to confess that Imaginisce is not my usual style, but when it comes to Easter prints these were too cute to miss. Lots of girly bright colours, and Adrienne has a fantastic range of their papers and embellishments. So I set to work making Eater cards for the grandparents and these gorgeous wee wonton boxes to fill with treats for my nieces Sophie and Annabel come Easter time... sorry J and J, these would've been wasted on you! I hope this inspires you to create some pretty little things with the Chocolate Holiday coming up so close...love Belinda


Monday 12 March 2012

DT Inspiration

Hi everyone!

Today's inspiration post is my last creation using Echo Park's Yours Truly collection. I have absolutely loved this range. It has provided endless inspiration for myself and it's even better that each page is double-sided, giving you a great range of beautiful patterns to play with.

The title itself lends itself to lovey creations so I've created another card that would be suitable for someone special and even a wedding.


I used a swirly background pattern and complemented that with a lot of circular shapes including a doilie which I think adds a touch of elegance to an otherwise modern design. For a bit of added texture and balance I used a strip of grey satin ribbon which also adds to the elegance.

I've kept the colour palette quite muted apart from a pop of colour in the centre highlighting the rosette. I was going to include a sentiment but I thought the heart in the centre said it all :)


I hope this provides you with some inspiration for your next special card or project.

X Lana

Products used: Echo Park 'Yours Truly' Collection, Doilie, Ribbon, Bazzill Cardstock, Tim Holtz Rossette Die.

Thursday 8 March 2012

OTP Inspiration : Rebecca

This months design kit presented itself with a beautiful challenge in the form of products that I have never really worked with. When I first opened my envelope, my first thought was "What am I going to do with these?" but only because I never have ever tried to. What was the mystery product? The gorgeous new line of Vintage Blue from Glitz, both Cardstock and Transparent stickers. Beautiful in their design, construction, and appeal and as I found out, far more versatile than I at first thought. I have initially stayed away from using stickers in my projects because they were so .... complete already. So I challenged myself to use the stickers in a way that I could not only highlighted them, but placed them in a bit of a different scenario than simple adoring an empty corner of my project (that's what I thought stickers were for in the past, space fillers!) But as I discovered, they have a great potential to be the main attraction.


 I am having a ton of fun with the endless creative possibilities that the "Off the Page" team has offered me. For my first project of the month I created an incredibly fun approach to gift wrapping. My husband didn't notice the absence of a birthday card because he was to impressed with the way I had decorated his gift. I started with kraft paper and worked from there ... This was the perfect project to use some of the Glizters Vintage Blue Cardstock stickers. The heart and the font are both from the fun set.


This month I've been inspired to think outside of the products that are usually finding their way into my craft pile. Thanks to the girls at Scrappin Patch I'm finding all sorts of new inspiration. What kinds of things to do you never use in your projects? I encourage you to try something new!


Wednesday 7 March 2012

Kaisercraft Inspiration

This is my first post as a Guest Designer for Scrappin’ Patch. I am very happy to be chosen as part of the Scrappin’ Patch team for 2012. Thank you Adrienne.

I was given some of the Kaisercraft Little Toot range to design with. This is such a fun line for little boys, but would also work wonderfully for road trip and holiday projects as it is travel and transport based.

Sunshine & Success

To replicate this layout you will need the following: off-white cardstock, like this one from Bazzill; Kaisercraft Little Toot ‘Bang’, ‘Honk’ and ‘Road Trip’ (specialty) papers; Kaisercraft Little Toot chipboard elements; Imaginisce Berrylicious die-cut phrases; Fancy Pants buttons; Green Tara ‘Sage’ fringe ribbon; double sided tape, foam dots/ tape, blue ink pen.


Usually I try to match the theme of the layout to the photograph. But for this layout, I decided to use the Little Toot ‘Honk’ paper and take the theme of the travelling for a more meaningful layout for a change. Sometimes doing something different than (your) usual is not only a challenge, but ends up with a great result.


A bit of dimension always makes a layout more pleasing to the eye. You don’t have to go overboard, just a few dimensional elements will do.

Favourite Big Boy Toy

For this layout I used a 5x7 photo, but a standard 4x6 would work equally as well.

To replicate this layout you will need the following: off-white cardstock, like this one from Bazzill; Kaisercraft Little Toot ‘Bang’, ‘Honk’ and ‘Road Trip’ (specialty) papers; Kaisercraft Little Toot chipboard elements; Echo Park A Boy’s Life cardstock stickers; My Minds Eye Lime Twist (Fly A Kite ‘Spring’) cardstock stickers; a paper clip, like these ones from Basic Grey; double-sided tape, blue ink pen.

If you are using large mats or blocks of paper that are going to get covered, it is a good idea to cut the centre of the paper out to be used on another project, like this:


Here is a little ‘how to’ for this layout:


Layer and adhere the photo mats, then adhere the photo.


Adhere the embellishments, starting with the zig-zag strip down the left, then the journaling spot and paper clip on the top right.


Adhere the paper strip, then chipboard shape. Adhere letter stickers.


Adhere phrase sticker and half journaling spot to finish.

Thanks for looking.

In a couple of weeks I will have two more projects from the Kaisercraft Little Toot range for you. Until then, take care.


LinkWithin

Related Posts Plugin for WordPress, Blogger...