Monday 30 April 2012

Let it Snow!!! Well not quite yet!!

Why is it that I always have difficulty with 'snow' photos? Is it the printing? Do I put too much pressure on myself because the images are so special? Who knows, anyhow it makes it a load easier when manufactures like Fancy Pants create stories like 'Winterland' to give me a bit of inspiration, I needed it!!

So I used the backside of 'Snow Angel', for my base then embossed a few snowflake stamps in a clear embossing powder to add a bit more "oommph" to the paper. After curling the edges and inking with Pinecone, I used 'Below Zero' on the bottom 2/3 of the layout, also curling the edges and inking. I think the inking just helps lift the design when using such muted colours. After adhering my photo, I had cut the little mittens from 'Row of Mittens' to create my own embellishments and sewed them to the 2 top corners of the photo.

I then did a zig-zag stitch around a strip that I cut from the 'Strips' paper, embossed this and adhered under the photo, as a subtle title. I think sometimes its cool not to have a big title on your page, and with the muted colours of the layout, I thought a bit title might be a bit over powering. 

Using my trusty Cuttlebug, I cut a few snowflake shapes to add to the embellishments, and also the cute wee buttons from October Afternoon's Farmhouse range, the colours matched perfectly!


I backed my layout with Bazzil, my new thing, and journaled straight onto the patterned paper! Scary eh! And there you have it! A bit of Snow inspiration for you all, lets hope we don't need to use them too soon!!

Love Bee


Thursday 26 April 2012

Technique with transparencies

Hmmmm, transparency's. We all love them, but they really are so one dimensional aren't they?! So I really had to think out of the circle for this one. First one was adhering, lets try something different from gluing down, into sewing at the moment, so lets try that! And it worked, giving the transparency a new dimension. Simple Stories have this gorgeous baby range called Baby Steps, and do co-ordinating 6x4 transparencies.

Another embellishment I'm into at the moment, as you would've seen from my other posts, is making rosettes with the Tim Holtz die. I cut the transparency in half length ways and hot glued the ends together making sure to do so on patterned areas so the glue would not show. Also add glue to the centre of the rosette to ensure it stays together.


 I wasn't sure how the plastic would go through the die, but after securing the transparency to the die with double sided tape, I put the die through the cuttlebug several times until it had cut through. A bit of added pressure was needed here so I added a layer or 2 of cardstock to the B plates. Once cut, fold along the scoring as though making a fan. To attach the two ends together you can use hot glue, though I did have problems with this, or a wee bit of double sided tape, again in a patterned area to disguise the adhesive.


I then used flower punches to adhere to the middle of the rosette to cover the glued centre of the rosette. I love the way they look being clear. You could paint around the edges of these too if you wished.

I then completed the layout using Simple Stories Baby Steps Boarder and Title Strips Elements paper for my bracket, hot air balloon, and bracket strip. I curled the edges of the ledger bracket and adhered the bracket strip with foam squares for added dimension. The Little Yellow Bicycle 12 month cards worked well as a subtle layer underneath.


So I hope these techniques that I have used for the transparencies will make you think differently next time you pick up one of these pieces of acetate and think "how will I use this?" rather than just over a photo. I sure will look at them differently!


Love Belinda


Wednesday 25 April 2012

Anzac Day with JessicaT

Anzac Day was originally dedicated to those Australian and New Zealand soldiers who fought on that fateful day in Gallipoli in 1915. However, it is now more widely referred to as a day to remember those who have died and served for their country, not just those that served in Gallipoli.

Like many New Zealanders, I have had numerous family and friends serve overseas – not just in the World Wars, but also for peace keeping missions and anti-terrorism. I am lucky to only have had one (great-great-grandfather) who did not return. On this day, I think of all of those who have served or are still serving, those who did not return, and those families that were - and those who still are - at home waiting and hoping for the best. We will remember them.

“They went with songs to the battle, they were young.
Straight of limb, true of eyes, steady and aglow.
They were staunch to the end against odds uncounted,
They fell with their faces to the foe.
They shall grow not old, as we that are left grow old:
Age shall not weary them, nor the years condemn.
At the going down of the sun and in the morning,
We will remember them.”

I have created two layouts for Anzac Day, the first about my great-grandfather and the second about my fiancé. Both are made using 7 Gypsies patterned papers.

My great-grandfather was on holiday in his native England when WWI broke out. He first served in the New Zealand Expeditionary Force, and then transferred to the Royal Flying Corps (which merged into the Royal Air Force in April 1918). The photo on the left was taken when he was in the RFC, in 1917. The photo on the right is of his RFC Service Dress Jacket that is on display in the WWI gallery at the National Army Museum in Waiouru (photo taken in 2010).

V.F.Toulmin

To replicate this project you will need: textured cardstock in Army Green or Brown, something like this or this from Bazzill; 7 Gypsies: Off The Wall Travel and Weeds patterned papers, and 7Gypsies: Camden Borough patterned paper; 5” french lace doily; Ranger: Distress Ink in Antique Linen and black; Fancy Pants: tradition buttons; May Arts: Satin Pleat ribbon in Chocolate; mini alpha stickers like these olive ones, these brown ones, these burlap ones, or this mixed set; journaling tags, like this or this from 7 Gypsies; Kaisercraft chocolate pearls; edge distresser, poppy, thread, pen, double sided and foam tape/ dots.


The second layout, about my fiancé, includes a photo taken in 2008 at a medal presentation ceremony where he received his fourth medal, after returning from a deployment to the Arabian Gulf. The layout also includes his miniature medals and miniature citation, veteran, name and hat badges, dog tag, and a poppy. I made chevrons for this layout, and I made them with three stripes as that denotes his rank of Sergeant.

Sergeant

To replicate this project you will need: cardstock in army green or brown, something like this or this from Bazzill; 7 Gypsies: Off The Wall Travel and Weeds patterned papers, and 7 Gypsies: Camden Borough patterned paper; Ranger: Distress Ink in Antique Linen; Echo Park: A Boy’s Life stickers (now sold out); plane & helicopter stamps, poppy, pen, double sided and foam tape/ dots.


This is the end of my time as a Guest Designer for Scrappin’ Patch. I want to thank everyone who has viewed my work, and those that have made lovely comments. I hope everyone has found some inspiration from my work.

Take care,
Jessica Toulmin

Final Echo Park projects with JessicaT

Today I have my last projects using the A Boy’s Life collection from Echo Park – a layout, a card and a note card.

This has been a fun collection to work with, as it is so bright and full of different patterns. The patterns are all so different, but because they are all in matching colours they work so well together. Each piece is actually patterned cardstock not paper, so very sturdy.

You can see my first two projects with this collection by clicking here.

You Colour My World

To replicate this project you will need: light lemon, textured cardstock, like this one from Bazzill. White cardstock would be just as good; Echo Park: A Boy’s Life – Charmer, Play Time and Suave (now sold out) double sided, patterned cardstock; Echo Park: A Boy’s Life - alpha cardstock stickers (now sold out); Imaginisce: Berrylicious die cut phrases; My Minds Eye: Lime Twist (Fly A Kite - Spring) cardstock stickers; Fancy Pants: Tradition buttons; Green Tara: Sage fringe ribbon, and May Arts: Celery 3/8 grosgrain ribbon; yellow thread; blue, green and red ink pens; double sided and foam tape/ dots.

Title

Handmade embellishment

Cards made with my scraps

Handmade embellishments


To replicate this project you will need: textured, light lemon cardstock, like this one from Bazzill. White cardstock would be just as good; Echo Park: A Boy’s Life – Charmer, Play Time and Suave (now sold out) left over cardstock strips; Echo Park: A Boy’s Life - cardstock stickers (now sold out); May Arts: Celery 3/8 grosgrain ribbon; double sided tape/ dots.


To replicate this project you will need: textured, light lemon cardstock, like this one from Bazzill. White cardstock would be just as good; Echo Park: A Boy’s Life – Charmer and Play Time left over cardstock pieces; May Arts: Scarlet 3/8 grosgrain ribbon and Green Tara: Sage fringe ribbon; a small yellow brad like the ones in this set from Fancy Pants, yellow thread, blue ink pen, double sided and foam tape/ dots.

Monday 23 April 2012

Final Inspiration - October Afternoon

Today is my last to show you the gorgeous Farmhouse Range from October Afternoon.  I started this layout wanting to use as many of the stickers and tin pins as I could,  but also wanted to incorporate the lovely Spellbinders circles which I got from Megan at the retreat.  

I used the Farmhouse Paper - Phonograph as my base and then went over it very lightly with some Old Victoria Rose Distress Rose.


So I used the circles as my base for the layout combining it with layering some of the stickers onto chipboard and foam tape to give it dimension.


I also made my own circle flowers, and finishing them off with some lovely pearls and some strips of journalling stickers.


I also added some dimensional magic on some of the stickers to give them an epoxy look.

 
I hope you have found the layouts inspiring and that I have given you some different ideas of how to use them, I have to say it's a fabulous range to work with.

TFL and Happy Scrapping


Sunday 22 April 2012

OTP Inspiration : Rebecca

I have two cards to share with you today for my Scrappin Patch Inspiration post. I thought I had run out of time and could only make one, but somehow the second card manage to squeeze itself into the time I had set aside. I love it when that happens! I was even more productive than I had planned ;)

I'm still playing with these gorgeous stickers and papers from my last kit. I can't believe how far you can stretch a kit when you need too. Originally I looked at all the things Adrienne and sent and thought "theres no way I can get 7 projects from this!" but I managed 8, and still have some left overs. Hurrah!

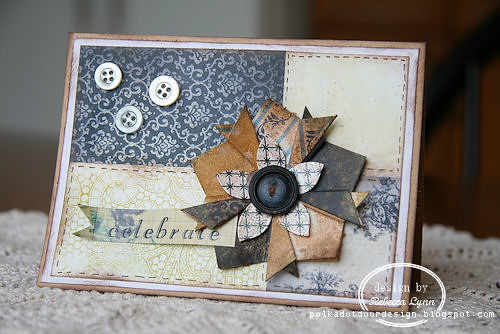
I used the technique from this post I created a matching flower with my little scrap bits and adhered it to a card that pretty well used up the rest of my larger scrap bits :) I love making cards for that reason, there always seems to be enough paper even when its just little bits and pieces. Once again I was able to use the gorgeous Glitz Vintage Blue "Titles" stickers for the sentiment/banner.


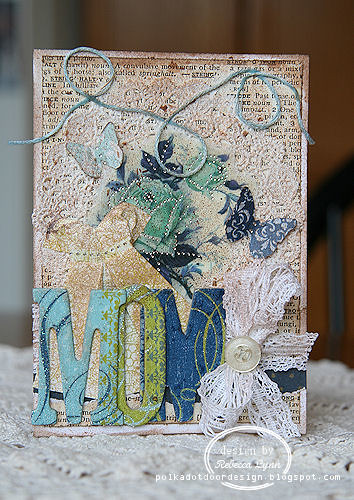
For my next card, I dug into my own stash a little more to accent the great Scrappin Patch product. I had a a really hard time photographing this card, no matter what angle/lighting/setting I was using, the layers just aren't coming through like they do in person. I think it might be because I was a bit generous with the glimmer mist once I had adhered it all together! I loved these roses from Glitz's Vintage Blue line, they worked as the perfect backdrop for the rest of the card. Its hard to see, but I created an origami dress behind the "MOM", a technique I just recently discovered but will be sharing with you all in my next technique post. They are so much fun, and so cute!


 I'm off to enjoy the gorgeous spring weather, and hope its just as beautiful where you are! Thanks for stopping in.

Saturday 21 April 2012

Product Focus - Stickers & Tin Pins

As part of my Design Team kit, I got some gorgeous Stickers & Tin Pins from the October Afternoon Farmhouse range ... I absolutely LOVE the Tin Pins - they just add that SPECIAL touch to any layout.

Stickers are so versatile - there are so many different ways you can use,  I love to back them onto clear transparency and that way I can add them anywhere on the layout.   I have done this on the butterfly sticker and then using some Foam Tape I have popped it up to give it dimension and by bending the wings of the butterfly it looks like the butterfly has it's wings out


As you can see, I have backed the round sticker and the Blue sticker onto black cardstock and then wrapped some twine around it, and finally adding a TIN PIN .  Suddenly they don't look like stickers, but embellishments to the page....and by adding some foam tape underneath some of them, it gives it alot of dimension to the page.


On the above picture, I created two banners from the Pattern Paper and then the centre one is actually a sticker which I again backed onto black cardstock and used some Foam tape to give it dimension.

On this one, you can see I have made my own banners, and then in between to add that something special I added a TIN PIN.

Lastly of course there are many stickers which are used as journalling spots.


Here is the whole layout....so as you can you stickers don't need to be flat, but by giving it a little dimension it can totally change the look of stickers.


 I hope you that I have shown you some other ways to use Stickers, and by adding some Tin Pins, just make the layout look totally different, 

TFL and Happy Scrapping
HEIDI

Monday 16 April 2012

Step by Step Flower Tutorial

Hi Everyone!

Today I thought I'd show you what you can do with some of the Pink Paislee Mistables Ribbon.
There are two types in the shop, both use muslin, either a plain scallop in the three sizes, or x2 18" of muslin or jersey knit fabric already pleated.  And can I just say it was really easy peasy to use :), which is great because fabric usually means a sewing machine, ( I do own one but confess I never use it) - which on any given day will see me cringe away from, and find another alternative, or better still find someone to do it form me, grin, Im totally useless on a machine, let me hand stitch any day!

To make my flowers you will need:
x1 packet of Pink Paislee Mistables Scallop Ribbon
Stazon Ink - black
stamps
needle and thread
Glimmermist and/or distress stain
various embellishments
headband, hair clip or safety pin

First you will need to decide how you wish to colour your strips of fabric and how much of each strip you want to use - I managed to make three flowers out of the three strips of fabric, making double layered flowers, but you could get even more out of them but just doing single layers, or smaller sizes.
Spray or ink your strips of fabric and leave to dry.  Once dry you can stamp them.


Take your needle and thread and make a gathering stitch all the way along both strips, about 1/4 of an inch down from the top of the straight edge, leaving a tail at both ends.


Next, hold tight to one end of thread and pull the fabric towards the other end, gathering it all together to form a  flower.


Tie the two ends together, keeping it as tight as you choose. It should look like this when you've finished.


At this point you could just embellish as you wish, or use the bigger size scallop and make another flower, which is what Ive done.


Now you can decorate as you wish. I have sewn my flowers together and then added buttons, twine, trinkets, pins, and a very old prima flower.
Heres what my flowers looked like when finished. The first flower is coloured with Red Velvet Glimmermist and attached  to a safety pin to use as a brooch, on the middle one Ive used Tim Holtz Distress Stain Weathered Wood and attached it to a headband, and the last one used Vintage Pink Glimmermist and attached it to a hairclip. Ive also randomly stamped this one with black stazon ink.


I hope you like them and they give you an idea of what you can do with the mistables range, and show that you are not limited to using them  for decorating  a scrapbook page :) but they have many more possibilities.

Happy Scrapping Everyone!
Megan

Saturday 14 April 2012

school photos, the good, the bad, and the down right ugly!

Every year I have them printed, and every year I get a bit stuck on how to scrap them. This year, James will not be having his scrapped, he looks like a lunatic! So here is my sweet cherub face James, when he was innocent and adorable!

Basic Grey's Oxford range again came to my rescue as the elements on the sticker sheet lend themselves to many embellishments for a layout.

I used Basic Greys Deans List as my base, the perfect ledger sheet, and attached coloured twine across the top of the page with Basic Grey brads. I then used my scraps from Frat House to make little tags which I stitched around, matted a shield sticker with Study Hall, both of which are from the Oxford range too. I also used other bits and bobs I had to complete the banner look. A great way to use up some odd pieces you may have at home.


I then layered a couple of label stickers from the sticker sheet as part of my title, and embellished the side with these gorgeous wee pencil stickers, again from the sticker sheet, and used dimensional magic on them to create a point of difference.


Journalling straight onto the patterned paper is a bit out of my comfort zone, but I think it looks ok.

So anyway, thanks for looking guys, I hope this inspires you to get some of those old class photos out to scrap, the old retro ones could be fun too!!!


.... love Belinda

LinkWithin

Related Posts Plugin for WordPress, Blogger...