Monday 24 August 2009

Get your iron out

No I am not asking you to do my ironing!!! Although if anyone would like to????? :WW:

Do you see those really lovely napkins and wonder what you could do with them? I love them and have a little collection. Now that I have found a very successful way to adhere them to cardstock I will be buying quite a few more!!!!!! In the past I have used modge podge or a special napkin glue to adhere them to laminating pockets but this new technique I have mastered is much easier, mess free and makes paper that is like material to touch.

So this is what you need

A cute/pretty paper napkin
An iron and ironing board
glad wrap
cardstock cut to size
old paper to use as a protector

1. You need to cut a piece of cardstock to the size you need for your project. Lay it on some paper ( I used an old colouring book of the kids)
Image
2. Cover the piece of cardstock with glad wrap, this needs to be just bigger than the cardstock
Image
3. Cut the napkin to size, just larger than the cardstock
4. Peal all the non- patterned layers of paper away from the napkin. You should be left with a very thin piece with the pattern on.
Image
5. Lay the napkin on the glad wrap
Image
6. Add another piece of paper or 2 over all the layers and iron over your little napkin sandwich
7. Iron for just a minute or 2. The glad wrap will melt and adhere the papers together.
Image
8. Peel back the top paper protector and see if your napkin has adhered. If some corners are still loose cover over again and re iron the needed areas.
9. Turn over your cardstock and trim off the excess Gladwrap and napkin
10. Now you have a lovely piece to embellish your page or make a card with. It feels just like a piece of material and looks very wrinkle free and strong!!!

Here are some examples of napkins I have used and some ideas of how to use them.

Image

here is the butterfly used again, This time I used glue onto a laminating sheet. It took a while to dry and it has broken apart in places but still looks cool
Image

Image
a card for our dear little Aurelia's 5th birthday on Friday!!!


Image

Now I challenge you to use your iron and some napkins to make something gorgeous. Upload you layouts/cards to the gallery. I will open a technique Tuesday and Iron category for you to show us what you have been making. I will send a RAK out to a few of you. This will include a variety of napkins to use in the future!!!! :P4: get your creative pieces into the gallery by Friday 28th August to be in to win!!!! :CLAP:

Tuesday 21 July 2009

Scrap Tech Tuesday - Lollipop flowers

With the start of Minute Mondays Scrap Tech Tuesdays will be coming your way once a month. This month by special request I will go over lollipop flowers in a bit more detail.

Lollipop flowers are an easy embellishment to make and there are heaps of possibilities with them. They are also great to use up some scraps. In the following layout I have made a tree with lollipop flowers.

Image

Now depending on the way you like your lollipop flowers to look depends on how you scrap. Some of you might like precise circles in which case you would use templates or diecut circles - others like myself like myself would either cut circles freehand or draw the circles freehand and then cut them.

So firstly cut how ever many different size circles you would like for your flower . All my examples only have three layers.
If you would like a distressed look take each circle one at a time and using your distress tool or scissors go right around the circles and distress them.
You can also distress them using inks.
Next step is to assemble them - get all the circles and put a hole through the centre of them and attach a brad through the holes of all the circles.
They are now ready to be attached to your Project either with the brad or with a glue dot.

Here is another layout which I did couple of months ago using the above technique for the flowers.

Image

You can also make even "scruffier" circles by cutting out the circles a little larger then you want them to be and then carefully ripping the paper around the edges as I have done on this card.

Image

Another cool thing you can do is cut slits all the way around the centre circle to make a different textured look as in this card.

Image

Lollipop flowers can also be made with fabric and buttons like I have done in this layout.

Image

As you can see you can make a variety of different looking lollipop flowers and there are many more ways you can make lollipop flowers.
You can make them with different colour cardstock, spray glimmermist on them or just have circles with no distressing on them for a cleaner look - to name just a few.

by Beverley

Wednesday 10 June 2009

Design Team Inspiration - Amy Butler Lotus Diecut Paper - Butterflies

In case you hadn't noticed, I am a little bit of a butterfly fan... in fact, check most of my layouts lately, and you will probably find a butterfly somewhere! So I was very happy when I found one of the Amy Butler Lotus Butterfly Diecut papers in my DT kit this month. This paper is extremely good value, as it has an amazing [b]30 [/b]butterflies on it, in coordinating colours of blue, green, pink, red, cream and grey. The butterflies are all lightly embossed, and all a bit different. They are just lovely, and I really enjoyed creating the below layouts.

On this page, I used 2 of the butterflies as masks. I put temporary adhesive on the printed side of the butterfly, stuck it to the page and Glimmermisted, then gently removed the butterfly masks, and rubbed off the temporary adhesive, and I was still able to use the butterflies on another layout. I then used the diecut sheet with the butterflies removed, as a stencil, placing it over the masked butterflies, then applied swirl rubons. I very gently used a kraft knife to cut around the inside edge of the stencil, ensuring I didn't cut into the background paper, only through the rubons, to make sure the rubons stayed put when I removed the stencil. It is a very effective look. I then also used 2 of the pink/red butterflies on the page. Check out the pic below for a closeup of the rubons on the masked butterflies.


I used the following products on this page, available in the shop:
Amy Butler Lotus Butterfly Diecut papers
Melissa Francis Paper - Matilda
Glimmermist - Graphite
Prima Flocked Transparency
Zva Swirls - Jet
My Little Shoebox Mini Alpha Stickers - Cream


I used 18 of the butterflies on this next layout:


First, I painted a round circle on the background page with cream paint, then adhered the body of each butterfly around the circle. I bent up the wings, then applied Kindyglitz for some sparkle. I then added the photo, title, journalling and ribbon bow inside the circle, and the page was complete. And look at all those gorgeous butterflies! Below is a closeup of the Kindyglitzed butterflies:
I also used the following product on the above layout:

Basic Grey Ambrosia Paper - Ebony
Kindyglitz - Crystalina


Here is my recent "i create" layout, on which I added one of the butterflies, using a black pen and Kindyglitz for the finishing touches.


And after all this, I still have some butterflies left. I'm sure you will see them on my next few layouts!


Tracy L

Tuesday 9 June 2009

Picasa Photo Editing

This week I thought we would do a bit of a technique on photo editing. For this Im using Picasa which is a free Google photo Editing programme which I like because it is easy to use.
Today Im going to show you the Retouch button on Picasa as it is very easy to use and is a lot of fun. When i took these photos my DD had a friend over to stay so i showed them what theyd look like with no freckles (for the friend)and with freckles for my DD! My DD also had a zit that I removed which she was most impressed with and although I would normally leave it like that I thought ..whoa this would be a useful too for those times when we want to look our best...hmmm opening a can of worms here Id say! lol
So how to? here is the original photo. Image
1. I click on the retouch button.
Image
2. Click on the brush size tool to have a large area or small area that you are going to retouch.
Image
3. Click on the area in the photo that you want to fix.(Ive clicked on the friends freckles).
Image
4. Click onto another area that will fix it (i have gone to my DDs skin to get the fix).
Image

It might take several attempts to fix it. Save your photo fix at the end before printing (which you can undo later as it only saves it in Picasa not in your Picture files on your computer.
Heres what i did ..
Image
I removed the zit, put freckles on my DD and removed some of the freckles from the friend. (I actually totally removed them all-not shown here)
and just as an aside. Both girls thought it was fun but the friend didnt want to lose the freckles (even though she hates them) and DD didnt want the freckles but was happy to lose the zit! So before you hit delete picture (because you dont like it), have a play around with the retouch tool. But beware....this is addictive!
Delys

Wednesday 3 June 2009

Making your own Chipboard Album

Photo Log Book – using Delish Design – Petite Peppercorn Double Dipped 6x6 papers

I decided to use these gorgeous 6x6 papers to create a little album of the pictures which Abigail has taken, most of the photo’s are black and white and go very well with these papers, excite for the one photo – which is my current favourite photo which Abigail has taken of her friend’s eye.
Products used :- Petite Peppercorn Double Dipped Paper Collection Delish Design Clear stack acetate (6x6)


I tried to incorporate a different BRIGHT colour on each separate page – Abigail is very outgoing and has a very strong personality – so the bright colours are well suited to her. It is really a nice way to use up your bits of pieces, on page 1 I have used a Green Tara 10cm Hot Pink flower and sprayed some Glimmermist Tattered Rose on it, and then folded it in half and added a Melissa Frances Resin Embellishment,


Here is a collage of the whole book :-


To make the little book is really simple, I used a 12x12 sheet of chipboard which I received when I got my goodies from Adrienne and simply cut them into four 6x6 pieces of chipboard. I then inked all the edges with Black Ink, and started covering the pages with the 6x6 sheets from the Petite Peppercorn Double Dipped Paper Collection. Once I completed each page, I then punched two holes in each page and tied them together with black & white ribbon.
I really enjoyed using these papers, it's always nice to use black & white because there are sooo many different colours which can be used with it.
Thanks for looking
Heidi

Monday 1 June 2009

Birthday Card Inspiration for Queen's Birthday Weekend

Hi everyone, I hope you are all having a great long weekend.

In honour of the Queen's Birthday today, Beverley and I made a birthday card each - only not for the Queen!

Here is Bev's lovely card, intended for her daughter:


using scraps and a Delish Designs chipboard frame, similar to the one here, sprayed with Graphite Glimmermist.

And my card, intended for one of my sisters:


using: Prima journal notecard [i](sold out, but I'm hoping we get some more in... Adrienne? Pauline?)[/i], Zva crystal swirl, Websters trim, Pink Taffy Glimmermist, Slice diecutting machine, and some bling brads.

We hope we have inspired you to make some cards for you family and friends; I am sure they would be most appreciated.


Tracy L

Tuesday 26 May 2009

Scrap Tech Tuesday - Machine Stitching

Hi everyone, get ready for a long one; you may want to get a cup of tea and a biscuit! Today I want to show you some examples of machine stitching on your layouts. I love machine stitching; it adds such a soft texture and dimension to my pages.
I often use stitching around the outside edge of my layouts, as a subtle border. On the page above, I used a zigzag stitch around the inside edge of the cream Melissa Francis paper, and then distressed and inked the edges around the stitching. I also used a straight stitch around the photo mat - when using a straight stitch, I usually go round 2 or 3 times to add more dimension. Oh, and the journalling on the Bright Spark layout is quite funny, it says: 'You are such a clever girl. Your Daddy was trying to explain something to you, but your reply was "Well, I know somebody who knows better... my Mummy." ' Isn't she so clever??!! And so right. Anyway...

On the Love You layout above, I machine stitched around the painted circle 2 times, and then stitched butterflies punched from book paper onto the page. I used black thread for contrast, and used a straight stitch back and forth. The only thing to be careful of is that if you stitch over and over in the same spot, you may rip the paper, so go delicately.


Also, a tip for attaching the Prima vines to your page, is to hand stitch them on using invisible thread, or fishing line. I pierce one hole in the paper where I want the vine to sit, go up through the hole from the back, around the stem of the vine, and back down the hole. I use sellotape over the back of the hole to hold the thread in place, and to strengthen the hole. If you do this 3 or 4 times in different spots on the vine, it holds it perfectly in place.


This final layout is a very old one from a couple of years ago when I was still doing all double page layouts, but I wanted to show you what else you can do with machine sewing. I had the use of a loaner machine while my old one was being repaired, and the machine had lots of fancy stitches, so I decided to make use of them. I used all different stitches as flower stems on this page, even stitching directly over one of the photos, as shown in the closeups.


The picture at left is a closeup of some stitching holding a piece of lace onto the layout. I used a zigzag stitch for this.


Luckily, if you don't have a sewing machine or can't be bothered threading it up, there is a cheats way to do it. Simply use a large needle or your paper piercer to punch small holes where you want the 'stitching', and use a white pen to connect the dots, and voila, you have faux stitching, as shown at left.


I hope I have encouraged some of you to dust off those sewing machines and do some stitching on your layouts; I know you'll love the outcome! And here is the product list for the layouts above (click on the product to be taken to it in the shop):


[b][u]Bright Spark[/u][/b]

[u][b]Love You Layout[/b][/u]
Prima Vine (sorry, sold out, but Wildrose is available on backorder)


Tracy le Roy

Monday 25 May 2009

Designers Choice Challenge

Welcome to the first Designers Choice Challenge. This week I am going to give the hoarders in you two choices for this challenge - you only have to do one of the options.

Option one: Is to do a layout and include ephemera on it.
Definition of ephemera: items designed to be useful or important for only a short time, esp. pamphlets,notices, tickets, etc.

Option two: Is to do a layout and include a drawing or note from your child/grandchild/godchild or any special child in your life

Here are some examples from the design team using option one

Heidi's lovely layout using boarding passes from the airline

Pauline has included baggage tag and a departure charge receipt on her awesome multi photo layout.
and some examples from Annelie and myself using option 2 including our childrens creations on layouts

Annelie's very cute layout including her daughters bunny creation

and here are two from me one with some very detailed pictures my son gave me on mothers day and the other includes a note I put away that Christopher did on his own accord about his favourite things.

Go on and get hunting for those little tickets or artwork and enjoy doing a layout with them and upload in the gallery here
http://www.scrappinpatch.co.nz/coppermine/thumbnails.php?album=135
by midnight June the 1st to be in to win a RAK from Scrappin' Patch.

Remember too that if you do this challenge and three others by the end of the month YOU could be IN THE SPOTLIGHT
(check this thread out for details - viewtopic.php?f=60&t=525)

Have Fun
Beverley

Tuesday 14 April 2009

Scrap Tech Tuesday - Distressing Photo Edges

Hi everyone; I noticed the thread in the forum recently about distressing, and I realised that there are probably a few scrappers out there who don't really know much about distressing, so I thought I would talk about distressing photo edges today.

I really like to distress my photo edges; I love the more casual, 'distressed' feel it gives my layout, as opposed to the more formal photo mat. It also helps your photos to stand out from the background.
In the past, I have always used sandpaper on my photos, and just simply sanded the edges, which leaves a rough, scratched appearance - just raid your hubby's tool shed, and look for fine grade sandpaper. I always keep going until the very edge is completely white, and there are scratches a little way into the photo edge. These pics show sanding using scrapbooking sandpaper, and a close-up of a sanded photo.

I usually either print my photos on my home printer, or get them printed at Harvey Norman's, and I have had no problems, but I do believe some photos change colour slightly when you sand them and I guess this must be dependent on the photo processing procedure, so you may like to try this first on a photo you won't be scrapping, just to be sure you are happy with the look.

When I was at the Retreat last weekend, I also learnt a very cool trick - I am pretty sure it was from the amazing Rachel (RTScraps) - but I can't quite remember! Anyway, whoever it was, showed me a way to 'file' the edges of a photo, to create quite a uniform sanded edge - not quite as rough as sanding. You simply put the photo on one of those clear stamp blocks, against the edge, and using an emery board, file the edges until you get the look you want.

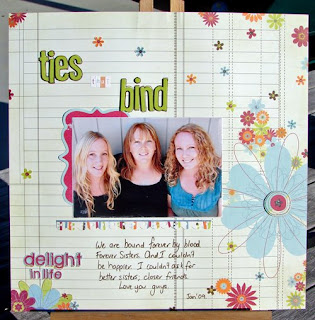
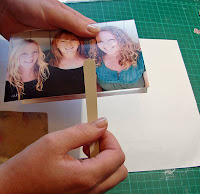
Oh, and this is the layout with my sanded-edge photos on. But if you look closely, you will see most of my layouts use this technique!

I have used patterned paper from the lovely Fancy Pants Delight range, available here from the shop, along with some Making Memories Tiny Alpha stickers, here, and some Kindyglitz.

Ok, so now you know how to distress the edges of your photos; I hope some of you have learnt something new. I hope I have explained it well; if you have any questions, please just ask. Happy scrapping!
Tracy le Roy

LinkWithin

Related Posts Plugin for WordPress, Blogger...