Showing posts with label Christmas. Show all posts

Thursday, 20 December 2012

Altering Christmas Ornaments

Hi Everyone!

This is my final post for 2012, I can't believe how fast this last month has gone, not to mention the entire year! Im sure I say that every year :) but its true!  Ive still got a few things to sort for Christmas Day, but not much really, we're having the whole family at our place this year, and a new Great-Nephew to celebrate his first Christmas makes it all the more special.

When I was thinking about what I could make for my blog post this month I was wanting something simple, time was of the essence! And then I was looking at the Christmas baubles as I was putting up the tree and thought "well you're a bit boring lets spice you up!". Nothing fancy, just some left over bits of Prima bling and   an odd flower I had left over and they were done.  The new Prima bling thats in the shop will be perfect for bauble decorating, with the three different flourishes in a pack they're the perfect size and you could do three baubles from one pack, cheap as chips! :)

Heres three Ive done:


Since Ive made these ones, Ive been thinking of other ideas. You could change they're colour by using alcohol inks or distress inks, now that could look funky! Might have to squeeze some playtime in and give that a go!

Merry Christmas Everyone!
Thanks for popping by, Megan

Saturday, 15 December 2012

A DIY Christmas Decoration

Hi everyone,

Tonight I am going to share with you a cute Christmas decoration that is super easy to make.  A few years ago I started a Christmas tradition where each child gets a new Christmas decoration for the tree with the idea that when they leave home they have lots of decorations to take with them to share on their family's Christmas tree.  This year I hadn't really gotten around to going out and getting each child a new decoration when I came across this cute tutorial by Lillyella to make Christmas decorations out of old holiday cards.  I thought it would be super easy to adapt this and use up some of my Christmas paper stash instead of cards and each child could have their own homemade decoration this year. 


One of the finished decorations on the tree!

To make one of these decorations you will need - 
  • 20 circles.   I used a circle punch to punch out my circles.  The larger the circle the bigger the decoration will be.
  • You need an equilateral triangle, the size of your circles.  Lillyella has templates you can print out  that fits into 1", 1.5" and 2" circles here.  Unfortunately, my circle punch was an odd size so I just drew an equilateral triangle and made my own template pretty easily.  Create your template on a piece of cardstock so it is easy to trace around.
  • A bone folder and ruler
  • Glue - I used Henzo Quick Dry Adhesive which is AMAZING glue. 
  • Twine or Ribbon to create the hanging part of the ornament.
To make the decoration: 

Firstly, punch out your 20 circles from your patterned paper.  I found that having 5 different patterns worked really well as it gave you variety without getting two matching papers joined together when the decoration is finished.  

Then using your equilateral triangle template - score a triangle shape onto the back of each circle.  The scored line needs to be on the back especially if you are marking it with pencil as you don't want to see this on the finished decoration.  Note, I didn't bother using a pencil as I found it was just easier to skip straight to the scoring stage.  When scoring your triangle onto the circle, make a note (I used a little T) to indicate the top point of the triangle.  This is useful later when assembling the decoration. 

Using the above score lines, fold the three lines up so that the reverse side (with the pencil lines is on the inside and hidden)

Next, adhere 5 circles together so that the top points of the equilateral triangle are all pointing together.  Before the glue dries, loop a piece of twine through the top points and tie a knot.  This forms the top of the decoration.  (as shown) 


Repeat above step with another 5 circles to create the bottom half of the decoration (without the twine)

Glue the last 10 circles side by side with the top points in opposite ends and then join them together to form the middle part of the decoration.  (as shown) 


To finish the decoration - glue the three pieces together!


These look really amazing on the tree.  I am just loving the handmade look and I may well start a new tradition of making each child a Christmas tree decoration instead of buying one.  Thanks for stopping by and I hope I have inspired you to make your own Christmas decoration!!

//Michelle 


Monday, 10 December 2012

DT Inspiration

Hi everyone!

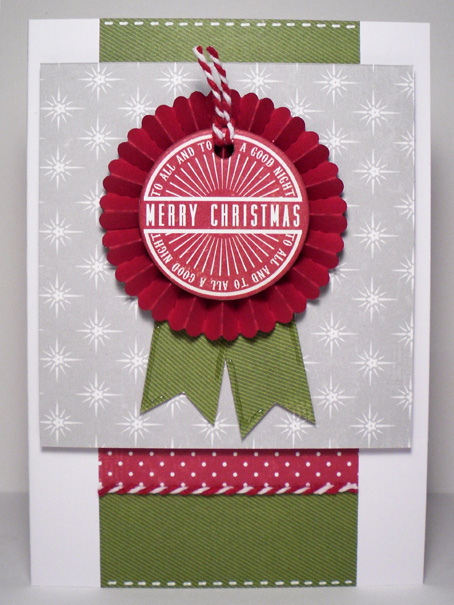
Today I'm sharing some more Christmas card inspiration using the Very Merry papers from Echo Park.

This card was actually made from scraps so going into it I was a bit unsure as to how it would turn out, but I'm really happy with the result.


My main feature of the card is a rosette I made using the Tim Holtz Rosette Die (large). I finished the rosette off with a chipboard sentiment from the My Mind's Eye Winter Wonderland Chipboard Elements sheet and I had a bit of cut off baker's twine laying around so I tied that to the top. I then added some banner details behind the rosette to make it pop.

This is my last post before the big day so I hope you all have an amazing Christmas with those close to you and I'll see you in the new year!

x Lana

Saturday, 24 November 2012

Imaginisce Stamps

Hi everyone!

Today my card features a cute Christmas Tree stamp from Imaginisce. I love Imaginisce stamps.


  • They are the perfect size for cardmaking and they're easy to store away
  • Feature so many cute images
  • They are clear stamps which I prefer over mounted stamps. This way you get a clear vision of where you're stamping your image. To use you just pop the clear stamp on an acrylic block and away you go
  • They are so affordable! They're usually around $3 each with 1 stamp in each package. 


I'm starting to build my own little Christmas collection as you can see below. I've used the top stamp on my card.


My card using the Very Merry range from Echo Park...


Thanks for stopping by!

x Lana

Supplies used: Imaginisce Christmas Cheer Candle Tree stamp, Very Merry papers by Echo Park, Kaisercraft Pearls in red.

Thursday, 22 November 2012

DT Inspiration - Christmas!

Hi everyone!

Well it's getting very close to my favourite time of year - Christmas! I just love making Christmas cards every year with a spot of Christmas music in the background to get me in the spirit. This week was no different. With the Diana Krall Christmas album in the background I made these 2 cards using Very Merry papers from Echo Park.


Make sure you stop by in the weekend to see some cute Christmas stamps that I'll be sharing. 

x Lana


Thursday, 15 November 2012

Very Merry Teacher's Gifts

Hi everyone!
 
As promised, I am sharing some more teacher's gifts. What I'm showing today is VERY simple, and it also involves the right to eat potato chips guilt free!!
 
Adrienne sent me the lovely Very Merry collection from Echo Park, and I got to work... Let me show you the end result first (I think I am finished anyway. There's a few weeks 'til Christmas so I might add some more decorations!)


So - here's where the potato chip bit comes in; the base for my gift is an empty Pringles container. And for it to be empty we have to eat what's in it, right? Luckily I got some help from the other family members. I really don't need any extra stuffing before Christmas, and I have a few of these to make! :)
 
 
So, we start with an empty container, and a paper cut to size (9x10 inches). Use strong glue to glue the paper to the container.


Honestly, from here you can do whatever you fancy, but I decided to cut two different strips of paper (3x10 inches & 1,5x10 inches) and glue them on. Make sure the papers lines up nice and tidy at the back.


Then decorate away! I've added a doily, some yarn, cranberries from Spotlight & leaves cut out with my cuttlebug for this one. Will possibly add some more decorations & a tag with the teacher's name closer to Christmas.
 
 
On the other two I also used yarn, and some bells from Spotlight. Also had some nice burlap that I thought would work well here. The possibilities are endless!


Let me know what you think in the comment section, and come back later in the month for some more teacher's gifts ideas!
 
HO HO HO!!
 

Monday, 12 November 2012

Step By Step - Kiwi Christmas

Hi everyone!

Today I'm going to show you how to make a Christmas card with a kiwi twist. I've been making this card for years, it's one of my favourites and one of my most popular cards at my craft market stall.

Let's begin!

STEP ONE:
I grabbed some scrap paper and did a freehand sketch of a jandal and the part where you slip your foot through. (Comment on this post if you would like a template for this and I can post one on the Scrappin' Patch Facebook page). Cut your shapes out. You only need one of each.


STEP TWO:
Trace around the shapes onto your chosen cardstock, flipping the shapes over to get the other jandal. Assemble your jandal by attaching the thong to the base. I used glue at the ends of the thong and then some dimensional adhesive at the top to make it pop a little.


STEP THREE:
Cut some small circles and leaves out for your holly. These don't need to be perfect. I actually prefer them when they're a little bit rough.


STEP FOUR:
Attach your holly to the jandals with some glue and dimensional adhesive. To give the berries a little shine, I covered them with some Glossy Accents.


STEP FIVE:
Add your Christmas jandals to your card base, include a message and there you have it - a fun kiwi Christmas card!


Hope you enjoyed this tutorial. I can't wait to share more Christmas cards with you this month :)

x Lana


Monday, 5 November 2012

It's only 50 days 'til...

...you know what. Yes. Christmas.

I will admit I am not the biggest fan of Christmas, but since having kids you just have to do it. :)

So with only 50 days 'til the big day, it means we have even LESS time to get those teacher's gifts together.

I always go overboard with this. When my oldest was in her first pre-school, I wasn't working full time and had only one child. So it wasn't a biggie doing 14 teacher's gifts. Then it seemed like a breeze when we moved and changed pre-schools, they had only 7 teachers! Sweet - so I started doing gifts for both Easter and Christmas. And now - they are expecting it. Yes. I dug a whole for myself that I can't get out of!

So - this year I have one girl in school - 1 teacher's gift to sort, plus those 7 teachers in pre-school.

Just painting a picture, sorry for the ramble. Just letting you know that my posts for November will be ALL ABOUT THE TEACHER'S GIFTS!!

I have started, with some lovely Echo Park papers that Adrienne sent me, but I will be honest and tell you I haven't finished. So instead, for today, I will share what I did for Tova's teacher last year. She was in a reception class, and had a fabulous teacher.

I found the idea online, and it's such an EASY gift to make, and the kids can help too!

You need a polystyrene wreath, I got mine from Spotlight. I covered it with ribbon, and then the gluing of crayons can begin...


After all those crayons are glued on, I added some handmade fabric flowers and Prima leaves.


Finshing off with a little twine as the "hanging device".


We gave this to my daughter's teacher on December 1st, so that it could hang on her door ALL of December. She was SO happy to receive something like this. 10 times better than chocolate!!!
 
 
She has a new teacher this year - and guess what she's gonna get?!?!?


Thursday, 25 October 2012

Simple Stories Handmade - December Daily Continued

It's that time again, another post with lots of new pages......

Day 10 and 11


Nice and easy for this page, as I used the Flash Cards Paper as my page, I can either pop a small 2x3inc photo on it or just use it for Journalling.  They are just the perfect size to add in between the pages.


For Page 11 I used another Flash Card but this one goes landscape and placed it over the Handmade Holiday Paper - Photo Mat & Quotes as the base and then placed the Flash Card over it, added a couple of stickers and presto - all done.


Page 12 and 13


I think this is my favorite page, I absolutely love the way this double page came out, the Handmade Holiday Paper - (Journal 2) which I backed onto Black Cardstock just pops, then stuck it down onto the Handmade Holiday Paper - Photo Mat & Quotes - which was quite a difficult page to use, so by sticking the Postcard PP down onto it, it made it a little different.  The number stickers are just fabbo too.... they are such cool sizes.

Page 14

 Again another favorite page, again using the  Flash Card which I have cut down to size and added a little sticker on the top and the super doopa NUMBER STICKERS.....  Base Page Handmade Holiday Paper - December 25,


Page 15 - nice and small

I used the Handmade Holiday Paper - Vertical Journal again which I have backed onto Black Cardstock and all I am going to do is tick the appropriate Holiday Favourites and pop a photo on the back and viola the page is done and dusted.... These Journal cards are just super for this type of album where you don't want a full on page every day.


Page 16 - another fav


This page was really simple to complete, I used the Handmade Holiday Paper - Page Elements as my base page, and popped those gorgeous Number Stickers on it. 


a little TIP - I have outlined all the pictures on this page using a black fine liner......

I will be back next week with the rest of the album....

TFL
Heidi


Tuesday, 6 December 2011

Christmas Gift Card Tutorial

Hi everyone,

Just a quick tutorial today on how to make another different cute little gift card. Originally, I found this idea on Pinterest but it was used to store small treats such as Hershey kisses inside but I adapted it to use it as a gift card idea suitable to for Christmas or any other occasion. Unfortunately, my pin didn't save and I can't give credit for the original idea as I can't find it!


Instructions
1. Trim a piece of patterned paper to 8.5 inches x 2.5 inches
2. Score and fold at 2 3/4 inches, 3.5 inches, 4 inches and 6 3/4 inches
3. At the left hand end, use a glass or a template to create the rounded edge.
4. Embellish the gift card part (I used a different KaiserCraft patterned paper and added To and From.
5. Punch two holes as shown and add twine (tie at the back with twine into a bow for added detail.)

6. Embellish the front as you wish. I used a scalloped border punch and some left over patterned paper. To create an edge for the flap of the gift card to slot into I added some firm Prima lace and adhered it in the centre so that the flap would sit nicely underneath the top edge and hold together. I then added a chipboard circle and button with twine to finish it off!

A fun kids idea

A great way of using up left over pieces of patterned paper and a fun idea for the kids is to create cute little packets of reindeer food. Reindeer food consists of oats and glitter and I just printed the little saying onto a piece of white cardstock and printed it out.


Instructions
1. Fill a small cellophane bag with the oats and glitter
2. Trim a piece of patterned paper to 4 inches by 4 3/4 inches (or to fit the width of your cellophane bag)
3. Score and fold in half at 2 inches to create the bag topper. Adhere to the cellophane bag.
4. Embellish as you wish and add the Magic Reindeer Food print out, I just punched out some circles, added buttons and twine to finish the look.

Thanks for stopping by...

//Michelle

Tuesday, 22 November 2011

Step By Step with Francine- Teacher Gifts

Hi ladies and welcome to Tuesday Step by Step.

This week i wanted to show you something simple that you could make for those all important teacher gifts for the end of the school year. When i was little my sisters and i would always make our teachers a container of homemade sweets (and our neighbours as well at Christmas time). We had heaps of fun making and tasting as we went along making chocolate, fudge, chocolate balls, marshmallow and coconut ice to go in our little parcels.

So i decided to zoosh up my containers a little as the step by step this week- going from an ordinary margarine container to this


I used my extras that i received after doing the Prima Roadshow class- all beautiful Alla Prima papers and prima flowers. As you can see i haven't done my baking yet but will when the time gets nearer and replace the chocolates with real homemade ones!

This was an easy project to make and quick! My daughter made this one for her teacher- he loves hardboiled lollies so i helped her make a little container for him to keep on his desk all year round! So this could be a great opportunity to get your kids creating with you to make those gifts too!


As for the step by step-

1. I used strips of patterned paper to cover my container.
2. I then cut a circle to fit the lid of my conatiner in matching papers.
3. Add ribbon trim around the lid- i used pom pom trim then add white trim to the bottom of the tub.
4. Now embellish- i added flowers , leaves and bling to my container
5. i then embellished my lid with flowers, raja centres, glimmermisted flowers, leaves and tags.
6. Add your chocolates or homemade baking and you are all done!

I hope that you will give these a try - quick and easy to make and a great way of using up some paper scraps too- and best of all the conatiners can be refilled or used for another purpose on the teachers desk all year round.

Happy Scrapping
Francine

Products used
Prima Blooms
Prima Leaves
Raja Centres
Silver trim
Prima Swirl
Pom Pom trim

Monday, 14 November 2011

Easy Christmas Gift Cards

Hi everyone,

Welcome to my second instalment of Christmas inspiration. Today I am going to share some easy gift cards that you can create for all your friends and family this Christmas. I did find the bases of these gift cards online but have tweaked them to suit my own style.

Again, I have used the KaiserCraft Christmas Silly Season range (see my previous blog post here if you want links to the products used) teamed up with Kraft and White card stock to create a Wine Bottle Gift Card (that sits over the neck of the wine bottle), a gift card holder and a cute little gift tag that opens up to reveal your message.


What I love about these three projects is that they don't just have to be Christmas based and you can adapt them just by using different types of papers to fit any occasion.

The first project I am going to show you how to make is the gift card holder at the bottom right of the picture above. These days the little plastic gift cards are such popular gifts to give those hard to buy for people in our lives and this gift card holder is a neat way of combining the gift card with a little message for that special love one.

Gift Card Holder Instructions


It is kind of hard to photograph the whole gift card and the card inside but I hope you get the picture from the instructions!

The second project I am going to give instructions for tonight is the wine bottle gift card holder. I just love how this card can sit on the neck of the wine bottle... no more loosing cards or trying to stick a card to an awkward bottle.

Wine Bottle Gift Card Instructions


I do have instructions for the little gift card to share and a cute little kids project but I may post them up tomorrow seeing as this post is so picture heavy already. I hope you have enjoyed reading my post tonight and that you might give these projects a try sometime in the future!

//Michelle

LinkWithin

Related Posts Plugin for WordPress, Blogger...