Showing posts with label Guest Designer - Jessica Toulmin. Show all posts

Saturday, 15 September 2012

LYB Saturday's Kit - Part 2

It's Jessica T back for you today with the second and final installment of inspiration using the Little Yellow Bicycle Saturdays kit. You can view Part 1 here.
The contents of this page kit included Little Yellow Bicycle Saturdays collection patterned papers, cardstock stickers, chipboard spinner, journalling cards, brads, burlap type ribbon, and some plain cardstock.  This kit, along with others, can be purchased here from the Scrappin' Patch shop.
The only things I have included on this layout that weren't included in the kit (other than adhesive), are the large white alphas, and the red mini alphas.
The photo and many of the embellishments have been adhered with foam tape.
All the hearts are hand cut from the patterned paper.
My second layout is completely different from the first, a nice and simple layout using a sweet little photo.
I pulled the burlap type ribbon apart into the eight individual strands to create my border. I knotted it in four places, and on the corners I stuck the ends through a hole and adhered them to the back.

All the banner pieces and the photo are adhered with a single strip of foam tape across the top.


I hope this has given you some inspiration. Next time I will have some inspiration from a new My Minds Eye Page Kit.


Thursday, 6 September 2012

LYB Saturday's Kit - Part 1

Hi, it's Jessica T back with you today.
Over the last couple of weeks I have had the pleasure of playing with one of the new Page Kits that Scrappin' Patch offers through their shop. The kit I am showing you today is made using the Little Yellow Bicycle Saturdays collection patterned papers, cardstock stickers, chipboard spinner, journalling cards, brads, burlap type ribbon, and some Bazzill.
I created four layouts, and there is still more product left over. I will show you two today, and another two next time.
For my first layout, I absolutely fell in love with one of the pieces of patterned paper and couldn't bring myself to cut it up, so I used it as my background piece and built my layout on top. The paper wasn't bright but it was still busy so I kept my embellishing to a minimum so it didn't distract from the photo.
The only thing I used that wasn't included in the kit (other than adhesive and pens), were the brown mini alphas.
I found the centre of the cardstock sticker to be too bright for my layout, so I layered it with two more of the stickers.
My second layout for today is a completely different look, although still in my style of clean and simple. It is created on a half and half background of plain Bazzill and patterned paper.

To be honest it would've been easier using smaller hexagons, but if they were smaller you wouldn't have been able to see the full context of the photos. Play around until you find a size that is right for you.


Again I layered the stickers.
I adhered the photos with foam tape.
I thought this sentiment was perfect for these photos, as I'm sure my partner had plenty of more 'important' things to get done.
I hope this has brought you some inspiration, and that you will buy this kit. Kits really are a great way to get product, as it all matches, and they're usually cheaper than buying the components separately.
Next weekend I will have the next two layouts from this kit to show you.

Wednesday, 25 April 2012

Anzac Day with JessicaT

Anzac Day was originally dedicated to those Australian and New Zealand soldiers who fought on that fateful day in Gallipoli in 1915. However, it is now more widely referred to as a day to remember those who have died and served for their country, not just those that served in Gallipoli.

Like many New Zealanders, I have had numerous family and friends serve overseas – not just in the World Wars, but also for peace keeping missions and anti-terrorism. I am lucky to only have had one (great-great-grandfather) who did not return. On this day, I think of all of those who have served or are still serving, those who did not return, and those families that were - and those who still are - at home waiting and hoping for the best. We will remember them.

“They went with songs to the battle, they were young.
Straight of limb, true of eyes, steady and aglow.
They were staunch to the end against odds uncounted,
They fell with their faces to the foe.
They shall grow not old, as we that are left grow old:
Age shall not weary them, nor the years condemn.
At the going down of the sun and in the morning,
We will remember them.”

I have created two layouts for Anzac Day, the first about my great-grandfather and the second about my fiancé. Both are made using 7 Gypsies patterned papers.

My great-grandfather was on holiday in his native England when WWI broke out. He first served in the New Zealand Expeditionary Force, and then transferred to the Royal Flying Corps (which merged into the Royal Air Force in April 1918). The photo on the left was taken when he was in the RFC, in 1917. The photo on the right is of his RFC Service Dress Jacket that is on display in the WWI gallery at the National Army Museum in Waiouru (photo taken in 2010).

V.F.Toulmin

To replicate this project you will need: textured cardstock in Army Green or Brown, something like this or this from Bazzill; 7 Gypsies: Off The Wall Travel and Weeds patterned papers, and 7Gypsies: Camden Borough patterned paper; 5” french lace doily; Ranger: Distress Ink in Antique Linen and black; Fancy Pants: tradition buttons; May Arts: Satin Pleat ribbon in Chocolate; mini alpha stickers like these olive ones, these brown ones, these burlap ones, or this mixed set; journaling tags, like this or this from 7 Gypsies; Kaisercraft chocolate pearls; edge distresser, poppy, thread, pen, double sided and foam tape/ dots.


The second layout, about my fiancé, includes a photo taken in 2008 at a medal presentation ceremony where he received his fourth medal, after returning from a deployment to the Arabian Gulf. The layout also includes his miniature medals and miniature citation, veteran, name and hat badges, dog tag, and a poppy. I made chevrons for this layout, and I made them with three stripes as that denotes his rank of Sergeant.

Sergeant

To replicate this project you will need: cardstock in army green or brown, something like this or this from Bazzill; 7 Gypsies: Off The Wall Travel and Weeds patterned papers, and 7 Gypsies: Camden Borough patterned paper; Ranger: Distress Ink in Antique Linen; Echo Park: A Boy’s Life stickers (now sold out); plane & helicopter stamps, poppy, pen, double sided and foam tape/ dots.


This is the end of my time as a Guest Designer for Scrappin’ Patch. I want to thank everyone who has viewed my work, and those that have made lovely comments. I hope everyone has found some inspiration from my work.

Take care,
Jessica Toulmin

Final Echo Park projects with JessicaT

Today I have my last projects using the A Boy’s Life collection from Echo Park – a layout, a card and a note card.

This has been a fun collection to work with, as it is so bright and full of different patterns. The patterns are all so different, but because they are all in matching colours they work so well together. Each piece is actually patterned cardstock not paper, so very sturdy.

You can see my first two projects with this collection by clicking here.

You Colour My World

To replicate this project you will need: light lemon, textured cardstock, like this one from Bazzill. White cardstock would be just as good; Echo Park: A Boy’s Life – Charmer, Play Time and Suave (now sold out) double sided, patterned cardstock; Echo Park: A Boy’s Life - alpha cardstock stickers (now sold out); Imaginisce: Berrylicious die cut phrases; My Minds Eye: Lime Twist (Fly A Kite - Spring) cardstock stickers; Fancy Pants: Tradition buttons; Green Tara: Sage fringe ribbon, and May Arts: Celery 3/8 grosgrain ribbon; yellow thread; blue, green and red ink pens; double sided and foam tape/ dots.

Title

Handmade embellishment

Cards made with my scraps

Handmade embellishments


To replicate this project you will need: textured, light lemon cardstock, like this one from Bazzill. White cardstock would be just as good; Echo Park: A Boy’s Life – Charmer, Play Time and Suave (now sold out) left over cardstock strips; Echo Park: A Boy’s Life - cardstock stickers (now sold out); May Arts: Celery 3/8 grosgrain ribbon; double sided tape/ dots.


To replicate this project you will need: textured, light lemon cardstock, like this one from Bazzill. White cardstock would be just as good; Echo Park: A Boy’s Life – Charmer and Play Time left over cardstock pieces; May Arts: Scarlet 3/8 grosgrain ribbon and Green Tara: Sage fringe ribbon; a small yellow brad like the ones in this set from Fancy Pants, yellow thread, blue ink pen, double sided and foam tape/ dots.

Wednesday, 21 March 2012

Kaisercraft: Little Toot

Jessica Toulmin here again for you today. This is my second and last post using the Kaisercraft: Little Toot range (sorry I can't link to the first one because for some reason it isn't there anymore).

I have thoroughly enjoyed being able to play with this line. It is full of red, orange, green and blue – but they’re not really bright and crisp colours, they are more muted which means they match so many more photos. And the vehicle images are adorable!

Today I have for you a layout, and four cards made using some of the scraps.

Stop and Wonder

To replicate this layout you will need:
white textured cardstock; Kaisercraft: Little Toot - Bang, Cruise, Honk and Road Trip (specialty) papers; Kaisercraft: Little Toot - chipboard elements; Echo Park: A Boy’s Life - alpha cardstock stickers; May Arts: celery and scarlet 3/8 grosgrain ribbons; clear and light blue rhinestones, like these ones from Melissa Frances; double sided tape, foam dots/ tape, white and blue ink pens.


To make the caravan journaling spot:

 
1. Take the car and caravan from the chipboard set.
2. Remove the strip from the caravan with a craft knife.
3. Trace around the caravan, and cut inside the line – so the paper is slightly smaller than the caravan. Then cut a half circle for the wheel well.
4. After writing on the journaling spot, attach it to the caravan with foam dots/ tape. Finally, add a rhinestone for the wheel. Attach to the layout with double sided tape.

Now for the cards.


All four of these cards were made with left-overs after making the layouts.

To replicate this cards you will need:
one sheet of 12x12, textured, white cardstock; Kaisercraft: Little Toot Bang, Honk and Road Trip (specialty) left over paper strips; Echo Park: A Boy’s Life - alpha cardstock stickers; Fancy Pants: Tradition buttons; Green Tara: gold fringeribbon; double sided and foam tape/ dots, thread.

Next month I will have projects for you using Echo Park and 7 Gypsies.

Until then, take care.

Wednesday, 7 March 2012

Kaisercraft Inspiration

This is my first post as a Guest Designer for Scrappin’ Patch. I am very happy to be chosen as part of the Scrappin’ Patch team for 2012. Thank you Adrienne.

I was given some of the Kaisercraft Little Toot range to design with. This is such a fun line for little boys, but would also work wonderfully for road trip and holiday projects as it is travel and transport based.

Sunshine & Success

To replicate this layout you will need the following: off-white cardstock, like this one from Bazzill; Kaisercraft Little Toot ‘Bang’, ‘Honk’ and ‘Road Trip’ (specialty) papers; Kaisercraft Little Toot chipboard elements; Imaginisce Berrylicious die-cut phrases; Fancy Pants buttons; Green Tara ‘Sage’ fringe ribbon; double sided tape, foam dots/ tape, blue ink pen.


Usually I try to match the theme of the layout to the photograph. But for this layout, I decided to use the Little Toot ‘Honk’ paper and take the theme of the travelling for a more meaningful layout for a change. Sometimes doing something different than (your) usual is not only a challenge, but ends up with a great result.


A bit of dimension always makes a layout more pleasing to the eye. You don’t have to go overboard, just a few dimensional elements will do.

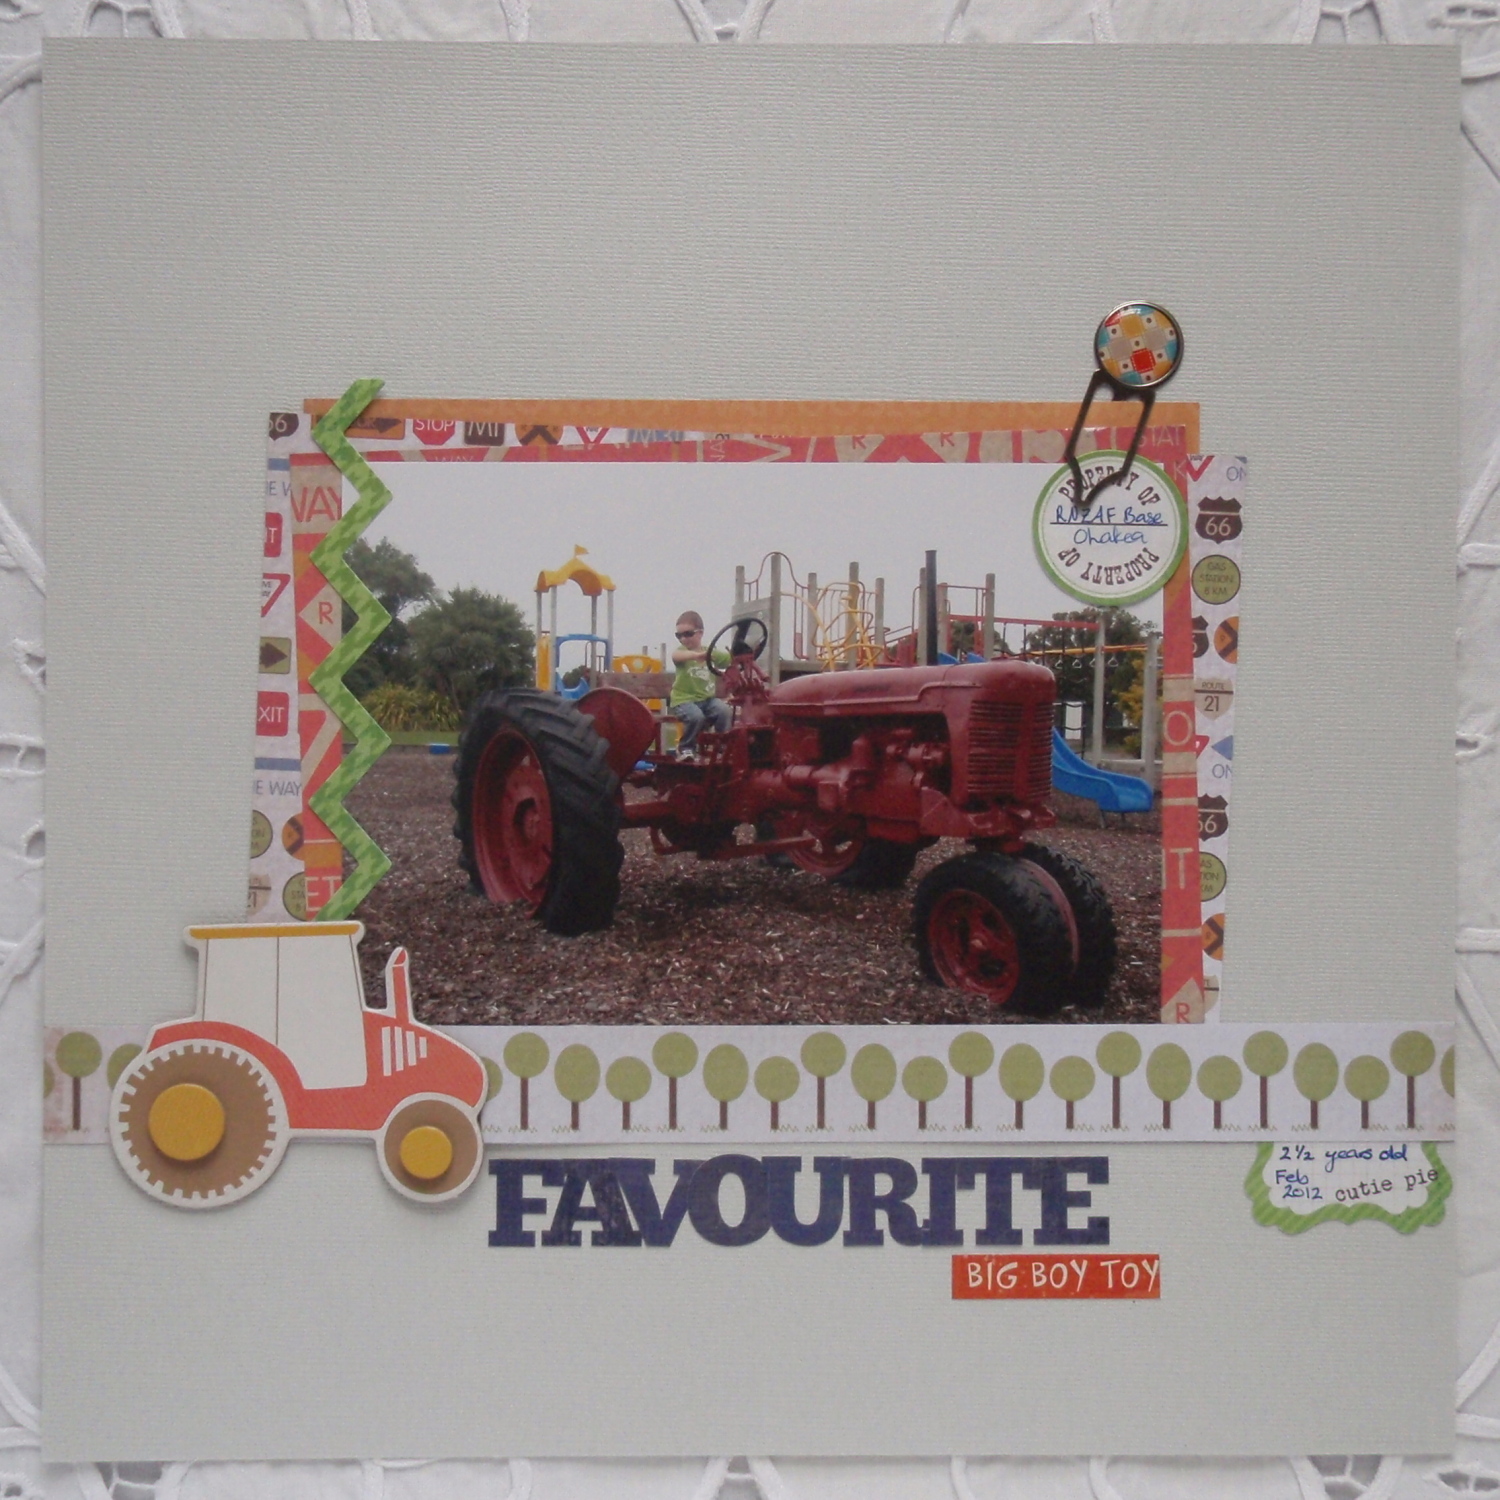
Favourite Big Boy Toy

For this layout I used a 5x7 photo, but a standard 4x6 would work equally as well.

To replicate this layout you will need the following: off-white cardstock, like this one from Bazzill; Kaisercraft Little Toot ‘Bang’, ‘Honk’ and ‘Road Trip’ (specialty) papers; Kaisercraft Little Toot chipboard elements; Echo Park A Boy’s Life cardstock stickers; My Minds Eye Lime Twist (Fly A Kite ‘Spring’) cardstock stickers; a paper clip, like these ones from Basic Grey; double-sided tape, blue ink pen.

If you are using large mats or blocks of paper that are going to get covered, it is a good idea to cut the centre of the paper out to be used on another project, like this:


Here is a little ‘how to’ for this layout:


Layer and adhere the photo mats, then adhere the photo.


Adhere the embellishments, starting with the zig-zag strip down the left, then the journaling spot and paper clip on the top right.


Adhere the paper strip, then chipboard shape. Adhere letter stickers.


Adhere phrase sticker and half journaling spot to finish.

Thanks for looking.

In a couple of weeks I will have two more projects from the Kaisercraft Little Toot range for you. Until then, take care.


LinkWithin

Related Posts Plugin for WordPress, Blogger...