Saturday, 31 December 2011
It's Big, it's Fun......check this out......
It's a New Year competition!!!!! There are prizes!!!! It will be fun!!!!
Welcome 2012 with a BANG!!!
How it will Work....
The competition runs from 2 January - 6 February 2012. Each Monday morning a challenge will be posted on the blog and Facebook page. You will have until 9am the following Monday to upload your submission to our gallery. Challenges will be a mixture of OTP and layouts (these can be any size you choose).
SCORING - Each submission will receive 1 pt, and the winner of each week will receive 3pts, 2nd will receive 2 pts, and 3rd will receive 1pt. Throughout the weeks there may be opportunity to win extra points on the blog or FB page as well. The winner of the competition is the person with thehighest total points. Judges decisions are final.
PRIZES - The winner of each week will win a $10.00 voucher from Scrappin' Patch, the overall winner will win a $100.00 product pack from Scrappin' Patch.
A hint for the first week.....think OTP and pens :)
Friday, 30 December 2011
Product Focus on Stamps
I have to apologise this post is a wee bit late this week. The short week completely threw me and I didn't realize what day we were up too and then we got a new computer and it took a bit to set up properly. But better late than never!!
I hope you all had a nice Christmas wherever you are and if you are on holidays right now are enjoying the break. We are having nice four day weekends and I am enjoying getting some stuff done around our new place.
This month I was using the clear stamp set for the Sports Edition II collection by Teresa Collins.

This particular stamp set is so versatile to have in your stash of scrapbooking products. What I love about stamping with clear stamps is that they are relatively inexpensive because you can use them more than once rather than using up store bought embellishments. You can also choose any ink colour to match in with your project and if you wish to add dimension to your projects by stamping onto card stock or patterned paper and then raising them with foam dots. Lastly, the advantage of using a clear stamp over a wooden stamp is that you can see exactly where you are going to stamp with them which ensures that your stamped image is exactly where you would like it to be.
Creating backgrounds
The first stamping technique that I am going to share which is quite trendy at the moment in the scrapbooking world is to create effective backgrounds using stamping. This can be a bit daunting as it does mean stamping directly onto your project but don't worry if you accidentally mis-stamp the image as I do this all time and it just adds to the effect. You can always add to the image by putting an embellishment in the area that was mis-stamped in the first place. There is no right or wrong way to create backgrounds using stamped images. You can either plan it out or instead if you are like me... start with one image and then add more images until you feel it is finished.
Here is an example using the TC stamps:

On this page I have added some stars to the lefthand side of the page. I have then added some of the smaller stars from one of the other stamps and raised them with foam dots and added some of the die cuts to cover where the stars haven't completely stamped.

Another background using the stamp set - this time I have created a border strip out of stamped images and I have also coloured in the stars in red to match in with the papers used on the project.
Also, I encourage you to think outside of the square when it comes to stamping! Instead of using ink on your stamps I have picked out only a small piece of the 'Play hard' circle without the rest of the stamp and used a marker pen to colour only that piece of the stamp.
Creating embellishments using stamps
I just love adding layers and dimensions to my embellishments using clear stamps. I have done this often throughout the mini album but in the photo below you can see I have added the little crest symbol to the edge of my photo on page 3 as well as another star to my photo pocket on page 4 of my album.

Also, I created a little tab using the 'Play Hard' stamp for the person reading the album to turn over the top team photo on page 5 below.

There are so many different ways you can add stamps to your projects to add interest and layers! A couple of others that come to mind are stamping using Stazon Ink onto transparency or stamping and then using embossing powders to give your stamped images a lovely glossy look to them.
I hope the above has given you a few more ideas of how stamping can feature in your projects in the future and inspired you to go shopping in the store for some clear stamps to add to your stash!
//Michelle
Tuesday, 27 December 2011
OTP Inspiration
Hi Everyone!
Hope you all had a wonderful Christmas, especially those that had to endure more earthquakes.
In my DT kit this month was a Solo Shadowbox Tray from 7 Gypsies. They come in either black or white, and the larger section of the tray will hold a 6x4 photo easily, the other three squares are about 2x2 inches. I chose to use a photo of my brother and sister and I, when I was by the look of it celebrating my very first Christmas - that would be 1970! But they are perfect for celebrating all lifes amazing events, and would make an awesome gift for someone.
My tray was white so first of all I used some Tim Holtz tissue tape and went around all the edges. I have'nt used it before - even though Ive had it in my stash for quite sometime :) but its easy as pie and best of all its self adhesive, even better! I mod podged over the top for added protection and then used two different distress inks, aged mahogany and walnut. Ive used Graphic 45 Christmas Emporium papers as embellishments to finish it off and Vintaj metal corners.
Sorry the photos are not the best, but for those in Canterbury, it will be in the shop for you to see very soon.
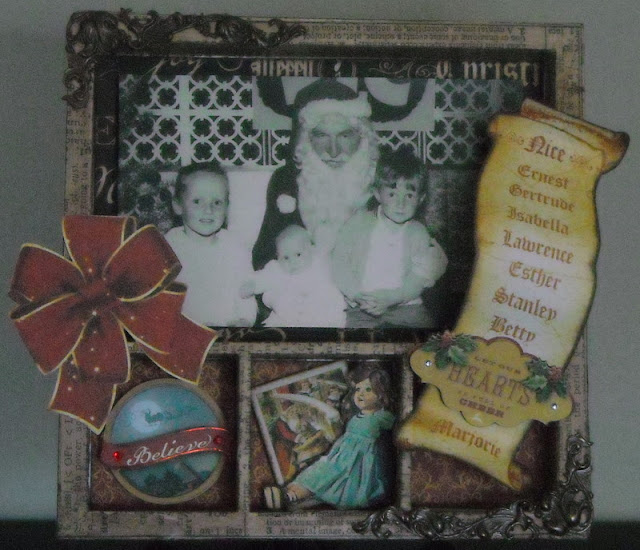


I hope this has inspired you to scrap with something a little different :)
Take care,
Megan
Hope you all had a wonderful Christmas, especially those that had to endure more earthquakes.
In my DT kit this month was a Solo Shadowbox Tray from 7 Gypsies. They come in either black or white, and the larger section of the tray will hold a 6x4 photo easily, the other three squares are about 2x2 inches. I chose to use a photo of my brother and sister and I, when I was by the look of it celebrating my very first Christmas - that would be 1970! But they are perfect for celebrating all lifes amazing events, and would make an awesome gift for someone.
My tray was white so first of all I used some Tim Holtz tissue tape and went around all the edges. I have'nt used it before - even though Ive had it in my stash for quite sometime :) but its easy as pie and best of all its self adhesive, even better! I mod podged over the top for added protection and then used two different distress inks, aged mahogany and walnut. Ive used Graphic 45 Christmas Emporium papers as embellishments to finish it off and Vintaj metal corners.
Sorry the photos are not the best, but for those in Canterbury, it will be in the shop for you to see very soon.


I hope this has inspired you to scrap with something a little different :)
Take care,
Megan
Wednesday, 21 December 2011
Teresa Collins Sports Edition II
Hi everyone,
Today, I want to share with you a card I made using up the left over pieces from my dt kit of the Teresa Collins Sports Edition papers. Making up cards is a great way of using up those small pieces of left over patterned papers and embellishments that don't quite make it onto our layouts! I do have a stash of scraps just for this purpose but it makes way more sense to just pull together a quick card at the end of that project so you can have there ready for when you need one.
I have created a thank you card for a sports 'coach' but it could easily be adapted to fit into another different masculine themed card to suit your gift giving occasion.

Here is how I made it:
To create the background, I used this Prima Fence Mask and Texture Paste. For anyone who hasn't used a product like this before - it is super easy. I used Jo Sonya's Texture Paste and a scraper thingey (which I got from Mitre 10 Mega).

Firstly, lay the mask over the area that you wish to add the texture paste too. Holding on to the mask so it doesn't move, scrap over a thin layer of Texture Paste. A quick tip is not to paste right to the edges of the mask otherwise you will get a square look which isn't as natural looking instead pick an area of the pattern you like the most and just paste that part. The mask I used is pretty much the same width as my card so I applied texture paste to the entire background.

I then added some Slate Glimmermist to give the paste a more grungy look.

Next, I added the left over pieces of patterned papers (Practice and Blue Numbers). I also stamped out 3 stars using the Sports Edition Stamp Set which I just love as they are perfect for using on masculine cards and layouts. Lastly, I layered a couple of the diecuts to create my sentiment and matted them onto some on a banner I created from blue numbers patterned paper.
I hope I have inspired you to use up your scraps and perhaps to try and give a product like Texture Paste a go... it is such an effective and easy way of creating that extra layer of texture to your creations.
Take care
//Michelle
Tuesday, 20 December 2011
Step By Step with Francine-
Hi everyone,
I hope that everyone is feeling the Christmas spirit and has finished all their shopping and looking forward to a nice break with family and friends.
This is my last post as a designer at Scrappin Patch and i just wanted to say a big thank you to Adrienne for choosing me to be on the team. I have thoroughly enjoyed my year and a half on the team - to all my fellow design team members both past and present thank you too for your support and encouragement. Next year promises to be a big one with 2 retreats and i know that Adrienne has lots of awesome things planned. The new design team will be sure to inspire and challenge you!
As part of my design team pack - i received a Basic Grey doily in a 12 by 12 size. I wanted to show you something different that you could try on a layout using one of these. i decided to cut it up into strips as each strip has a different pattern on it and then layer it on my page and then glimmermist it to create a funky background.

So before i sign off- i would like to wish everyone of you a Merry Christmas and Happy New Year- may 2012 be one of your best ever years!
Over and out
Francine
I hope that everyone is feeling the Christmas spirit and has finished all their shopping and looking forward to a nice break with family and friends.
This is my last post as a designer at Scrappin Patch and i just wanted to say a big thank you to Adrienne for choosing me to be on the team. I have thoroughly enjoyed my year and a half on the team - to all my fellow design team members both past and present thank you too for your support and encouragement. Next year promises to be a big one with 2 retreats and i know that Adrienne has lots of awesome things planned. The new design team will be sure to inspire and challenge you!
As part of my design team pack - i received a Basic Grey doily in a 12 by 12 size. I wanted to show you something different that you could try on a layout using one of these. i decided to cut it up into strips as each strip has a different pattern on it and then layer it on my page and then glimmermist it to create a funky background.

 |
| Glimmermisted in 3 colours |
 |
| you get this cool effect |
 |
| My finished layout with the glimmermisted background using the doily |
 |
| some close ups |
 |
| another close up |
Over and out
Francine
Monday, 19 December 2011
Christmas Ornaments
Hi everyone!
I wanted to show you this very cool Christmas decoration I whipped up. The original idea is not one of my own. I first saw them on www.2gypsygirls.com last year and then they popped up again in Stamping and Papercraft magazine, Vol 16 no 8. I had wanted to make them last year but just ran out of time, but this year I was determined to give them a crack!
Heres my two decorations and then I will write up the basic instructions to complete them.


Ok, so first of all Ive just used left over scraps of paper to make the strips, and the layered poinsettia flowers. Ive added a glass decoration I found at the Warehouse and layered some glittered chipboard snowflakes I had in stash, from Kay & Co, to decorate.
Basic instructions:
Cut x7 20mm wide strips out of double sided patterned paper, and then trim them to the following lengths. You could use a variety of different papers or keep them all the same.
One strip 100mm long
Two strips 115mm long
Two strips 130mm long
Two strips 140mm long
Ink the edges of all strips now if desired.
Arrange the paper strips so they descend inwards in size, with the largest two pieces on the outside edges and the smallest in the middle.
Line up all the strips at one end and staple them together. Then line them up at the other end and staple these together too - this gives the curved effect.
Trim two 40 x 20mm strips of co-ordinating paper and fold them in half. Trim the short ends with scalloped scissors. Affix these over the top and bottom of the ornaments to hide the staples.
Set an eyelet in the top of the ornament OR just punch a hole through like I did and hide it with ribbon :), if like me you don't have eyelets.
Feed ribbon or wire through the hole you have created to hang your ornament.
Now decorate as desired!
Heres some closeups of my two examples:


Happy scrapping everyone! and Merry Christmas!
Megan
Wednesday, 14 December 2011
DT Inspiration - Teresa Collins Mini Album
Hi everyone,
I'm excited to share my latest creation on the blog.
This month I have created a little keepsake for Liam using the Teresa Collins Sports Edition II Collection including Album Covers, patterned papers, clear stamps, and die cuts (see links below to actual products used).

The first two pages are about Liam's first year of playing soccer.
 Then his second year of playing which includes a pocket for various photos.

And his third season of playing:


Next week, I am going to share some of the ways that I have used the clear stamps on the album in my product focus so please do check the blog again for my next blog post.
Thanks for stopping by..
//Michelle
Products used:
Teresa Collins Chipboard Album Covers Sports Edition II
Teresa Collins Sports Edition II Diecuts
Teresa Collins Sports Edition II Clear Stamps
Teresa Collins Sport Edition II Paper - Blue Numbers
Teresa Collins Sports Edition II Paper - Practice
Teresa Collins Sports Edition II Paper - Shields
Teresa Collins Sports Edition II Paper - Stars
I'm excited to share my latest creation on the blog.
This month I have created a little keepsake for Liam using the Teresa Collins Sports Edition II Collection including Album Covers, patterned papers, clear stamps, and die cuts (see links below to actual products used).
Liam has been playing soccer for a number of years now and this collection has the perfect colours to match in with his club uniform. I used the TC Chipboard Album Covers in a landscape orientation and created inside pages for the mini album by using the covers as a template with the various patterned papers in the collection. I then set about creating the pages themselves! What I just love about Teresa Collins' collections is there are usually lots of designs in her papers that can be fussy cut out to create little embellishments and along with the die cuts and the clear stamps I was really spoiled for choice with what I could add to my pages. The bright blue, red, black and white colours in this collection are also striking to work with and would make stunning scrapbooking layouts as well.
If you wish to view larger images of the album, please click on the image for more detail..
If you wish to view larger images of the album, please click on the image for more detail..
Firstly, I liked the plain black part of the chipboard covers so I have used those sides for album covers.

The first two pages are about Liam's first year of playing soccer.
 Then his second year of playing which includes a pocket for various photos.
And his third season of playing:

There are so many little details on this album which are hard to capture in photos. I always have lots of photos and not so much space for journalling so I have created lots of little pockets and hide away places for journalling and the extra photos. I hope you can see some of them in the below collage.

Next week, I am going to share some of the ways that I have used the clear stamps on the album in my product focus so please do check the blog again for my next blog post.
Thanks for stopping by..
//Michelle
Products used:
Teresa Collins Chipboard Album Covers Sports Edition II
Teresa Collins Sports Edition II Diecuts
Teresa Collins Sports Edition II Clear Stamps
Teresa Collins Sport Edition II Paper - Blue Numbers
Teresa Collins Sports Edition II Paper - Practice
Teresa Collins Sports Edition II Paper - Shields
Teresa Collins Sports Edition II Paper - Stars
Monday, 12 December 2011
Hi Everyone! Merry Christmas to you all!
If you're like me and love altering, well anything :) you would always be on the hunt for something to revamp! In my scrap room I have a cupboard filled with quite a few alterable items, well more than a few if the truth be told hehe, but they do come in handy!
Maya Road Tins anyone? You know the ones, came out ages ago filled with chipboard items like arrows, flourishes stars etc. Well I still had a few that needed reinventing. This one Ive decorated with the scraps from my DT kit using Websters Pages Western Romance - such a lovely range, sigh.
To decorate the sides of the tin Ive cut straight strips of paper and then punched the edges with a Martha Stewart punch and then added some ribbon tape. On the top Ive done a triple bow with seam binding ribbon. On the front Ive used layers of paper cut using Spellbinders Picot Edge Circles and Labels Twenty Two. Ive also used the paper motifs as an embellishment, cutting the hat so that my 'letters' looks like they're tucked inside - Ive popped this whole thing up with foam tape, and then just added some flowers, cameo and a pin.


So there you go, quick and easy, did'nt take long at all and makes the perfect gift filled with some yummy treats.
Happy Scrapping!
Megan
Tuesday, 6 December 2011
Christmas Gift Card Tutorial
Hi everyone,

Instructions
1. Trim a piece of patterned paper to 8.5 inches x 2.5 inches
2. Score and fold at 2 3/4 inches, 3.5 inches, 4 inches and 6 3/4 inches
3. At the left hand end, use a glass or a template to create the rounded edge.
4. Embellish the gift card part (I used a different KaiserCraft patterned paper and added To and From.
5. Punch two holes as shown and add twine (tie at the back with twine into a bow for added detail.)
 6. Embellish the front as you wish. I used a scalloped border punch and some left over patterned paper. To create an edge for the flap of the gift card to slot into I added some firm Prima lace and adhered it in the centre so that the flap would sit nicely underneath the top edge and hold together. I then added a chipboard circle and button with twine to finish it off!
A fun kids idea

Instructions
1. Fill a small cellophane bag with the oats and glitter
2. Trim a piece of patterned paper to 4 inches by 4 3/4 inches (or to fit the width of your cellophane bag)
3. Score and fold in half at 2 inches to create the bag topper. Adhere to the cellophane bag.
4. Embellish as you wish and add the Magic Reindeer Food print out, I just punched out some circles, added buttons and twine to finish the look.
Thanks for stopping by...
//Michelle
Just a quick tutorial today on how to make another different cute little gift card. Originally, I found this idea on Pinterest but it was used to store small treats such as Hershey kisses inside but I adapted it to use it as a gift card idea suitable to for Christmas or any other occasion. Unfortunately, my pin didn't save and I can't give credit for the original idea as I can't find it!

Instructions
1. Trim a piece of patterned paper to 8.5 inches x 2.5 inches
2. Score and fold at 2 3/4 inches, 3.5 inches, 4 inches and 6 3/4 inches
3. At the left hand end, use a glass or a template to create the rounded edge.
4. Embellish the gift card part (I used a different KaiserCraft patterned paper and added To and From.
5. Punch two holes as shown and add twine (tie at the back with twine into a bow for added detail.)

A fun kids idea
A great way of using up left over pieces of patterned paper and a fun idea for the kids is to create cute little packets of reindeer food. Reindeer food consists of oats and glitter and I just printed the little saying onto a piece of white cardstock and printed it out.

Instructions
1. Fill a small cellophane bag with the oats and glitter
2. Trim a piece of patterned paper to 4 inches by 4 3/4 inches (or to fit the width of your cellophane bag)
3. Score and fold in half at 2 inches to create the bag topper. Adhere to the cellophane bag.
4. Embellish as you wish and add the Magic Reindeer Food print out, I just punched out some circles, added buttons and twine to finish the look.
Thanks for stopping by...
//Michelle
Saturday, 3 December 2011
This month's spotlight is on.....
Scraphappy!!! Congratulations. Here for your enjoyment are Gwen's challenge layouts....


And so you can get to know Gwen a little better I conducted this little interview...
2. How long have you been scrapbooking
3. What got you started
4. Where do you get most of your inspiration from
5. If you had to choose just THREE scrapbooking products, what would they be
and why?
6. Who are your favourite celebrity scrapbookers.
7. Your favourite quote is.
Stop worrying about the potholes in the road and celebrate the journey!
November Sketch Challenge

Challenge 1

Challenge 2

And so you can get to know Gwen a little better I conducted this little interview...
1.
Tell us a little about yourself
- your family, where you live etc
I’m an Aucklander, a busy teacher with a grown up family and grandchildren.
2. How long have you been scrapbooking
Seven
years now – spurred on by a desire to record ordinary family moments. Not just the big celebrations but the good,
the bad and the ugly even!
3. What got you started
While waiting for my eldest
daughter’s overdue baby to arrive, we visited a LSS to get materials to while
away the time until his arrival. I was going to record each grandchild’s life
just until each was two years old, but couldn’t stop!
4. Where do you get most of your inspiration from
The photos are my
inspiration. I started off wanting to
scrap my photos chronologically and wanting to be ordered in how I preserved
memories, but now it’s simply a magic moment when I pick up a photo or group of
photos and think ‘Yes – I’ll scrap that,’ and then find the papers to
suit. However, I also love a challenge,
and a sketch or a theme or the requirements to use a certain number and variety
of products can set off that inspiration as well.
5. If you had to choose just THREE scrapbooking products, what would they be
and why?
Patterned papers because I
have always loved paper products from when I was a small girl standing at the stationery
counter at a store called MacKenzies, wondering how to spend my pocket money on
paper and pens.
Alphas – chipboard or
rubons or stickers because as they create the titles that explain the feelings,
the places, the people in the photos.
Embellishments – any sort
at all. With two grandsons, flowers
aren’t always on my layouts, but I love them just the same. So I scrap past photos of my daughters in
order to pretty up a layout!
6. Who are your favourite celebrity scrapbookers.
There are so many whose
styles differ, one from another, who inspire me. Too many to count, but Trina McClune and Nic
Howard are New Zealand scrapbookers whom
I admire to bits.
7. Your favourite quote is.
Stop worrying about the potholes in the road and celebrate the journey!
Thursday, 1 December 2011
December Sketch challenge
Hi Ladies and welcome to the final sketch challenge for the year!
This months sketch is from Pagemaps

This months sketch is from Pagemaps

Lots of room for some great photos and some stamping on your pages this month!
Remember that you have until the 31st of December to enter this challenge and have the chance to win a RAK from Adrienne!
Happy scrapping
Francine
Tuesday, 29 November 2011
Christmas Crackers
Hi Everyone,
It's not long now til the big man arrives with gifts for all. I love this time of year, thinking of what unique gifts or decorations I can come up with each year. People seem to enjoy the handmade gift more I think because it shows how much effort and thought you have really put into each gift.
Christmas crackers were on my design team list to make this month. This turned into more of a chore than I intended. I had originally intended to decorate an old tin I had and fill it with a glass Christmas decoration I had found at Crabtree & Evelyn. Unfortunately I forgot to leave 1/4 of an inch at the top so the lid would fit on again, so it didn't fit!! What to do? So I chopped off the bottom with a can opener and carried on, so my container turned into a Christmas Cracker.
The paper I have used is from last years Pink Paislee Christmas range - honestly I have so much Christmas themed paper that I have tried to be good this year.....................................................until I saw the new range from The Scrapcake, but thats a whole nother story :)
So heres the end result of my inital mistake :)

and heres a few close up shots.


I have used to Spellbinders Poinsettia and 2011 Christmas Ornaments to decorate the cracker. The bauble ornament has been stamped with embossing ink and embossed with white powder. The stamps are from Waltzing Mouse Stamps. The triple bow is made with a bow maker.
To make the ends of the cracker. I have pleated a strip of calico and used double sided tape to adhere it - hot glue did not work against the metal of the tin. For the paper I would advise to have two strips of 12x12 cut in half and then pleated using an acordian fold method. When I made mine I discovered when it was too late that I only had one sheet of the striped paper to go around each side, when I think it would've looked better with two strips joined together, so I had to make do. So if you do use x2 pieces of paper you would have more of a pleated look that what I have. The edges of the paper are punched with a Martha Stewart border punch. Considering how things went Im pleased with how the cracker turned out .................mistakes and all! :)
So have a go, would love to see what you come up with!
Happy Scrapping
Megan
Wednesday, 23 November 2011
Design Team Inspiration - Pink Paislee Vintage Vogue
It is time for another DT inspiration post!
This time I was lucky enough to receive some Pink Paislee Vintage Vogue goodness in my design kit. I really really really enjoyed working with these papers. One of my favourite parts of designing is getting to work with ranges that I wouldn't have normally picked out for myself.
Pink Paislee Vintage Vogue is full of yummy pinks, purples, sea foam greens and blacks which give your layouts a hint of glamour but still being fun and easy to work with. In Particular, Vintage Vogue works well for girls of all ages from wee little ones (like my Taylor) to the tweens and even BOM pages.
My first layout encompasses several of the patterned papers in several layers. I have used the reverse side of the Eau de Parfume to form the base of my layout. Used a die cut template (from some Prima Packaging) to make the layered parentheses shapes with the Corner Boutique and Dress Shop patterned papers and cut out the little shape at the bottom of this paper to use an embellishment.
 Other products used: Ephemera, Prima Bling, Martha Stewart Butterfly Punch, Prima Cream Trim, Prima Butterfly, Scrapware Birdcage, Twine

Have a great day!
// Michelle
Pink Paislee Vintage Vogue is full of yummy pinks, purples, sea foam greens and blacks which give your layouts a hint of glamour but still being fun and easy to work with. In Particular, Vintage Vogue works well for girls of all ages from wee little ones (like my Taylor) to the tweens and even BOM pages.
My first layout encompasses several of the patterned papers in several layers. I have used the reverse side of the Eau de Parfume to form the base of my layout. Used a die cut template (from some Prima Packaging) to make the layered parentheses shapes with the Corner Boutique and Dress Shop patterned papers and cut out the little shape at the bottom of this paper to use an embellishment.
 Other products used: Ephemera, Prima Bling, Martha Stewart Butterfly Punch, Prima Cream Trim, Prima Butterfly, Scrapware Birdcage, Twine
My second layout compasses more Vintage Vogue Ephemera which is great value at $7.90 for 112 different pieces, both sides of the Beauty Parlour patterned papers and left over pieces from the papers I used in my first layout.

I hope you have enjoyed my inspiration for today. I have just sent both of these layouts to the store so they should be up for display shortly if you want to see them in real life.
Have a great day!
// Michelle
Tuesday, 22 November 2011
Step By Step with Francine- Teacher Gifts
Hi ladies and welcome to Tuesday Step by Step.
This week i wanted to show you something simple that you could make for those all important teacher gifts for the end of the school year. When i was little my sisters and i would always make our teachers a container of homemade sweets (and our neighbours as well at Christmas time). We had heaps of fun making and tasting as we went along making chocolate, fudge, chocolate balls, marshmallow and coconut ice to go in our little parcels.
So i decided to zoosh up my containers a little as the step by step this week- going from an ordinary margarine container to this


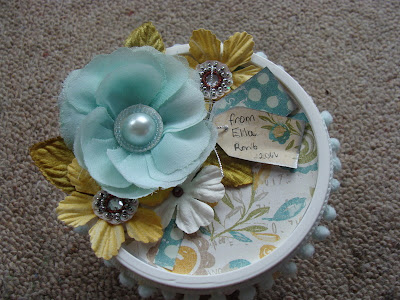
I used my extras that i received after doing the Prima Roadshow class- all beautiful Alla Prima papers and prima flowers. As you can see i haven't done my baking yet but will when the time gets nearer and replace the chocolates with real homemade ones!
This was an easy project to make and quick! My daughter made this one for her teacher- he loves hardboiled lollies so i helped her make a little container for him to keep on his desk all year round! So this could be a great opportunity to get your kids creating with you to make those gifts too!

As for the step by step-
1. I used strips of patterned paper to cover my container.
2. I then cut a circle to fit the lid of my conatiner in matching papers.
3. Add ribbon trim around the lid- i used pom pom trim then add white trim to the bottom of the tub.
4. Now embellish- i added flowers , leaves and bling to my container
5. i then embellished my lid with flowers, raja centres, glimmermisted flowers, leaves and tags.
6. Add your chocolates or homemade baking and you are all done!
I hope that you will give these a try - quick and easy to make and a great way of using up some paper scraps too- and best of all the conatiners can be refilled or used for another purpose on the teachers desk all year round.
Happy Scrapping
Francine
Products used
Prima Blooms
Prima Leaves
Raja Centres
Silver trim
Prima Swirl
Pom Pom trim
Tuesday, 15 November 2011
Inspiration Wednesday with Francine- Crate Paper - Part 2
Hi Ladies and welcome to Inspiration Wednesday.
This week i wanted to share the second layout that i completed with the beautiful Crate Paper range "Portrait". This range covered alot of colour options- from red and green to brown and to black and white and yellow also which makes it very versatile to use for whatever photos you would like to scrap.
For my second layout i wanted to show you how you can use yellow- as i know that a lot of people hate yellow and tend to avoid using the colour in their albums. I think of yellow first and foremost as a happy summery colour but i think that when you use yellow and black and white it can also look stylish and elegant. That was the effect that i was going for in this layout! I tried to keep the layout pretty simple because i wanted the photos to be the dominant force of the layout and yellow and black is a pretty striking combination which i feel doesn't need alot of embellishing!
 I decided to layer my papers in a horizontal direction and used a series of punches to give the layering some extra interest. Here is a close up...

I hope that i have managed to show you 2 different looks and colour schemes that can be used with this range and that you will have a bit of play with them too!
happy Scrapping
Francine
Products Used
Crate Paper- Portrait Collection- Honeymoon
Crate paper- Portrait Collection- Vintage Lace
Pink Paislee- Nantucket Ribbon trim
Cheery Lyn Dies- Fanciful Flourish
Prima Flower
Prima Leaves
Basic Grey Black Alphas
Crate Paper Diecuts
White Bazzill Cardstock
Martha Stewart Punches
This week i wanted to share the second layout that i completed with the beautiful Crate Paper range "Portrait". This range covered alot of colour options- from red and green to brown and to black and white and yellow also which makes it very versatile to use for whatever photos you would like to scrap.
For my second layout i wanted to show you how you can use yellow- as i know that a lot of people hate yellow and tend to avoid using the colour in their albums. I think of yellow first and foremost as a happy summery colour but i think that when you use yellow and black and white it can also look stylish and elegant. That was the effect that i was going for in this layout! I tried to keep the layout pretty simple because i wanted the photos to be the dominant force of the layout and yellow and black is a pretty striking combination which i feel doesn't need alot of embellishing!


I hope that i have managed to show you 2 different looks and colour schemes that can be used with this range and that you will have a bit of play with them too!
happy Scrapping
Francine
Products Used
Crate Paper- Portrait Collection- Honeymoon
Crate paper- Portrait Collection- Vintage Lace
Pink Paislee- Nantucket Ribbon trim
Cheery Lyn Dies- Fanciful Flourish
Prima Flower
Prima Leaves
Basic Grey Black Alphas
Crate Paper Diecuts
White Bazzill Cardstock
Martha Stewart Punches
Subscribe to:
Posts (Atom)