Friday, 15 July 2011

OTP Inspiration with Sarah

I was lucky enough to play with this beautiful range this month....including some gorgeous stamps that make card making or embellishing your scrapbook easy!

I started off making a super simple tag book using these adorable Green at Heart die-cuts. This range called to mind summer for me, so I added a few photos of our summer exploits with my younger brother to flip through and act as memory prompts.

Image

Image

Image

Image

Image

Image

This is just a few of the pages, to see the rest, please visit the Basic Grey album.

Making this tag album was super simple:

1) Choose a selection of tags from the pack
2) Back the tags with papers from the Green at Heart Range
3) Lightly ink paper edges with distress ink
4) Add photos, flowers, brads to decorate. The photo edges were inked with Vintage Photo distress ink.

Some of the flowers in the album have been painted with Marigold Shimmerz - not only does it give a beautiful sparkle, it stiffens the flowers a little and makes them a little less vulnerable to wear and tear.

I love that the tags give me a place to journal (which I haven't done yet!) and the range of shapes make the tag album interesting while still being quick and easy to put together.

I also made a couple of cards with the Green at Heart Pocket Garden stamps - love these!
Image

For this card I have stamped a few of the flora type images, before stamping and cutting out the bird which is adhered with foam dots. The green strip is the lovely die-cut doily paper that also made it's way into the album. A wee tip for these type of stamps: if you're having trouble getting a clear image, give the stamp a very light sand with a sanding block, then clean the stamp before use. This gets rid of any film leftover from the manufacturing process and gives you a much clearer image.

This second card couldn't be easier - I love the clean and simple style of card making and these stamps are perfect for it!
Image

Sometimes, one layer cards can just be stunning. Using big images like this helps fill the space while keeping a clean look. To get the multicolour effect I have with the flowers, ink with a light dye ink first, then roll the edges of the stamp on a darker ink. Congrats - you just learned the "rock n roll" technique! Sometimes with smaller images I'll just dab the ink pad on the edge of the image to avoid covering the first colour completely.

I hope I've inspired you to give this gorgeous range a try! Even better - it's all currently on sale! yay!

Supplies:
Green at Heart Papers
Green At Heart - Die-cut Pieces
Green At Heart - Doilies - Ribbon
Green At Heart - Clear Stamp - Pocket Garden
Green At Heart - Glazed Brads
Paintz - Marigold
Assorted Prima Flowers
Distress Inks - Old Paper and Vintage Photo
Dye based ink for stamping images
Ribbon
White Card stock
Nestabilities dies and/or punches for cutting out photos

Have a great day!
Sarah

Wednesday, 13 July 2011

Inspiration Wednesday - 7 GYPSIES Mykonos RANGE

Hi everyone,

This month, my design kit included some 7 Gypsies Mykonos papers to create some layouts with. I found them to be quite a versatile colour range which works well with boyish photos to autumnal and outside photo shoots. I must admit they wouldn't have been papers I would have been drawn to in the shop but I actually really enjoyed how easy they were to create with.

Here is the first couple of layouts that I have created.

Image

Products used:
Fancy Pants Glitter Cuts To the Moon
7 Gypsies Mykonos Paper - Naxos (7g)
Simple Stories Destinations Stickers/Alphas
October Afternoon Campfire Label Stickers

And my second layout, I cut out some of the leaves from the papers, used a Martha Stewart leaves border punch and added a misted background with my new Prima mask.

Image

Products used:
Mykonos Paper - Paros (7g)
Mykonos Paper - Tinos (7g)
Mykonos Paper - Apollo (7g)
Simple Stories 100 Days of Summer Alphas
Glimmermist Wheatbeer
Martha Stewart Around the Page Punch
Kraft Cardstock

I will have another couple of layouts to share with you in a couple of weeks time with the same range of papers...

Tuesday, 12 July 2011

Tech Tuesday - Scraplift yourself

Hi ladies,

Today I'm going to share a very effective technique that you may not have tried before. Do you have those days where you want to scrapbook, but you've completely lost your mojo? You just aren't inspired. You sit there, shuffling papers around, but nothing really gels. I know, we ALL have those days!

A lot of people turn to online galleries, magazines, sketches and challenges when they are stuck for inspiration. Those are fantastic ideas, but how about this one: SCRAPLIFT YOURSELF!!

I'm sure you all have layouts that you just LOVE. You're really happy with how they turned out, you love the design and the colours, you love the finished product. Why not use one of these layouts as a starting point for your newest creation? Either use it as a sketch, or take inspiration from the colour palette (I have done both today).

Here's my original layout. I created this page a few years ago, but it's still one of my favourite layouts. I love the colours, the design, and the overall feel of the page.

Image

And here is my "lift". This time I used 2 photos, but the general design is the same. I also stuck with similar colours, as blue is my favourite colour and I love how it looks when different shades of blue are layered like this.

Image

I hope you've been inspired to pull out some of your old layouts and scraplift yourselves. Be sure to share with us if you do!

Happy Scrapping! :-)

Monday, 11 July 2011

Prima Mistables Canvas Sheet

The Prima Mistables Canvas sheets are quite versatile, there are so many things you can do with them to jazz them up, you paint, glimmermist, ink, emboss and stamp them.

I decided to emboss them with some Cuttlebug embossing folders and then used some glimmermist, Distress Ink and Shimmerz on them.

First I cut the flowers out, and then popped them into the cuttlebug die to give them some added texture.

Image

Image

then I added a mixture of Pumkin & Mel's diner Glimmermist on them, and for the leaves, I used Olive Vine Glimmermist.

Image.

Once the glimmermist had dried, I gently glided the Distress Ink - Vintage Photo over the flower so that the ink would darken the embossed / raised edges. Lastly once everything had dried, I put the flower together using a material brad, and then painted some Shimmerz paint - white on them, this allowed me to curl the edges of flower so when it dried it stayed in that shape.

Image

I promise you won't be disappointed, I am also thinking about running a class using these gorgeous sheets.... so watch this space

Friday, 8 July 2011

Product Focus - Cheerylyn Design Doily Dies

Well this month I got to play with 2 x Cheerylyn Design Doily Dies. The two which I got to work with, was the Italian Flourish and the Kiwi Doily.

Image
Image

They work pretty much the same as Spellbinders, you can use them in your cuttlebug together with your normal plates, the only extra goodies you will need are the Embossing Mats and the Metal plate.

To cut the Italian Flourish out, you will need your cuttlebug, put the A plate down first, and then the first B plate, your Doilie Die facing up, your paper and then the metal plate and lastly the second B plate, and whip it through the cuttlebug, I go through twice, just to make sure it has cut all the way through. It's quite easy to get the little cut out pieces out of the die, just flick it with your finger over the bin.
The Italian Flourish doesn't emboss, it's purely for cutting the shape out.

For the Kiwi Doily, you need to emboss first, put the A plate down first, then the B plate, place your Kiwi Doily die down with the paper on top, the embossing mats (both of them) and then the C plate. In order to keep the paper together, make sure you use a little sellotape to hold the die onto the paper so it doesn't move when you take it out and cut it out.

So once you have embossed, take the embossing mats out and replace it with the metal plate and your second B plate and whip it through the cuttlebug once or twice, and when you take it out it will be embossed as well as cut out perfectly.

Before you emboss, you can also dab some ink over the die, and then emboss it and once it is done, the actual lines etc will come through - it looks pretty cool when doing the Butterflies and the leaves, it looks soo real.

So here is my example which I have completed using both the above Dies, I have inked them - it's pretty cool to go over the embossed section with some ink,

Image

and a couple of close up of the Doilies which have been cut out

Image

Image

Check out the website where you can watch a video of how to do things, or check out all the lovely designs, Adrienne will be more than happy to order any of dies for you.

Wednesday, 6 July 2011

Inspiration Wednesday with Francine

Hi Ladies and welcome to Inspiration Wednesday!

This week i wanted to show you a couple of layouts using the new Imaginsce- Berrylicious range of papers. When i first saw them i thought mmmmm- not my usual style of papers what could i do with these? They would be great for baking or gardening photos- but i didn't have any of those so i thought why not use them for some birthday photos? I certainly have plenty of those to scrap and bright colours are perfect for birthday fun.

This is the first layout that i did...

Image

i went abit crazy with the stars but like the effect. I was really happy with this one as i normally never use these colours at all!

The second layout i used again some birthday photos- i kept this one more simple and rolled my edges using my quilling tool

Image

I hope that these layout inspire you to try some colours that you normally wouldn't use and also to try and scrap some multi- photo layouts of birthdays that normally get left at the bottom of the pile!

Happy Scrapping
Francine

Products Used

Berrylicious Papers- Berry Patch
Berrylicious- Sweet Summer Garden
Berrylicious- Just Peachy
Berrylicious - Fresh Phrases- Diecuts

Monday, 4 July 2011

Brand New Challenge - OTP

Yay - it's time for the first OTP challenge! I promise it's an easy one....

Image

This month I'd like you to make a set of cards with a matching box! You can make any size cards you like, and any kind of box. We're celebrating a Winter Wonderland this month, so use some icy blue and glittering rhinestones or glitter on your gorgeous creation!

Image

I love having little sets like this on hand for last minute hostess or teacher gifts. I made a pizza box (directions here) with little 3"x3" notecards and envelopes. The decoration on the box is all on a removable belly band.

Image

You can use stamps, chipboard, images cut from paper, rub-ons - whatever your heart desires! Make full size cards or mini, make them all different or matchy matchy - it's up to you! I like to keep the cards simple and sentiment free so they can be used for many occasions - this size are perfect to accompany flowers or a gift. Most of my decoration goes on the box which can be re-used once the cards are gone.

Image

I made all four of my cards the same, with variations in paper and the colour of Prima flower used. I hope you have fun with this month's challenge, I can't wait to see what you come up with!

Supplies:
Madeline Papers - Prima
Essentials 10 Flowers - Prima (looks like these are sold out!)
Rhinestones
MS Glitter and Gel Adhesive
Assorted stamps, punches and dies

Saturday, 2 July 2011

Monthly Sketch Challenge - Winter Wonderland

Gosh - we are in the 7th month of this year.... :wow: :wow: where has the time gone. This month we are celebrating Winter as we are in the midst of Winter at the moment, so the theme is WINTER WONDERLAND

I thought instead of just having a sketch, I would combine it with something else, so I googled WINTER WONDERLAND COLOURS and came up with these gorgeous colours, so your challenge this month is to combine some of the colours or all of the colours together with the sketch.

Image

here is my take on the sketch & colour combo

Image

and a couple of close up's of course :D

Image

For my flags I used my Glitz Love Games Banner Stamp and stamped directly onto Calico and then cut them out and use it for my title.

Image

Products used:-

Rocket Age Paper - Docking Maneuver
Red Bazzill Cardstock
Teresa Collins Notation Diecut Tags and used my Tim Holtz Cling Mount stamps on them - simply gorgeous :wow: :wow:
October Afternoon 5 & Dime - Shape Stickers
October Afternoon Mini Market Alpha Stickers
Basic Grey Basics Mono Alpha Stickers
7 Gypsies 97% Complete Label Stickers - Primitive
Glimmermist - Patina (Blue) and Mel's Diner (Red)

To be eligible to win the RAK from Adrienne you need to enter at least 2 of the challenges of the monthly challenge as well as getting the chance to be in the spotlight. You will be interviewed by Hannah and your interview and examples of your creations will be posted on the forum so that we can all get to know you and your fabulous work.

You have until 31st July to complete your layout and upload in the gallery over here http://scrappinpatch.co.nz/coppermine/t ... ?album=427

Happy Scrapping

Friday, 1 July 2011

1st Fortnightly Challenge - Ends 14th July

Hi everyone,

Wow I can't believe it is July already... where did JUNE go...

So this month it is all about WINTER! With July being the coldest month of the year ... it is only fitting that all the challenges will be around this wintery theme.

And I know you guys all love Multiphoto challenges so my challenge for you is to create a multi-photo layout that has more than 4 photos on it.

Here is my example layout... using my latest favourite Martha Stewart punch - the daisy border! And I used up some cardstock in craft and turquoise, The patterned paper is Simple Stories and very Old Scenic Route and Jenny Bowlin Alphas.

Image

You have till 14th July to place your layout in the gallery and remember, if you complete all 3 challenges during Jyly (the sketch challenge and the 2 fortnightly challenges), you might be chosen to be "In The Spotlight" next month!

Cheers
MICHELLE

Tuesday, 28 June 2011

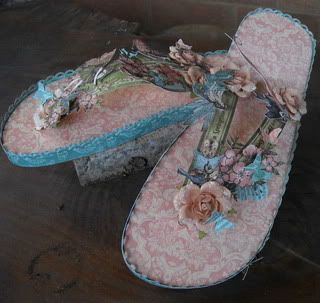
ALTERING JANDALS with Megan

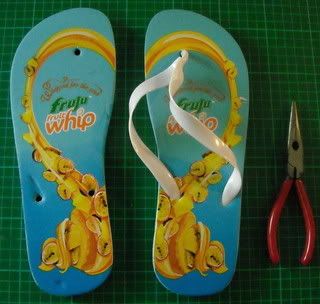
so this is what the jandals looked like before I revamped them - I think they're ugly but then I don't like jandals lol! Sorry Michelle!
I cut off the plastic straps and had to use the pliers to pull out the bits on the back of the jandal.

Image

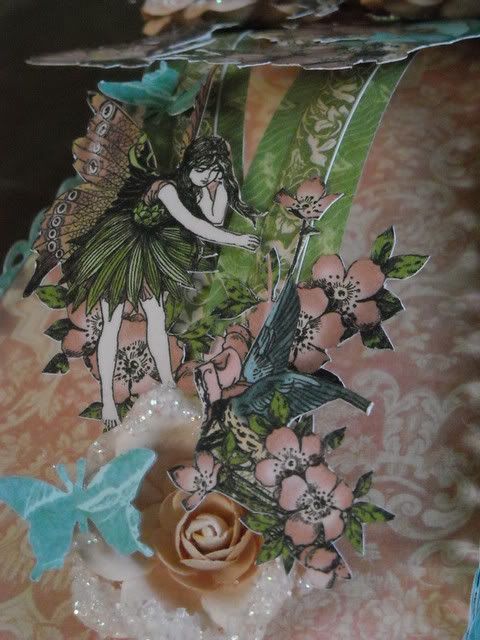
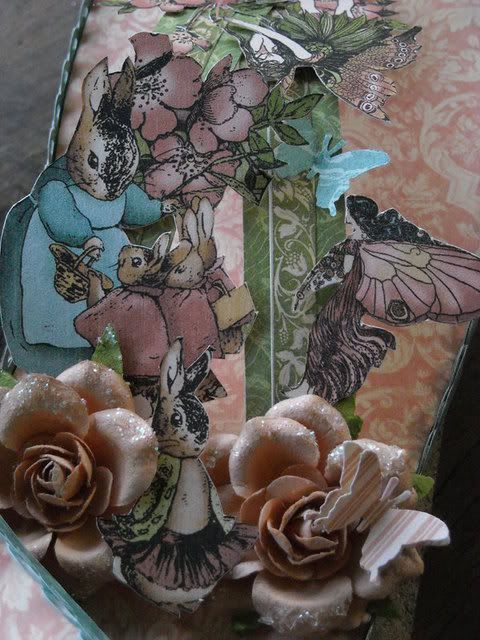
I cut strips of paper to replace the straps, and then did a lot of fussy cutting to decorate and some Prima flowers.

Image

Image

Image


Products used:

Once Upon a Springtime - Graphic 45
Prima Flowers
Martha Stewart butterfly punch
Fiskars border punch

Step by Step - Making your own cotton reels

Today I am going to show you how to make your own Cotton Reels, you can buy the kit from Collections, which gives you everything you need, but I thought I would try and make them myself.

Image

What you will need:-

- Cardstock or light weight card (you can actually use empty toilet rolls and cut them down the middle
- Pattern Paper - I have used some Collections Paper
- 4 x Chipboard Circles (I have used the Staples Chipboard buttons from Graphic 45)

1. Take the cardstock and using your index finger run it down the cardstock or card.

Image

2. You will see the cardstock will start curling, put a little adhesive at the end, and now roll it up tightly.

Image

3. Roll it up tightly and put some adhesive on the other end.

Image

4. Now cut a piece of pattern paper to the same width as the roll, and put some glue on the rolled up piece of cardstock and place it on the paper. Once it is adhered, start rolling the paper over the cardstock roll and once at the end of the roll, glue the other end of the paper down.

Image

5. Now take your four chipboard circles (cover or ink them if they are plain) or use the Graphic 45
Chipboard buttons which I have used and glue two together.

6. Take your covered Roll piece and glue it to the one button, once adhered, glue the other one down.

Image

Embellish as you wish, and now you have your very own cotton Reel.

Image

You see it doesn't take that long, hope you have found this tutorial useful.

happy Scrapping

Saturday, 25 June 2011

Little Yellow Bicycle - Product Focus with Michelle

Hi everyone,

I received the super cute Little Yellow Bicycle Envelope Album to play with...

Image

And Wow... after I got over the initial shock of the fact that I had to actually put together the album all by myself...I had great fun playing witih all the yummy goodies in the album kit.

The kit itself includes everything you need to produce the little Album. This 5.25 x 3.75" album comes complete with 43 pcs. - 5 reversible envelopes, 5 double sided cardstock inserts, 2 chipboard covers, 4 sheets of patterned paper, 10 washers & eyelets, linen string, and 2 binder rings. It also comes with very easy to follow instructions on how to put it all together. I used my crop-a-dile to punch the holes and to set the eyelets. Which I must admit I have never done... it just makes it so easy.

The envelopes are pre cut, prefolded and come double sided so you choose which side you wish to use.

I just used glue to adhere the little pieces of patterned paper to the album covers and inked around the edges. The small off cuts of patterned papers I used to punch out the little border strips embellishments.

This would make a super fun gift album for someone... perfect for little girls. I used some of my own embellishments but I know that the LYB range does some fun embellishments in the same Little Princess range which would work really well with the Album.

You can find the Album and matching embellishments in the shop here LYB Princess Range

So I decided to make a little Album for Taylor. I went hunting on the internet for several little poems that fit in with the general theme of how precious Taylor is in our lives and added these in on the little journalling cards. I added some embellishment details with my Martha Stewart border punches, butterflies and chipboard from MME.

I hope that Taylor will enjoy reading through this album when she is older and treasure it as much as we treasure her.

Thanks for looking!

All of the images are in my gallery if you want to see them bigger. For some reason, I can't get the images any bigger here http://www.scrappinpatch.co.nz/coppermine/thumbnails.php?album=293.

Image

Image

Image

Image

Image

Image

LinkWithin

Related Posts Plugin for WordPress, Blogger...