Okay, I have made my decision - which wasn't easy! I really loved ALL
the layouts and wish I could choose everybody, because you all worked
hard and every single page contained elements of my style.
In the end I have chosen the layouts that I think best represented my overall style.
1st place - Heidi (topkatnz)
2nd place - Beverley Warwick
3rd place - Sara Zenger
Congratulations,
girls! And thank you to everybody who participated this week. I hope
you had fun, because I really enjoyed seeing all your creations in the
gallery. It was a real honour to be chosen as a STAR, so thank you
Adrienne!
Friday, 29 June 2012
Wednesday, 27 June 2012
Stars in their Eyes - Week 8
Hi everyone!
Lana here with your next fabulous STAR. It gives me great pleasure to introduce Dawn McVey!
Hi there! My name is Dawn McVey and I've been stamping for quite a few years now. I got started in paper-crafting by making cards that friends and family eventually started asking to purchase from me. In the fall of 2007, I started my blog and started submitting my work to magazines and since then, have had over 100 projects published in various paper-crafting magazines.
In July of 2008 I accepted a position on the Design Team for Papertrey Ink and in February of 2009, I became a Stamp/Product Designer for Papertrey as well. I am thoroughly enjoying working with such a creative and innovative company. In the summer of 2009, I was laid off from my office job and my husband and I made the decision for me to work from home, full time, as a designer. At the time, it was a very hard decision to make, with the uncertainty of losing the guaranteed income that came with that day job. It was not a move we would have chosen to make on our own at that time, however, several years later, Bart and I can both say that God clearly had other (better!) plans in store for us and this career change has certainly been a tremendous blessing! I love working from home and have so enjoyed adding many new products to my Raspberry Suite product line over the last few years! In 2011, I also joined the Studio Calico Design Team and have been enjoying working with their kits of products each month.
God has blessed me abundantly with a job that I love and with a wonderful husband that encourages me to follow my dreams! Bart is my best friend and I'm so grateful to get to share each day with him. We love traveling and spending as much time together as we can. We also have a one year old labrador retriever, Windsor, who is as lovable as they come! He's my little (big!) shadow in the studio each day and he's brought so much joy to our lives.
It's a wonderful life and I'm so, so thankful.
You can visit Dawn's blog at dawnmcvey.typepad.com
Here are some examples of Dawn's gorgeous style...
Here is my take on Dawn's style:
Your challenge is to design a card in the style of the STAR, (not a scraplift of any of the STARS' designs) so be sure to do your homework and check out Dawn's blog to see what inspires you the most.
JUDGING
They will then be judged by Dawn! Each week points will be awarded for first (4 pts), second (3pts) and third (2pts), and all other entries will receive 1 pt. At the conclusion of the competition the one with the most points will bag the STAR prize, with second and third receiving a consolation prize.
Have fun ladies! I can't wait to see your beautiful work! Your cards should be uploaded over here... http://scrappinpatch.co.nz/coppermine/index.php?cat=64 by 8pm Tuesday 3rd July 2012.
**NOTE: Please include a blurb about what aspect of the STAR's designs and style have inspired you, and how you incorporated them into your card. Additionally, please include your name in the title of your layout to assist with the judging- thanks!!**
Tuesday, 26 June 2012
More PP Spring Jubliee Inspiration
Hi,
This is the last layout I have to share with you that I have created with the Pink Paislee Spring Jubilee collection.
I really wanted to create another multiphoto layout but using bigger photos and not small ones and this time around I fussy cut out the flowers and the birdcage from the Spring Jubilee - Bash patterned paper and used it to create frames around my photos. The one thing I have discovered when using this collection is that the bright colours work especially well with black and white photos as the brightness in the papers really draw your eye into the photos themselves.
To give the layout texture and more dimension I used a dienamics rolled roses die and created cute little paper flowers which you can see above to go along side some Prima flowers. I have also added a Butterfly from a Spellbinders Fanciful Flight set and finished off the layout with some chipboard from MME Follow Your Heart collection.
I hope you have enjoyed my latest inpsiration and thanks for stopping by the blog today.
Cheers
//Michelle
Labels:
die namics,
DT Inspiration,
michelle whorwood,
Pink Paislee,
prima
Saturday, 23 June 2012
Stars in Their Eyes - Week 6 - WINNERS
Hi ladies! I woke up this morning to an email with Piradee's winners!
After a lot of agony and a whole lot of Internet problems, here's what Piradee said:
"Winners are:
1. "Friends" by Topkatnz
2. "Us" by Megz99
3. "Watching & Waiting" by Hayley
And as most of the ladies guessed my addiction to washi tape, I have some that I would like to giveaway to the following ladies as a little special prize.... (3 rolls per person)
1. Topkatnz
2. Megz99
3. Hayley
4. Kelly Foster
5. Beverley Warwick
6. Andrea Davey
7. Trace
8. Robbi
If everyone could email me their mailing address, will get this out in the mail for them!"
Wow, Piradee, so generous!
OTP Inspiration : Rebecca
Another project for Scrappin Patch to share with you today!
For this father's day, my husband informed me rather suddenly that he had every intention of celebrating it. I of course was more than happy to comply as I love any excuse to celebrate! Our little one is not due until August, but just because it is a little shy doesn't mean that we cannot enjoy being parents already ... I had a little trouble knowing what to put on the card, but once I got past that, this card just came together and my husband loved it.
SUPPLIES
Prima : Paper and cardstock
Prima : Paper and cardstock
Vintage buttons
Cosmo Cricket : Type font
More great Prima product to work with, though I choose a much simpler card this time. That seems to be a trend in this household. The cards I make for girls tend to get very "product heavy", while my masculine cards are much more CAS. How do you do it?
Thanks for looking!
Thursday, 21 June 2012
OTP Inspiration
Hi Everyone!
I thought I would show you something today, that some of you might not be aware of in the shop that is available for purchase. Adrienne has an Accucut diecutting machine and whole lot of different dies for it. She has a variety of shapes and styles for you to pick through, so I thought I'd show you some of my favourites. You can see some of them here. I decided to make a mini album, so I chose some of the rectangular dies with funky edges - tabs scallops and bracket shapes.
On the front cover I used a smaller piece with a window precut out of it. Popped a piece of transparency behind and added a rubon quote to it, tied some tulle on the rings and added a Prima flower from my stash.
I have also used the same range of paper throughout the album Prima's Pixie Glen - its just the cutest range of paper for babies and it went perfect with my theme, and theres still some in the shop!
So, meet little Indie Grace, is'nt she just the cutest :)
I wanted this album to show some different techniques as well, so Ive altered metal with paint, used texture paste on Primas gate stencil, and I also went into my stash of rubons and rubbed onto transparencies and ribbon.
These next two pages are my favourites combining texture paste and altering Tim Holtz's metal angel wings with paint. Ive also used Vintaj metal embellishments, but left these as they were - theres quite a variety of these in shop.
The best thing about these albums is that once you decide which pages you want Adrienne can then cut the patterned paper you want too, so you have a perfect fit without having to cut and sand back - saves a lot of time! You can also have square pages as well! Go check it out - I'd love to see how you go :) In the meantime, this will be in the shop on Friday for you to have a look at it.
Happy Scrapping!
Megan
Wednesday, 20 June 2012
Stars in Their Eyes - Week Seven
Week 7 already - that means only two more weeks to go. Well done if you have been with us from the beginning. If you haven't joined in yet be sure to create this week and upload it to our gallery. Read on for details.....
And my STAR is previous DT member - HANNAH BLAIR.....
Hi, my name is Hannah and I live on the beautiful Hibiscus Coast, just
north of Auckland, NZ. I've been married to Rob for 13 years, and we have
2 gorgeous boys, Ethan (10) and Tyler (7). I work full time from home as
a medical writer. I really enjoy writing, and my other interests
include reading, photography, baking, music and scrapbooking (of course)!
I started scrapbooking in 2005 when Tyler was a baby. It is a creative outlet for me, and I view scrapbooking as a form of art. I find it therapeutic and relaxing, and love getting together to scrap with friends. Preserving memories for my family is a bonus, and my boys love looking back on my albums and reliving those moments.
Over the years, I have been published several times in Up2Scrap, Scrapbooking Memories and For Keeps magazines. I have also been on several Design Teams, including Scrappin' Patch for a few years. I'm currently on the Design Team for Challenge Me Happy.
To see some more examples of my work, head to my blog (http://www.blairsboys.wordpress.com) and choose the "Scrapbooking" category. Lots of layouts there!
Hannah
Here are some examples that are typical of Hannah's style....
Your challenge is to design LO in the style of the STAR, (not a scraplift of any of the STARS' designs) so be sure to do your homework and check our her blog to see what inspires you the most.
JUDGING
They will then be judged by HANNAH!! Each week points will be awarded for first (4 pts), second(3pts) and third (2pts), and all other entries will receive 1 pt. At the conclusion of the competition the one with the most points will bag the STAR prize, with second and third receiving a consolation prize.
Have fun ladies, and I cannot wait to see what you have created.....your layouts should be uploaded over here... http://www.scrappinpatch.co.nz/coppermine/thumbnails.php?album=506 by 8pm Tuesday 19th June 2012.
**NOTE: Please include a blurb about what aspect of the STAR's designs and style have inspired you, and how you incorporated them into your layout. Additionally, please include your name in the title of your layout to assist with the judging- thanks!!**
And my STAR is previous DT member - HANNAH BLAIR.....
I started scrapbooking in 2005 when Tyler was a baby. It is a creative outlet for me, and I view scrapbooking as a form of art. I find it therapeutic and relaxing, and love getting together to scrap with friends. Preserving memories for my family is a bonus, and my boys love looking back on my albums and reliving those moments.
Over the years, I have been published several times in Up2Scrap, Scrapbooking Memories and For Keeps magazines. I have also been on several Design Teams, including Scrappin' Patch for a few years. I'm currently on the Design Team for Challenge Me Happy.
To see some more examples of my work, head to my blog (http://www.blairsboys.wordpress.com) and choose the "Scrapbooking" category. Lots of layouts there!
I hope you enjoy
creating a layout in my style, and I am really looking forward to seeing all
your creativity!
Hannah
Your challenge is to design LO in the style of the STAR, (not a scraplift of any of the STARS' designs) so be sure to do your homework and check our her blog to see what inspires you the most.
JUDGING
They will then be judged by HANNAH!! Each week points will be awarded for first (4 pts), second(3pts) and third (2pts), and all other entries will receive 1 pt. At the conclusion of the competition the one with the most points will bag the STAR prize, with second and third receiving a consolation prize.
Have fun ladies, and I cannot wait to see what you have created.....your layouts should be uploaded over here... http://www.scrappinpatch.co.nz/coppermine/thumbnails.php?album=506 by 8pm Tuesday 19th June 2012.
**NOTE: Please include a blurb about what aspect of the STAR's designs and style have inspired you, and how you incorporated them into your layout. Additionally, please include your name in the title of your layout to assist with the judging- thanks!!**
Monday, 18 June 2012
Product focus with Michelle
Hi
Hope you are wrapped up warm and cozy on this winter's day. It is pretty miserable and wet here in Auckland - a perfect day to spend inside.
Today, I was going to do a product focus for you on the gorgeous Prima Shabby Chic Resin Shapes but I noticed that when checking out the shop to link up the product on this blog post.. that there isn't much of it left in stock. So I decided to talk about SEVERAL different products that I have used this month as they are pretty cool too.
I have used Pink Paislees' Spring Jubilee patterned papers mixed in with a small amount of MME Follow Your Heart to create the basis of my layout below. This is fun, bright spring like paper range which is so lovely to work with this time of the year with the cold weather outside.
Okay, I will start by talking about the Prima shabby chic resin. These are totally gorgeous as it goes without saying with the Prima product lines. I particularly like to use them clustered with amongst flowers and thought the lamp post fit in really well with the patterned paper. To be honest, I prefer to use these resin shapes au naturel. They really don't need a lot of work as they are gorgeous in their own right. It couldn't be easier to just adhere the resin to your page where you want it. Of course, if you wish you could add a little colour to the resin by using products such as mists, inks or stains to match in with your project.
Next, I created the cute little tulle flowers using Trim from Glitz Design and adhering it in a circle pattern onto some Cosmo Cricket Glubers. These giant glue dots come in 3 different sizes and make it super simple to create your own fabric flowers. To create these tulle flowers I just twisted the tulle and then stuck it to the outside of the circle and moved inwards until I had reached the centre of the Gluber. I then used my hot glue gun to stick a sweet button from MME Sweet Caroline Range .
I finished off the layout using a mix of Prima flowers, some masking, a little banner and I fussy cut out some of the PP - Spring Jubilee: Party patterned paper to fit in under the lamp post. Finished off by adding my title in the negative space of my photo.
I hope you have enjoyed my little product focus today!
//Michelle
Labels:
Cosmo Cricket,
michelle whorwood,
Pink Paislee,
prima,
Product Focus
Friday, 15 June 2012
a little Paradise...
You know how sometimes products can be overlooked. Maybe because they are not so new. Maybe they are not showcased in the shop so well. Well I'm here to take those lonely little lines and shed some light on them. A little like an extreme makeover (without any bus to move). So here we have Little Yellow Bicycle's Paradise. Cute. Not "too pink", with heaps of embellishment options.
I really enjoyed using this line to create this layout of my darling wee niece, the colors tying in beautifully with my photo. I really liked the doodled boarder of the Happy Dots paper so decided to use it as the boarder of my layout. I distressed a cream piece of Bazzill cut down to reveal this doodled edge then added the bannered title from the Paradise Cardstock Stickers. Using the patterned papers Earthy Dots and Simple Pleasures, I layered them in the bottom right corner of the layout, with an old manilla tag and the Paradise Chipboard Slider. Finishing off with the card stock stickers that I adhered using foam squares, these little birds are just delightful.
I really enjoyed using this line to create this layout of my darling wee niece, the colors tying in beautifully with my photo. I really liked the doodled boarder of the Happy Dots paper so decided to use it as the boarder of my layout. I distressed a cream piece of Bazzill cut down to reveal this doodled edge then added the bannered title from the Paradise Cardstock Stickers. Using the patterned papers Earthy Dots and Simple Pleasures, I layered them in the bottom right corner of the layout, with an old manilla tag and the Paradise Chipboard Slider. Finishing off with the card stock stickers that I adhered using foam squares, these little birds are just delightful.
So next time you pass by those darling little lines that you've seen time and time again take a closer look. Sometimes its just a fresh layout design that is needed to give these fabulous designs a new lease of life.
With love,
Belinda
Thursday, 14 June 2012
OTP Inspiration : Rebecca
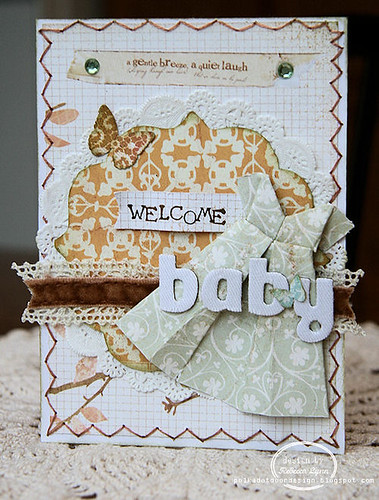
A few months ago I saw an adorable little card with a handmade dress embellishment and decided then and there, I was going to master the skill. It took a little bit of searching since I had never attempted origami before and had no idea where to begin, but I finally found a a youtube tutorial that helped me through the process and help me create something that has become one of my favourite little tricks that I've picked up. I've attached the youtube link to this post as well, just in case my photo tutorial and instructions are a little hard to follow. It took me a few tries to get it just right.
My most recent Scrappin Patch kit came full of yummy Prima Songbird papers and they were just the right texture and pattern for this little dress. You don't want to use a really heavy paper because it doesn't fold easily, but you also don't want to use a lightweight paper as it will tear! Some medium is perfect.
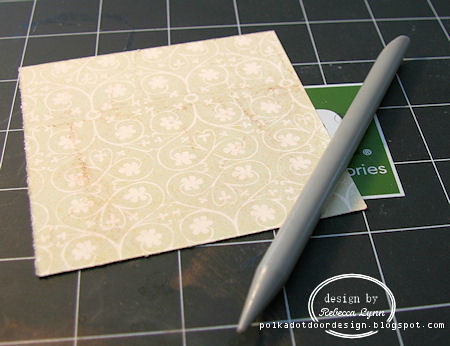
The only tool you (may) need is something to press the folds and help get them nice and sharp. But fingers work well too! You want a square piece of paper approx. 1/2 inch larger than the finished size you want to end up with. In this case, I am using a 3.5 x 3.5 inch square.
Again on the backside of the bodice, fold the sides of the bodice in, you may have to crease the skirt a bit to help everything line up as well. Then take the corners of your turned in sides and fold them out again, creating the sleeves.
My most recent Scrappin Patch kit came full of yummy Prima Songbird papers and they were just the right texture and pattern for this little dress. You don't want to use a really heavy paper because it doesn't fold easily, but you also don't want to use a lightweight paper as it will tear! Some medium is perfect.
The only tool you (may) need is something to press the folds and help get them nice and sharp. But fingers work well too! You want a square piece of paper approx. 1/2 inch larger than the finished size you want to end up with. In this case, I am using a 3.5 x 3.5 inch square.
Fold your paper in half. Crease this line well.
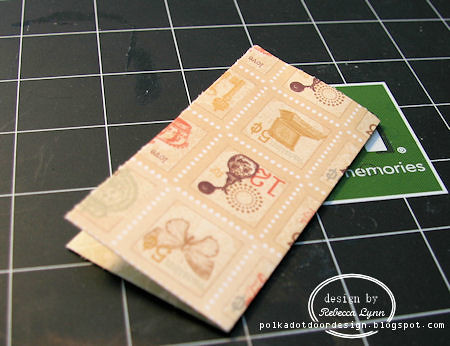
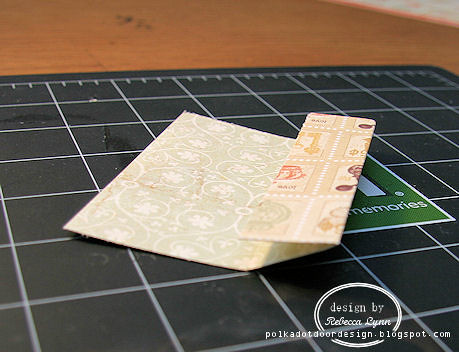
Then unfold your paper, and fold the edge to the center crease.Repeat with the opposite side.
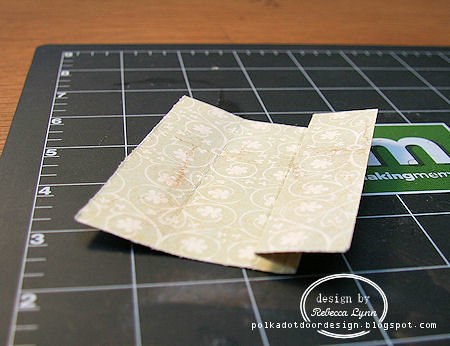
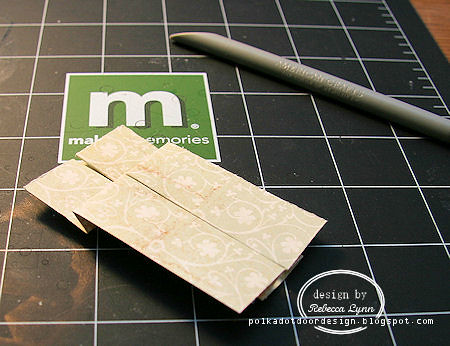
Unfold your paper again and fold half of your halves, in half again. Its a bit complicated to explain, but hopefully you can see what I mean in the photo. Repeat. The end result is that you want it to look like this :
Be sure to crease these folds well. This is the basis of your dress form and the sharper the lines are, the better.
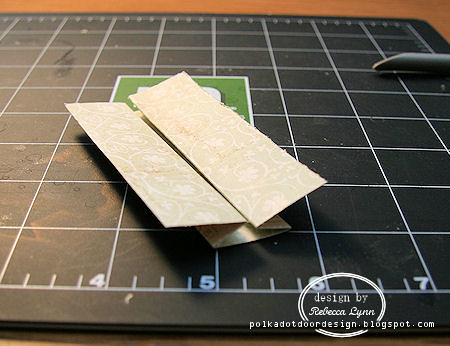
Now turn your paper over and fold it at about the 1/3 line. This fold is very customisable, as it creates the separation between the skirt and the bodice of the dress. Depending on the style of dress you want to create, you may want to change the length of this fold.
Fold it once over itself so that your paper now looks like this.
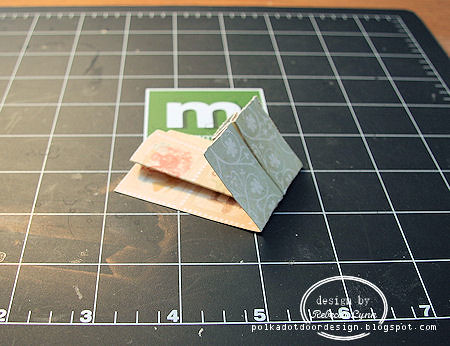
To create the full dress, you want to gently pull one section of the skirt so that you are opening up the part from the bottom up. The waistline will no longer be straight across, but a slight "v" once both sides of the skirt are pulled open. Crease these lines sharply.
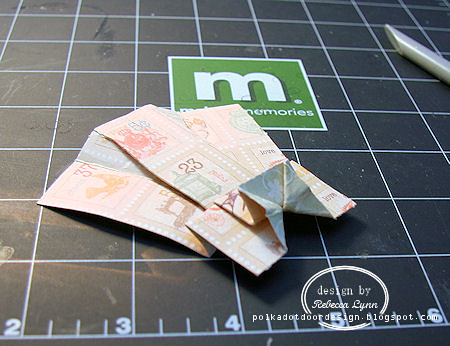
We're now creating the neckline. Bring the corners of the topmost layer of the paper and fold inwards.
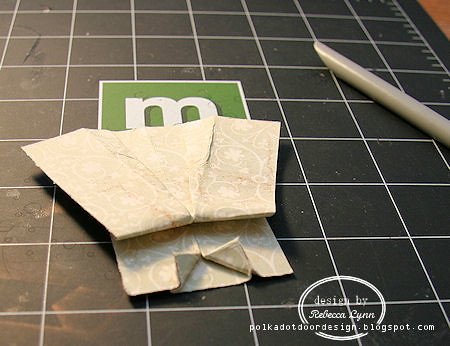
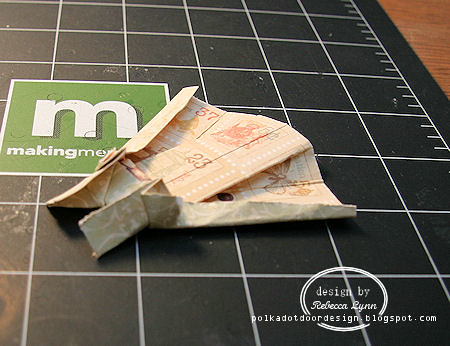
This is probably the trickiest part of the dress... Unfold your neckline, turn the dress over and pull the corners inside, pulling down the excess paper as you go so that there is a full "v".
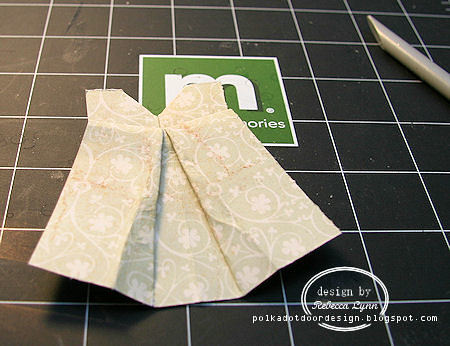
This is how the front should look.
and thats it, you're done! Hope you were able to understand my instructions! The youtube video is an excellent resource if you get stuck.
I just love how easy this dress is once you get the hang of it. You may need to practice on scrap paper before you attempt working with your nice paper, but its such a fun little dress, and perfect for so many applications. Now that I know how, I have to tell myself not every card needs a dress. Little boys really are more into trucks and puppy dogs ....
Thanks for stopping in!
Subscribe to:
Comments (Atom)


