Tuesday, 28 June 2011

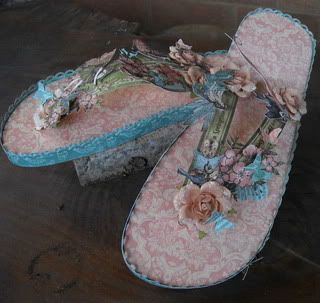
ALTERING JANDALS with Megan

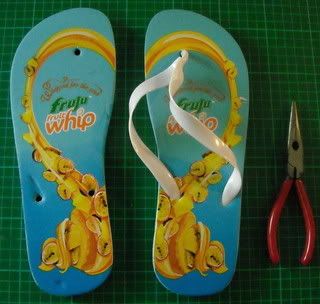
so this is what the jandals looked like before I revamped them - I think they're ugly but then I don't like jandals lol! Sorry Michelle!
I cut off the plastic straps and had to use the pliers to pull out the bits on the back of the jandal.

Image

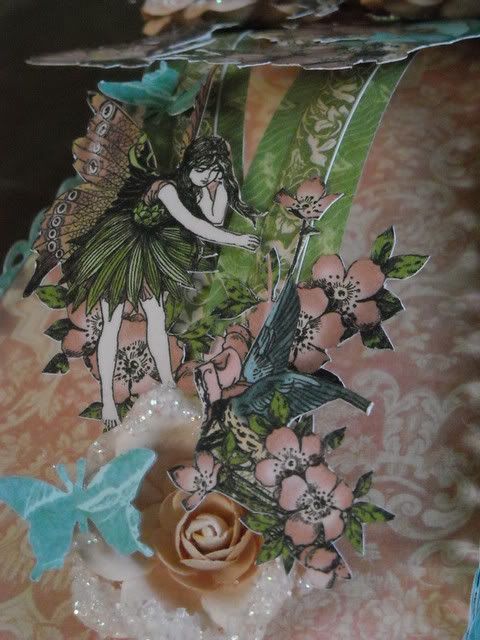
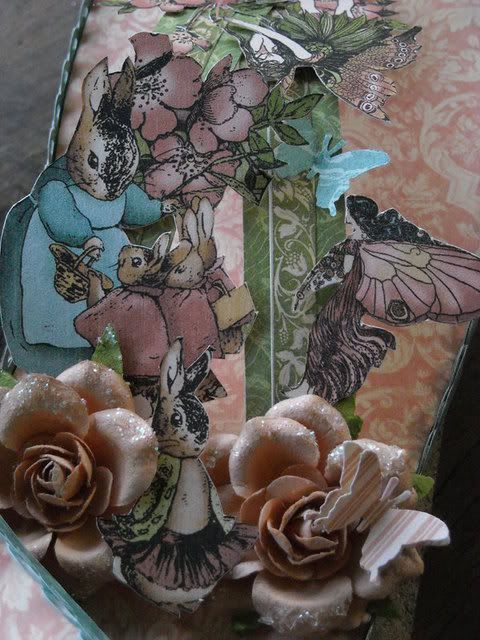
I cut strips of paper to replace the straps, and then did a lot of fussy cutting to decorate and some Prima flowers.

Image

Image

Image


Products used:

Once Upon a Springtime - Graphic 45
Prima Flowers
Martha Stewart butterfly punch
Fiskars border punch

Step by Step - Making your own cotton reels

Today I am going to show you how to make your own Cotton Reels, you can buy the kit from Collections, which gives you everything you need, but I thought I would try and make them myself.

Image

What you will need:-

- Cardstock or light weight card (you can actually use empty toilet rolls and cut them down the middle
- Pattern Paper - I have used some Collections Paper
- 4 x Chipboard Circles (I have used the Staples Chipboard buttons from Graphic 45)

1. Take the cardstock and using your index finger run it down the cardstock or card.

Image

2. You will see the cardstock will start curling, put a little adhesive at the end, and now roll it up tightly.

Image

3. Roll it up tightly and put some adhesive on the other end.

Image

4. Now cut a piece of pattern paper to the same width as the roll, and put some glue on the rolled up piece of cardstock and place it on the paper. Once it is adhered, start rolling the paper over the cardstock roll and once at the end of the roll, glue the other end of the paper down.

Image

5. Now take your four chipboard circles (cover or ink them if they are plain) or use the Graphic 45
Chipboard buttons which I have used and glue two together.

6. Take your covered Roll piece and glue it to the one button, once adhered, glue the other one down.

Image

Embellish as you wish, and now you have your very own cotton Reel.

Image

You see it doesn't take that long, hope you have found this tutorial useful.

happy Scrapping

Saturday, 25 June 2011

Little Yellow Bicycle - Product Focus with Michelle

Hi everyone,

I received the super cute Little Yellow Bicycle Envelope Album to play with...

Image

And Wow... after I got over the initial shock of the fact that I had to actually put together the album all by myself...I had great fun playing witih all the yummy goodies in the album kit.

The kit itself includes everything you need to produce the little Album. This 5.25 x 3.75" album comes complete with 43 pcs. - 5 reversible envelopes, 5 double sided cardstock inserts, 2 chipboard covers, 4 sheets of patterned paper, 10 washers & eyelets, linen string, and 2 binder rings. It also comes with very easy to follow instructions on how to put it all together. I used my crop-a-dile to punch the holes and to set the eyelets. Which I must admit I have never done... it just makes it so easy.

The envelopes are pre cut, prefolded and come double sided so you choose which side you wish to use.

I just used glue to adhere the little pieces of patterned paper to the album covers and inked around the edges. The small off cuts of patterned papers I used to punch out the little border strips embellishments.

This would make a super fun gift album for someone... perfect for little girls. I used some of my own embellishments but I know that the LYB range does some fun embellishments in the same Little Princess range which would work really well with the Album.

You can find the Album and matching embellishments in the shop here LYB Princess Range

So I decided to make a little Album for Taylor. I went hunting on the internet for several little poems that fit in with the general theme of how precious Taylor is in our lives and added these in on the little journalling cards. I added some embellishment details with my Martha Stewart border punches, butterflies and chipboard from MME.

I hope that Taylor will enjoy reading through this album when she is older and treasure it as much as we treasure her.

Thanks for looking!

All of the images are in my gallery if you want to see them bigger. For some reason, I can't get the images any bigger here http://www.scrappinpatch.co.nz/coppermine/thumbnails.php?album=293.

Image

Image

Image

Image

Image

Image

Thursday, 16 June 2011

Introducing our new Off the Page Design Team Members

We are thrilled to welcome two wonderful new designers to the Patch family!!! I am sure they will inspire and challenge you with their amazing talent. Join me to :welcome: Megan & Sarah.

Image"Hi, I'm Sarah! I live in Wellington with my husband Shanan, my high school sweetheart. We've been in Wellington for almost three years but were born in Invercargill and spent 8 years living and studying in Dunedin. We have two extremely spoiled cats, a Balinese named Gabriel and a Silver Shaded Persian named Luna. Needless to say, all of my creations carry a little bit of extra "embellishment" in the form of cat hair!

I've been crafty and creative my whole life. As a child I distinctly remember saving the foil from easter eggs and cutting it into tiny pieces to store in a tic tac box and use as glitter! As an adult, with a whole drawer full of glitter, I often look around and wonder at how excited that little girl would be to play in my craft room! I love paper crafting and stamping and make time every day to indulge my obsession! I also enjoy crochet, sewing and quilting, jewellery design and cake decorating. When I'm not creating I'm usually curled up in my favourite chair with a book - I love everything from a sappy romance to a great mystery or horror novel. My favourite authors are Nora Roberts, Janet Fitch, Dean Koontz and Stephen King.

I'm looking forward to becoming a part of the Scrappin' Patch family and stretching my creative wings with some awesome products - hopefully inspiring you along the way!"

And some lovely examples of Sarah's work..

Image

Image

Image


INTRODUCING MEGAN.....
Image
Hi!
My name is Megan Gourlay, and I live 5 mins north of Christchurch, in Woodend, with my husband Forbes - yes that really is his first name!, and our two fur babies, Dougal and McKenzie.
Im a bit of an old fashioned chick, in that I love anything heritage, whether Im scrapping layouts, or reading etc. So my scrapping does tend to feature heritage layouts at times.
I started off making cards originally back in 2001 and did nothing else for a long time. Some years later I ventured into OTP, and layouts came along a long time later. OTP remain one of my favourite things to scrap!
I love distressing things, inking and stamping so you will find a lot of my OTP or layouts tend to incorporate those things. I love creating girly things, and find items for boys more of a challenge, but Im quite stubborn by nature, so I don't give in!
Ive been on the DT at Artistic Document, which is based in Australia for the last 12months, and I also have been teaching classes for the past three years.
Im delighted to be invited to join the DT at 'the Patch', and look forward to showing you some OTP tricks and hopefully teach some classes!


Image

Image

Image

Tuesday, 14 June 2011

Scrap Tech Tueday - Corner Punches

Hi Ladies and welcome to Scrap Tech Tuesday.

This week i wanted to show you an inexpensive way to make your own diecut shapes using your corner punches. With the popularity of spellbinders and other dies this is a poor mans version that will still give you some great results. i used 2 different punches to show you the different effect that you can get and then used both on a layout.

Here are the 2 punches that i used - but any that you have will work too...

Image

Firstly i cut out some circle shapes- the bigger the circle the easier it is and the better effect with some punches but have a play ...
You have to line up your punch- looking at the bottom of the punch as you line it up - just above the edge of your circle and punch hard. This is the result.

Image

Then watching very carefully on the bottom of your punch line it up as best you can just above the edge and to the right of your last punch...
Image

Once you have punched the whole way round it will look like this - with triangles between each punch - these can be popped out ..

Image

The finished diecut shape

Image

I then used a different punch to do some smaller circles in a different colour.

Image

I then created this layout using the three punches circles...this is my second daughter Ella who has the KEMP hair (my maiden name) hence the wordplay in the title.

Image

Products Used

Prima Botanical Paper - Sweetheart
Prima Alphas
Prima Flowers
Bazzill Cardstock
Pinecone Ink
Kaisercraft Ribbon
Creative Imaginations- Leaf paper

i hope that you will give this technique a try...

Happy scrapping

Francine

Friday, 10 June 2011

Photo Editing in Picasa 3

Hi Girls,

Adrienne has had a couple of queries in the shop of how I change the "look" of my photo's. I used a free photo editing programme called Picasa 3. If you are looking for a photo editing programme, the download for Picasa 3 is http://picasa.google.com/. It's really easy to work with, and my recommendation is just to play around with a couple of photo's and all the goodies it has to offer.

You can change a normal photo to black / white or sepia / or even newsprint, and those nice soft shadows around the photo's, you can do it all using this programme.

So here is the photo which was uploaded directly into Picasa. You will see there are three sections,
Basic Fixes, Tuning, Effects.

Image

In Basic Fixes you can crop your photo, straighten the photo, remove red eye, add texts, colour contrasts and also using the "Magic Button" - I;m feeling lucky - this button just automatically fixes the photo. Below all I clicked is "Feeling Lucky" and you can already see the difference in the brightness of the photo.

Image

Next I go to the second panel, "Tuning" where i play around with the Fill Light, Highlight and shadows, and by moving the little indicator you can change the colour of your picture completely. You can see already from the initial picture the picture is darker,

Image

Here I moved the "highlights" indicator towards the right and it brightens it up but still keeps the shadows which you have already changed.

Image

If you go to the last panel "Effects" - this is where you can change your photo into black & white, sepia, sharpen the photo, tint it, saturate bright colours etc. In the photo below I have clicked the "Warmly Button" which brings out the natural colours of the photo, it seems to give it earthy colours.

Image

and in the last photo I have changed the same photo into black & white. What I normally do is if I want a black and white photo - I change it to black and white first and then go to the second panel and play around with the Brightness, Highlights & shadows and you will be thrilled with the results.

Image

Here are a couple of other photo's which I have played around with

Image
Image
Image
Image

My best advise is just play around to see what you like, I hope you have the above tutorial helpful and let me know if you have any questions.

Happy Editing

LinkWithin

Related Posts Plugin for WordPress, Blogger...