Thursday, 19 July 2012

On the Go with Bo Bunny

Scrapping the boys used to be a bit of a challenge as there were sooooo many gorgeous girl papers, but not many for the little rascals in our lives. Now, however, manufactures are producing some wonderful boyish ranges, and truly nothing says cars, trucks and zoom like Bo Bunny's On the Go range. This selection is so versatile and can be adapted to many styles. I chose to think outside the square a little on this rather than using the 'whole" papers, I cut them up which was more 'my thing' and created a layout using 'white' space and paint to co-ordinate with the range. I cut embellishments from the ArgyleOn the Go, and Planes papers and arranged them around the double matted photo which used the b sides of the Planes and Scooter papers.


These were also sewn onto the page as were the diamonds that were cut and inked from the Argyle paper. Using foam tape to create depth and small stickers from the Dimensional Stickers sheet, along with washi tape, I think the Bo Bunny range has really complimented my photo and in true boyish style.


Thanks, and enjoy scrapping those boys!
Love Belinda

Wednesday, 18 July 2012

Catch The Wave with Fancy Pants!

Hi Scrappin Patch Fans!  Sara Zenger here again to show you more fun with the Fancy Pants Wave Searcher line!


 I had so much fun with this layout!  I love the sheets of paper that come with all the little cut out cards! I took this sheet and cut all the cards out then cut my photo to match the size.  This allowed me to create a great grid on my page.  I outlined all of the cards and photo with some of that amazing Glimmer Glam by Tattered Angels.  I added a border to the bottom of the layout and then had FUN with the Chipboard embellishments and coordinating buttons!

If you like what you see head on over to the Scrappin Patch Shop to get yours today!

Sara

Monday, 16 July 2012

OTP Inspiration: Rebecca

This is my last post for a few weeks as I'm taking a a little bit of a break for a rather important event in our lives :) Our little one is due in about 3 weeks, and with having just moved house we decided a few weeks off from my scrapbooking room (the husband has literally locked the door so I'm not tempted ... ) so I could concentrate on the next few weeks. Needless to say we are extremely excited to meet our little one!

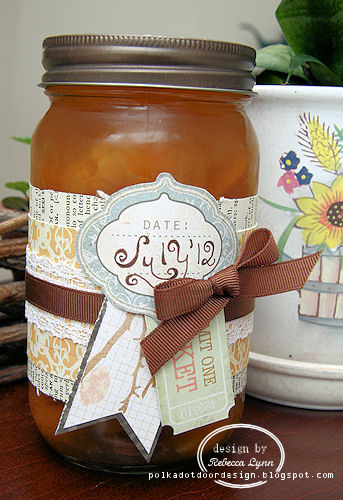
For my this post I have two projects I wanted to share, both using up the bits and pieces that I've collected from the gorgeous kits that I have been sent. My first project is a dolled up jar full of preserves. I love the idea of giving home made food gifts and love finding fun ways to dress it up. These papers from Prima were the touch I needed.

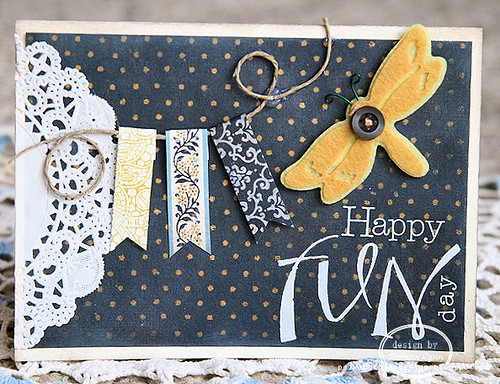
 and to go with it .... a card made from the this and that. Do you ever have paper that you can't remember who its made by? After my initial projects made from this kit, these pieces found their way into my scrap stash and I completely lost track of what they were. I do know though, that you can find the exact papers in the Scrappin Patch store. Maybe you should head on over there and do a little detective work. I'd love it if someone came back with some information :)

Thank you so much for being part of my adventure. 

Sunday, 15 July 2012

Simply scrap your stories - part 1

Welcome to the first installment of many in my new series about how to scrap your stories in a simple way.

I will be using the very clever "Mix & Match album" from Simple Stories, and the paper series "Summer Fresh" from Simple Stories as well. I will also add bits and bobs from my stash, to match my stories and the colours in the album.

The album pages are approx 6.5 by 8 inches, but the best thing with this idea is that it all comes with the pack. Sure you can add WHATEVER YOU WANT to your album, but if you don't have an evergrowing stash, there'll be lots to choose from in the pack.

This is what the album looks like:


Now, because I scrap quite frequently, and I also do Project Life, I had to have a think about what my theme for this book was gonna be. I dindn't really want to "double up", if that makes sense. I decided on something that I know my family is gonna LOVE - photos and stories about my kids around their birthdays! So my first installment shows my beautiful girls at birth.

Now, I haven't decided on what my front page is going to look like, or even the tab dividers inside the album, but here is what I have done so far:


It's a little hard getting good photos of plastic sleeves, but you get the picture.

What I love about Simple Stories paper is that they do just that - make it SIMPLE. You don't have to add a lot of extra decorations if you don't want to. So much freedom!

As you can see, I've decided to use my old typewriter in this album. I might also get my alpha stamps out, I like the "home made" feel that gives.

I've only just started this project, but I'm in love with it already. I'll be back in a couple of weeks to show you my next pages!
//Annelie

Materials used:
Simple Stories Mix & Match System
Simple Stories Summer Fresh Papers & Stickers
Echo Park So Happy Stickers
Simple Stories 100 Days of Summer Papers & Stickers (older line - sold out)
Echo Park This & That Charming Alpas & Stickers (sold out)
Crate Paper Random Alphas (sold out
Clock pebble
Studio Calico Mr Huey mists


Saturday, 14 July 2012

A month of Basic Grey - Part 2

Hi Everyone!

Well, this time I thought I'd do something quite different and not something Ive done before, so it was a bit of an experiment.  Throw in that I wanted to something for a little boy and it became more than a little challenging, after all you know what me and flowers are like :)
The reason for the boy theme was because Im about to become, well in October anyway, a Great Aunt!  An aunt would be fine, but heavens a great aunt sounds so old!  My niece is in her mid twenties and its all exciting, so I have been thinking of decorating babys' room ideas.  Actually I was thinking of lovely girly things, and then he turned into a boy! So, I got thinking a bit more and decided to turn my lovely bright Picadilly orange papers into a lampshade.
I purchased an ordinary touch lamp with a plain canvas lamp shade in a sale, and set about turning it into something a bit more interesting.


So how did we get to this point?  Easy peasy. Decide what theme you want first - I chose stars - and then randomly diecut a mixture of sizes and colours.


Then its just a matter of playing with placement....................................................


Once I was happy with placement, they needed something else, so I added buttons and twine for finishing touches, and it was done!


The paper I used was still part of the Picadilly range, specifically Eat at Jones, Eggs & Bacon, and Farm Fresh Eggs, with a piece of Bazzill cardstock.  The buttons were from the range too.

Thanks for stopping by!
Megan

Friday, 13 July 2012

Summer Fun with Fancy Pants

Hi everyone, Sara Zenger here.  I am so happy to be here at The Scrappin Patch this month, and next, as a Guest Designer to show you some fun things to do with an awesome assortment of products.

Today I have a layout to share with you.  The layout contains products from the Fancy Pants line Wave Searcher.  I started the layout with some fun Glimmer Glam from Tattered Angels.  This was in a fun bright orange color that let me add some streaks of color to the back ground paper.  


I love the sheet of paper with the giant wave at the bottom and knew I had to put that to good use!  I even stacked it with a wave I cut out of the coordinating transparency in this line.  I wanted to give the layout a more finished off feel so I added the border to the top and the bottom of the layout.  I could not help my pile on the matching chipboard embellishments - those little tiki guys are too cute! 

Thanks for stopping by to take a peak, I will be back next week with more! 

Sara

Click below to see this amazing line in the Scrappin Patch Shop!
Fancey Pants - Wave Searcher 

Thursday, 12 July 2012

Stars in Their Eyes - Overall WINNERS!!!

Can you believe it - there is a tie for 1st place!!!  S0 after much deliberation and thought re allocation of prizes I am thrilled to announce........DRUMROLL please..............!!!!!

:winner: :winner: :winner: :winner: :winner: :winner: :winner: :winner:
1st equal -Kelly Foster and Heidi - you will each receive $150 product prize pack (1st and 2nd prize shared equally)


3rd place - Saraz - you will receive a $50.00 prize pack

 And then there is the 'DT surprise' still to be announced tomorrow!!!!

Making your own Poloroid Frames

Poloroid photo's are making a comeback big time, especially the little mini ones, they are so cute.  I was blog surfing the one day and came across someone who had made their own ones, so I decided to give it a go, but instead of using the usual white frame I decided to go with Black.


Here is a little frame I made and embellished using the Amy Tangerine Sketchbook - Remarks - Doodle embellishments.  They are really easy to make and it's something different to try on your layout,


Firstly you will need to get some cardstock (choose any colour) and cut it to measure approximately 3.5inch wide by 4.5inch long, using a corner rounder, shape each of the edges.


Next you need to measure a square in the middle to measure approx 2.5 x 2.5inch and cut it out


Turn the frame around and adhere some double sided tape as shown in the picture below, and attach your photo.  Embellish the frame as you wish, you can doodle around the frame, add some bling, emboss it through the cuttlebug to give it texture, or even just leave it plain,


Your frame is now complete and ready to place on your layout.  I made another one which was slightly smaller (measured 3inch wide by 4inch long).  I have doodled around the inner edge of the square to add a little something extra.


here is the full layout using the GORGEOUS Fun Filled, bright coloured papers from the Amy Tangerine Sketch Range of papers.  I think the black frames really compliment the colours of the papers really well and draws your eye to the photo's but the colours really make it look soooo FUNKY.


Here are a couple of close up shots to show off those gorgeous embellishments.... I cannot rave enough about them ladies, honestly they are just FABBO.....

 
 I think this is by far my most favorite range of papers at the moment, I absolutely LOVE the colour hues, the washed paint look, the funky patterns and the brightness of them, and combined with all the little nick nacks which come with the range, you will have well balanced GORGEOUS pages which you are extremely proud of.

TFL & Happy Scrapping

Wednesday, 11 July 2012

Stars in Their Eyes - Week Nine - Winners

Well, you certainly know how to make things tough on a girl, don't you!!! Seriously, every single page in that gallery is amazing. There are so many talented scrappers here! I know people always say it was hard to choose, but it REALLY was. I loved seeing everyone's take on my style - it was such fun....

So, here are my picks.

3rd place- Skater Girl by Kelly Foster

I loved the fact that Kelly tried an 8.5 by 11 page! I've just recently started doing them and I'm hooked, so it was great to see her gorgeous page. I love the banner below the photo, her fussy cutting and the Girl Land paper she used. I reach for that a lot these days! Beautiful page, Kelly!


2nd Place- I Simply Enjoy Her by Hayley

Such a beautiful page! I love her use of the tags and that gorgeous, cut title. The kraft background and doilies are also something that just 'speak to me'. Such a wonderful layout, Hayley!


:winner:

Winner- Snow Angel by topkatnz

This page is stunning! I love the grey, with the touches of pink and purple. Her doily embellishment is beautiful. And those borders look amazing! I use that doily border punch ALL of the time! Such an ingenious way of incorporating the 8.5 by 11 page, too! Congrats on creating a gorgeous page, Heidi! I love it.
:)


(And I have to give a special shout out to Nannywazo because she literally made me laugh out loud when she mentioned that she noticed I love to eat! LOL, yes I do!) :LOL2:


It has been such a pleasure being here with you ladies. What a fun competition! I'm truly honored to have been your final star! Thank you so much for having me. And a special thanks to Michelle for the invitation. Wishing you all the best ~ Anabelle
Anabelle

Tuesday, 10 July 2012

OTP Inspiration

Hi everyone!

Today I'm sharing with you a card I made using the lovely Simple Stories 'Documented' range.


I'm a huge fan of typography so I must say I'm loving this collection! It can be made masculine, girly or neutral which is even better. One of my favourite papers features various inspirational sayings that are great for cards or layouts. You'll see on today's card I used 'Cherish the moment, life is good'.

I wanted this saying to be the main focus of my card so I kept everything else reasonably simple. My background paper also features inspirational sayings but on a much smaller scale.

I finished my card off with a butterfly button detail that includes some gorgeous wood buttons from Prima. I just love these! They come in a pack of 18 various shapes and sizes and they all have some sort of pattern on them. I used 2 on my card. I wanted the heart to stand out a little so flipped the bottom button over to just show the woodgrain instead of the pattern. These were tied together with a piece of twine.


Hope you enjoyed today's inspiration, thanks for stopping by :)

x Lana

Products used: Simple Stories 'Documented', Prima Wooden Buttons

Monday, 9 July 2012

July Sketch and June Winner...


Check out this stunning sketch from Annelie!!!  Lots of opportunity for creativity - make either a card or layout from this sketch.   Sorry it is late being posted - somehow got lost with all the STARS posts :(  Upload your take to our gallery by midnight July 31 and be in to win a $15.00 RAK!!!


CONGRATULATIONS to Rarsberry for winning the June Sketch challenge - a $15.00 RAK will be on it's way to you this week.  Check out her gorgeous layout....


Sunday, 8 July 2012

Amy Tangerine with Annelie

Adrienne sent me some lovely Amy Tangerine papers & embellies this month, and I created a very summery LO with them!


I love these colourful papers, and adore the embellishments! I used a bit of Studio Calico Mr Huey mist in matching colours, it just gives the page a bit of interest. I also used my black journaling pen to outline the papers, to match with the "beauty tile" in my left cluster. I am very thrilled that this line works PERFECTLY with my photo!


I also added a Melissa Frances resin frame, love how it works with most papers!


Hope you feel inspired to play with your Amy Tangerine goodies today!
//Annelie

Saturday, 7 July 2012

Stars in Their Eyes - Week 8 - Winners

Ok, Girls! I've got my top picks to announce this morning! What a tough decision....there were some really cute cards to pick from!!

3. Thank you so much Card by Topkatnz
I love the simplicity of this card. It's not 'fussy', and yet there are lots of really pretty, interesting details!


2. Thinking of You Card by Vicki
I adore the gorgeous, colorful flower! I love the vintage feel, but it's still so bright and cheery and I love the way she incorporated the sentiment. Super cute!


and my top pick is...

1. Sending You Sunshine... Card by Hayley
I love that, again, it's a simple layout, but it's all in the details! I love the big banner, love the sentiment strip that's popped up with another bit of patterned paper peeking out from below. And the buttons perfectly placed, finishing things off beautifully!


Thank you soooo much, to each of you that played along!! I hope some of you might be inspired now, to create cards once in awhile! :wink: And a special thanks to Lana (who could not be sweeter!) for inviting me to be a part of Stars in Their Eyes 2012. I'm honored and so appreciate y'all inviting me into your space here, and letting me participate in this fun event!

LinkWithin

Related Posts Plugin for WordPress, Blogger...