Hi everyone!
I'm back with my last batch of inspiration with the Echo Park "Yours Truly" collection.
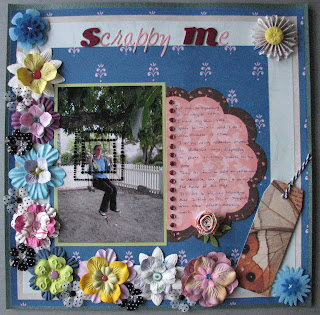
It's actually the first page I made when the kit came. There was NO WAY I couldn't create a girly, rosy page with these papers. :)
I used a fantastic flower from Manor House Creations (sold out), but the colour in the middle was wrong for my page. So, I simply coloured the middle with a little bit of glimmer mist. Yes, it leaked a little bit, but that doesn't bother me. :)
One thing I love with the Echo Park collections are the sticker sheets. You get SO MUCH for the money with those!!
The heart doilie, the pearl ribbon and the gorgeous pleated ribbon gives a lovely girly feel to the page. You can alse see that I have used my sewing machine again!
Lastly, I added some details by using a punched border, a photo corner and some brads.
That's all for today, hope you have found some inspiration!
//Annelie
Monday, 27 February 2012
Saturday, 25 February 2012
More Basic Grey Inspiration!
Good morning to you all! I'm here today to share with you my final layout utilizing the Nordic Holiday collection from Basic Grey. I used mainly scraps on this one to create the matted area behind my photos. I wanted it to be as busy as my little Gunner is! Get him outside and AWAY he goes!
I chose to use some of the cooler tones, combining the greys and blues, and threw in just a few hints of red to keep your interest. I love how the little bird draws your attention to the journaling- isn't he just adorable? One of the many cute stickers included with the 12x12 sticker sheet. I popped him up with a small foam adhesive square to add some dimension.
As you can also see, I have used my sewing machine to add little details here and there- it is definitely one of my most treasured of scrapbooking tools! I used it to create the journaling lines here- a surefire way to make sure you write in a straight line :).I sure hope you were able to draw some inspiration from here today! And I hope I've encouraged you to try out this gorgeous collection yourself! I have all of my supplies listed below, including direct links to each individual piece in the Scrappin' Patch store to make is easier on you :).
Take care and have a wonderful day!!
Supplies Used: Nordic Holiday Paper- Slalom, Wedge, Gondola, & Arctic Yule, Nordic Holiday Die Cut Shapes, Nordic Holiday Stiched Brads, Nordic Holiday 12x12 Sticker Sheet (included in the Collection Pack), The Dusty Attic chipboard (Holiday Assortment), October Afternoon Mini Market Alphabet Stickers, American Crafts Thickers, Rhinestones, Mist.
Thursday, 23 February 2012
Thursday Inspiraton - BoBunny & Butterflies
Hi everyone!
Today I'm sharing some very bright and fun inspiration using the BoBunny Vicki B collection. This gorgeous range has a nice summery retro feel with its bold, bright patterns and funky shapes. I love using bright bold colours so this collection was right up my alley.
I've kept my first card quite simple using a solid colour as a backdrop to the cluster of butterflies. Each butterfly shows a different pattern from the Vicki B collection. To lift the background a little I stamped a polkadot background and used clear embossing powder to give it a little shimmer. I finished the card off with a simple sentiment and some tulle detail.
For my second card I've used one of the Vicki B cutout shapes as the base of the background. This gave me some nice movement and curve to the card. To complement the curves I made 2 rosettes and paired them with a butterfly for a nice cluster. To tie everything together I added a nice sentiment and some ribbon.
For my final card I used another Vicki B cutout and added some faux stitching detail to really make it pop. Now I'm not normally a flower girl but I thought I'd attempt to use them on this card and I must say I'm really pleased with the result. What do you think? For a bit of added texture I added a little tulle behind the flower cluster. It's such an easy product to work with and adds a really cool dimension to your project.
I hope this got your creative juices flowing. I can't wait to see what you create. Do share!
Supplies used: BoBunny Vicki B Collection, Kaisercraft Pearls in Plum, Tulle Butterfly, Various flowers, Bazzill Cardstock, Prima Alphabet Stickers.
x Lana
Monday, 20 February 2012
Using Crackle Paint
Hello fellow 'Patch fans! Today I'm going to share with you my technique post which stems from my previous post using Tattered Angels Glimmer Glaze & The Dusty Attic chipboard. If you recall, I dressed up an ornament chippie and said I would teach you how to get the aged finish I had accomplished on the piece.
If you've never used crackle paint before, you definitely need to try it! And it's quite simple- but make sure you've got a little bit of time on your hands, as you will need to apply a couple of coats.
To begin, you brush on a nice thick coat of crackle paint onto the chipboard. Then allow it to dry completely. Next, you brush on an even, medium layer. Allow it to partially dry, until it feels tacky.You will next need to choose the color you want your embellishment to be- and you can use a variety of mediums- paint, gesso, glimmer glaze, etc.- it all works! In my case, I chose to use the Sangria Glimmer Glaze I'd received with my kit to color the ornament. Simply brush on a layer (try to keep your brush strokes to a minimum for optimum crackling)- and the crackles will follow the direction of your brush strokes, appearing within just a couple of minutes or less!Here's a revisit of the photo included in my previous post, showing the crackled finish on my chipboard piece:Here is another example for you, utilizing more chipboard from The Dusty Attic, but this time I applied some gesso for my top layer:I just love the texture it gives- and it's perfect for achieving that "antique-y" or vintage look.
Thank-you for taking the time to check out my little tutorial- and that you're inspired to try some of this stuff out yourself! Take care :).
Supplies Used: Crackle Paint, Tattered Angels Glimmer Glaze (Sangria), The Dusty Attic chipboard.
Saturday, 18 February 2012
Valentines OTP inspiration
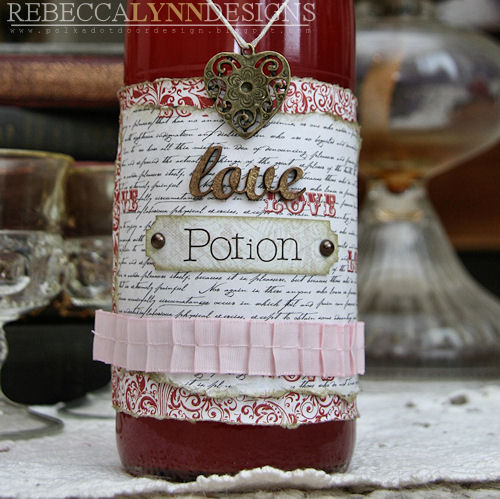
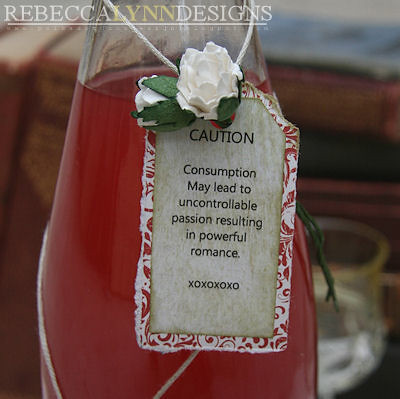
Even though Valentines is a few days past, I wanted to share with you a project that I created to help my husband and I celebrate our first Valentines day! As soon as Adrienne asked me to join the Off the Page design team I knew I wanted to take the opportunity to create some projects that allow me to express my creativity outside the realm of layouts and cards, though there will be lots of cards coming up too!
I had so much fun with this project. While I tailored this "Love Potion" for Valentines (really just Sparkling Blood Orange Juice from the grocery store), I plan to re-use the idea for other holidays or special events. What fun you can have with re-labeling your favourite drinks! My husband loved this.
The first step to creating this project is removing the labels from the glass which I did by soaking the bottle in warm water and a little white vinegar. After about 10 minutes, the label peeled off very nicely. The adorable kit that Scrappin Patch sent all the way to wintry Canada consisted of everything except the alphabets I used in the "potion". I loved how the ruffled ribbon and metal locket added to the look that I was trying to create.
I'm so excited to be part of this incredible team and looking forward to sharing more in the month of March. I'd love to see any projects you might create inspired by this! Thanks for looking.
Rebecca
Thursday, 16 February 2012
Product Focus: Glimmer Glaze & Chipboard!
Good morning! I'm excited to share with you my product focus for this month: Tattered Angels Glimmer Glaze & The Dusty Attic Chipboard! I've never used glimmer glaze before, so I was anxious to get started :).
I was delighted to find that the Glimmer Glaze has its very own brush within the cap, and it's exactly like a nail polish brush! That makes it very easy (especially if you're a woman!) to paint with, even on very small areas. I knew I wanted to use this particular shade to dress up this particular piece of chipboard to coordinate with my Christmas-themed layout I was working on.
As you can see, the piece is a little shiny- and I'll reveal why in my next post, when I teach you how to get the aged finish below:
I really love the bright, shimmery effect of the Glimmer Glaze- and that chipboard is such an easy surface on which to use it (and it dries quickly too!). I also used the glaze on the holly berries in the spray at the top of the ornament- what is nice is the etchings around the berries help keep the glaze from running- which is especially nice when painting a very small area.
Next what I did was use some green acrylic paint to paint the leaves and some Ranger Stickles to decorate the bow. My final touches were some tulle and rhinestones and you have your very own custom embellishment!
For my next experiment with the Glimmer Glaze I decided to dress up some plain KaiserCraft white paper blooms. Simply by taking the brush and lightly running it over the edges of the flowers, you get this fun effect:
I also used it to paint the bow on this horn, as well as some Stickles to dress up the rest, to be used on a future layout:
And here is my project showcasing how you can use your hand crafted chipboard accent to coordinate as you wish. I definitely went for the traditional red, green, and white Christmas colors on this First Christmas page for my daughter Aspen. I used the gorgeous Basic Grey Nordic Holiday collection once again, pulling out the more holiday-themed pieces from the line to coordinate with my theme :).
Thank-you so much for stopping by and having a peek. I hope you try out some of this fabulous Glimmer Glaze for yourself. Since this project, I have done a bit more experimenting and found it works great for a trend I've been seeing everywhere: paint runs. Just pour a small dot of glaze on your paper and then stand the paper up, letting the glaze run down your page. It works nicely here as this particular medium is thicker than mist but thinner than paint- exactly what you need to create this effect :).
And as far as The Dusty Attic's chipboard? Versatile as they come- I just love that you can create something that nobody else has- and coordinate it to perfectly accomodate your project.
Finally, don't forget that you can get the Nordic Holiday range from Basic Grey at 20% off at the Scrappin' Patch store until February 17th! Just enter erin into the coupon box during your online checkout process!!
Products Used: Tattered Angels Glimmer Glaze (Sangria), The Dusty Attic Chipboard, Ranger Stickles, Bazzill Tulle (Grasshopper), Rhinestones, Nordic Holiday Paper- Arctic Yule, Nordic Holiday Paper- Catching Air, Nordic Holiday Paper- Yard, Nordic Holiday Die Cut Shapes, Nordic Holiday Layered Stickers, Nordic Holiday Stitched Brads, Nordic Holiday 12x12 Sticker Sheet (included in the collection pack), Prima Fluer de Lys (Ivory), KaiserCraft Paper Blooms (Coconut).
Monday, 13 February 2012
Week 6 winners and overall winner!!!
Congratulations to.....
And the winners and place getters of the layout competition are.....
And the overall winner is........ MICHELLE VO - you have won a $100 prize pack.
Winners of the $10.00 vouchers are as follows:
Jessica T - two vouchers
Michelle vo - three vouchers
Anne T - one voucher
Jeljane - one voucher
Angie B - one voucher
Lainie/Maddock - two vouchers
Gypsykate - two vouchers
Please email me at adrienne@scrappinpatch.co.nz so that I can give you your voucher code.
Thank you to all of the ladies who participated for some or all of the weeks - it has been fun.
Have a great week,
Adrienne
MADDOCK - Envelope Album
And because only three ladies submitted and all were beautiful, detailed, and very creative I have to showcase these two as well!! And all three will both receive a $10.00 voucher.
Gypsykate - honourable mention.
Jessica T
Michelle vo - Layout winner
Maddock - 2nd
Gypsykate - 3rd
And because they are all beautiful, and it is the last week, here are the other two layouts
Rarsberry
Rarsberry
Maddock
Winners of the $10.00 vouchers are as follows:
Jessica T - two vouchers
Michelle vo - three vouchers
Anne T - one voucher
Jeljane - one voucher
Angie B - one voucher
Lainie/Maddock - two vouchers
Gypsykate - two vouchers
Please email me at adrienne@scrappinpatch.co.nz so that I can give you your voucher code.
Thank you to all of the ladies who participated for some or all of the weeks - it has been fun.
Have a great week,
Adrienne
Step By Step - Making moving pinwheels
Hi everyone
Here's a fun last minute Valentines Day card using the Echo Park Yours Truly range. It's always fun to have a bit of interaction with your projects so today I'm going to show you how to make an easy moving pinwheel for a card or layout.
Step 1
Cut a perfect square and measure in 4 centre points. For example this square measures 7 x 7cm and I measured in 3cm from each corner which left me with a 1 x 1cm space in the middle.
Step 2
Cut from each corner into the corresponding centre point.
Step 3
Lightly curl and stick down every second point until you create the pinwheel effect. To make it less bulky for when we cut our centre hole, I chopped the tip off the points that were being stuck down.
Step 4
Make a decent sized hole in the middle of the pinwheel (about .5cm) and place a brad embellishment through the hole.
Step 5
Turn over the ends of the brad leaving room for the pinwheel to spin around.
Step 6
Stick in place with a strong glue making sure the glue only touches the end of the brad and not the pinwheel. I used a hot glue gun so I could get a decent sized blob and it dried in place fast and firmly.
And there you have it! A simple but effective fun embellishment for your card or layout.
I changed my mind on the colour halfway through making the card hence why my final pinwheel is different on my card, I do that a lot! lol.
Supplies used: Echo Park Yours Truly Range, Bazzill Cardstock, Crystal Bling Brad, Paper Doilie, American Crafts Thickers, Tattered Angels Glimmer Mist in Pearl, White Gel Pen
x Lana
Labels:
Cards,
Echo Park,
Lana Wigley,
otp design team,
tutorials,
Valentines Inspiration
Saturday, 11 February 2012
Basic Grey Inspiration!
Good morning! This is my very first post as a new design team member at Scrappin' Patch and I'm thrilled to be here! I've got some great inspiration coming your way using the amazing Nordic Holiday collection from Basic Grey. I was very excited to receive this line in my kit. I just love its warm, eclectic patterns- perfect for scrapping Christmas photos. And living in cold Northeastern Minnesota, it's also very complimentary of the many snow scene shots I get during our long winters.
For this layout, I really wanted to show how you can mix and match the different patterns of this collection. I started by tearing along the top of my base paper and adding torn layers in behind it. But of course I did not use full sheets of paper behind, only what I needed- saving the rest to be used in future layouts. I always like to stretch my stash as far as possible!
I then added stitching along the sides and bottom, as well as stitched on the circle behind my photo. I matted my photo using a journaling tag from the collection, topping it off with a pretty tulle bow. After adding some strips of paper (some punched with a Martha Stewart punch from my stash) and a couple border stickers from the 12x12 sticker sheet, I adhered my photo. The layered stickers with this collection are just awesome- I especially loved this little red cabin with the snow covered roof. It reminds me of the little cabin we live in- and it just seems to add a little more warmth to this layout.
Finally, I had some fun creating the button & brad twine banner- it helps draw the eye from the photo to the journaling and back again :). Throw in some mist splats and simple title and my layout is complete!
And here are a couple of close-ups for you:
I hope I was able to give you a little bit of inspiration today :)~ and encouraged you to try your own hand at this beautiful line! Nordic Holiday is actually on sale this week, starting today (Saturday, 11th of Feb.) until next Friday the 17th! Just enter "erin" in the coupon box during the online checkout process and you'll receive 20% off!!!! How can you resist a deal like THAT?! Can't wait to see what you create! :)
Supplies Used: Nordic Holiday Papers- Gondola, Wedge, & Half Pipe, Nordic Holiday Die Cut Shapes, Nordic Holiday Layered Stickers, Nordic Holiday Stitched Brads, Nordic Holiday 12x12 Sticker Sheet (included in the collection pack), Tulle- Candy Apple by Bazzill.
Thursday, 9 February 2012
Lovey dovey papers for a man, and a little tutorial
Hi everyone!
Have you bought your Echo Park "Yours Truly" products yet? They're a must have, and expecially with Valentine's Day around the corner! Today I want to show you that you can easily use this range for a "male" project, and I have a little tutorial to share as well.
This is the LO I made, featuring my supportive husband - and Valentine!
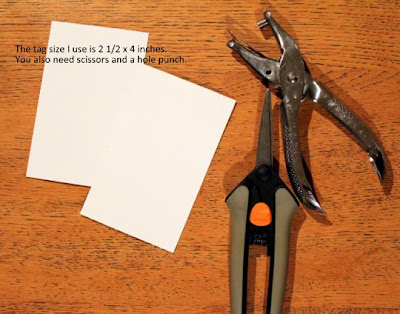
The little trick I'd like to share with you today, was something I picked up while attending the Prima Roadshow classes last year. It's such a simple thing, and I can't believe I haven't thought of it before! It's how to easily make a TAG. Tags are in right now, so it's a cool little trick to know. Hopefully you don't already know this trick, hopefully I wasn't the LAST to know!!
Here goes:
I then did faux stitching on mine, but you can decorate it however you please of course!!
Now, if you try this technique, or if you create a manly LO with this range - be sure to tell me so that I can come and check it out!
Wednesday, 8 February 2012
February Sketch
Well it's a funny thing when you have a sleeping baby...you actually get things done!! Thank you Master L for making this layout possible!
This is a layout I've done using the February Sketch so I hope you all are busy getting yours ready to submit by the 29th...
products I have used are MME Lime Twist Out of the Blue "Family" "Remember" and Fly a Kite "Soar", and Prima Alphabets
Tuesday, 7 February 2012
October Afternoon scraps....
Hi, Nina here.
I want to show you a new layout using the actually October Afternoon Thursday Sketch. I think that´s a great way to use the lots of scraps. The leaves are cutting with a Sizzix leave die.
And I LOVE LOVE LOVE it.
Naturally in combination with a lot of stitching *hehe*
My suffering sewing machine...
Tell me, how did you use the lots of scraps you have? I would love to see it...
Subscribe to:
Posts (Atom)