GLIMMERMIST on Glimmer Glass Instructions

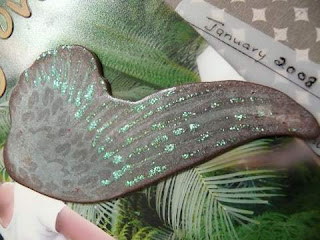
1. Using a paint dabber, brush or dabb the paint over the top of the Glimmer chip - it needs to be quite rough so it leaves some bubbles or a brushed effect and let it dry.
2. Once dried spray Glimmermist directly onto the paint glimmer glass and allow to dry further, naturually
3. Ink around the edges of the glimmer glass
4. I have applied some Kindy Glitz to the glass to give it some extra texture.
5. Using a heat gun, heat the chip a little and then bend it into shape quickly and then let it cool down, to form the final shape.
6. I have applied some Kaiser Bling to the centre of the butterfly
GLIMMERMIST on Glimmer Chipboard Instructions

1. You will need two different colour Glimmermist for this one, apply the first one (I applied the Green one first)
2. Once dried, apply the 2nd colour (I used the Blue one) spraying on some of the areas only thus to combine both colours together
3. Ink around the edge using Pinecone Ink, to give it a bit of deeper definition.
4. You can further embellish using Kindly Glitz or Bling
2. Once dried, apply the 2nd colour (I used the Blue one) spraying on some of the areas only thus to combine both colours together
3. Ink around the edge using Pinecone Ink, to give it a bit of deeper definition.
4. You can further embellish using Kindly Glitz or Bling
GLIMMERMIST on Prima Flowers Instructions
 This is definately one of my favourites and it is sooooo easy.
1. Decide on which flowers you want to use and how
many
2. Ink the inside of the flowers as well as the edges (I
2. Ink the inside of the flowers as well as the edges (I
have used Pinecone Ink as well as a Deep Pink
Brilliance Ink)
3. Spray a decent amount of PEARL Glimmermist on
3. Spray a decent amount of PEARL Glimmermist on
the flowers and allow to dry.
4. Once dried - assemble your flower and place it on
4. Once dried - assemble your flower and place it on
your layout
TIP - use a make up applicator to apply the ink it works really well and you can get a packet of 10 for $2 from the $2shop.
GLIMMERMIST on Heidi Swapp Sheer Alphas Instructions

1. Apply a coat of paint directly onto the Heidi Swapp Sheers and allow to dry completely
2. Spray a coat of Glimmermist over the paint and wait to dry.
3. Use a little Pinecone Ink around the edges and apply Alpha's to your page.
GLIMMERMIST on Maya Road Chipboard Flourish - Instructions

1. Spray Graphite Glimmermist directly onto the Flourish - you will see it dries very quickly on this Chiboard and looks absolutely FABULOUS.
2. Add a little Pinecone Ink around the edges and apply to your page.
GLIMMERMIST on Tissue Paper & Patterned Paper - Instructions

1. On Tissue - Crunch the tissue paper up, spread it out and then spray some Graphite Glimmermist onto the Tissue Paper and let it dry,
2. On Pattern Paper - Spray a couple of sprays randomly on the paper, and allow to dry.
2. On Pattern Paper - Spray a couple of sprays randomly on the paper, and allow to dry.
So there you go girls, loads of different ways to use up that FABULOUS Glimmermist you have sitting on your table....
Happy Scrapping
HEIDI


