Showing posts with label heidi barclay. Show all posts

Saturday, 8 June 2013

Echo Park - Here & Now Range

Hi, sooo excited to share some layouts with you using the brand new range from Echo Park, Here & Now.  I have posted a couple of sneaks on Facebook, but here are the complete layouts.

What I wanted to show you is at first, the colours seem to bright and bold but they are so versatile so you can create a soft look using them as well.

For this first layout, I created a background of strips of different colours using Blues, Greens and yellows, and mixing it up with some black cardstock and washi tape.  I chose these colours because of the colours of the canoe, so definately wanted to include these colours on the layout.  To add some more dimension I added three layers underneath the photo, including some gorgeous Vellum from Studio Callico Atlantic Range.


I have also added a little dimension using some texture paste and a homemade mask.  I used some transparency and using my hand hole punch, I just punched some holes in the transparency.  The butterflies are cut from the Silhoutte including the gorgeous word "Explore" which is from the Heidi Swapp Cut Files.


Products used for this layout :-
Here & Now - Sticker Sheet,

The second layout is much softer and subtle, using the pinks & soft blues from the range, and I have added some Heidi Swapp Serendipity Range - Lovey Dovey Paper.  I just love this photo of the girls, which was taken quite a while back.


Using lots of strips of Washi Tape to add some colours here and there, I wanted the colours to match the PJ's my daughter is wearing.  So I used that as my inspiration for this layout, 

The title is one from the 4x6 Journalling Card Paper, and I just cut the words up and arranged them how I wanted.


Products used for this layout
Here & Now - Sticker Sheet,

So there you go, two completely different layouts using the same range of papers.

TFL & Happy Scrapping
Heidi


Monday, 28 January 2013

My Minds Eye - Collectable

Today is a sad day for me, it's my last official post as a Design Team Member at Scrappin Patch,  It's been an awesome 5 years since starting with The Patch as a Guest Designer back in 2009, it's been truly wonderful being part of a very talented team of ladies and of course promoting The Patch, So thank you Adrienne for giving me this wonderful opportunity to be part of The patch and thank you to all the ladies on the team, it's been an awesome journey.

Enough said now, lets move on to the newest products in the shop.  I stopped by the shop on Friday during their closing down sale and picked up some bargins.  Adrienne said to me do you want to have a look at the new My Minds Eye - I had seen it on-line and said... hmm not really nothing really grabbed me, but once I had seen it in real life, WOW it's truely gorgeous.  Again the papers are a great thick quality and double sided with lovely rich colours.


One of my newest favorites at the moment, is this gorgeous BLACK  DAMASK WASHI TAPE, it's just FABBO, and I have used it to frame the photo as well.

My other favorite at the moment is the background stamp from Dark Room Doors, just gorgeous as it gives it a little grungy feel to the layout.


Papers used in this layout, Cute Paper Petite, Authentic Paper Original Beautiful Paper - Delightful,

If you haven't picked up any of these papers and love the colour combo, you won't be disappointed,

TFL and Happy scrapping everyone
Heidi

Thursday, 24 January 2013

Now & Then Mini Album

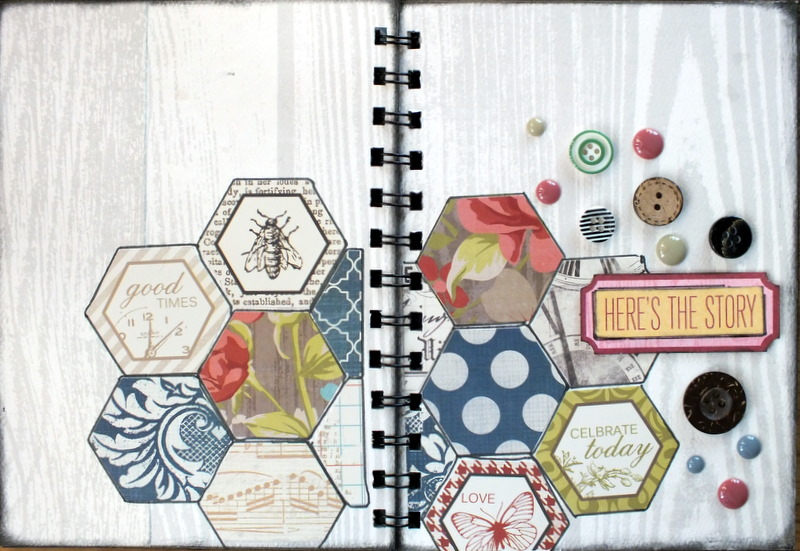
Hello girls, as promised in my last post I've created a 10 page Mini Album using the gorgeous range of Now and Then from Teresa Collins.  The whole album is made from three 12x12 sheets of papers and you have head on over here to check out how to create it.


For the Cover I used Woodgrain as my base (I just love the Woodgrain paper it's one of my favourites) and then using the hexagonals from the sticker sheet I created a little collage for the front and back so they match and embellished it with the buttons (sorry the sticker sheet & buttons are out of stock).


Here are the inside sheets showing the use of the papers and the embellishments


 Look at the little pocket to put the extra's photo's in.


So there you go girls, a nice quick and easy Mini Album which would also be perfect to use for a Nana's Brag Book as well

TFL and Happy Scrapping


Monday, 14 January 2013

Teresa Collins - Step by Step

There are more and more layouts which have alot of WHITE SPACE, so today I am going to show you how I created this layout using the gorgeous Now & Then Papers from Teresa Collins.


Products  you will need

Papers - Woodgrain Bee, Damask
Diecut Sheet, Buttons & Emerald Dots
Black Ink, Sewing machine, Black Thread

***********************************

1.  Using your sewing machine, randomly sew on the top right hand corner of the Woodgrain Paper, as well 
     as a little zig zag at the bottom
 

2.  Now cut the Damask, as well as the back of the Woodgrain to measure as shown below - 
     Ink all the edges


 3.  Do the same with the bottom two little strips which will measure the same length as your zig zag sewing


4.  Cut your photo down to size as well as the Bee Paper.  Ink around the edges, and place your photo 
     onto a spare piece of chipboard - this gives the photo a little height and dimension. 


5.  Using the little triangles from the Diecut sheet - ink around the edges and put some foam tape or dots 
      underneath each one and place under your sewing (top right hand side).  Tip:  If you don't have the 
      diecut sheet, you can just make your own triangles.


6.  Lastly place a button on the round diecut circle and place on the top of your photo as well as the Title 
     (Remember) - to tie the yellow button in I have used the yellow Emerald Dots at the bottom of the Title.


 Your layout is now done, simple right?  Hope you have enjoyed the step by step instructions, and I will be back again show casing some other layouts using this gorgeous range of paper.

TFL and Happy Scrapping
Heidi 


Saturday, 5 January 2013

Teresa Collins Now & Then

Happy New Year to all, here is hoping that 2013 is a fantastic year ahead,

This month I received the gorgeous new Teresa Collins Now & Then range to work with. The papers are really good quality and are the texture is nice and thick, and the colours are just fabbo.

My first layout I am sharing is one of our newest addition to our family, Milo - she is a border collie pup and is absolutely adorable but naughty at the same time.


I started off with Creampuff Bazzill Cardstock which goes perfectly with this range of papers.  To add a little glitz to the layout I used the silver glitter ribbon from the Border Strips.  A little Tip I always ink the edges of my papers with Black Ink this just gives the edges a lift.


I have also created my own embellishment using the Rosette Die and the Words Paper, and finishing it off with the Now & then buttons which are self adhesive so they are nice and easy to add to your layout.


 I hope you have been inspired by this layout, there are a couple more layouts to share plus a little project which I will share which doubles as a great gift to someone special.

Products used in this layout:-

CreamPuff Cardstock
Alphas - Studio Calico thickers “Winter Wonderland” red

TFL and Happy Scrapping
Heidi


Saturday, 1 December 2012

December Sketch Challenge

Right ladies this is the last sketch of 2012....

Whilst blog surfing a while back I found this fantastic site, called Page Drafts which has some awesome sketches to work with.  Here is the sketch I have chosen.


 For some inspiration I have done up my example which is made up of a mixture of this and that.


Products used:- American Craft Chap Range Mini Frames, MME Dilly Dally Range, Various Washi Tapes,
Echo Park For the Record Stickers, MME Bluebell Enamel Dots (Yellow)October Afternoon Mini Market Black Alpha Stickers, Fancy Pants Red Alpha Stickers,

We would love to see your take on the sketch, so please upload your take on this sketch, using the Link tool below, by midnight on 31st December to be in to win a RAK from Scrappin' Patch

TFL and Happy Scrapping
Heidi


Monday, 26 November 2012

OTP Inspiration

Hi everyone!

In last months newsletter I had promised to share a mini album I had made using Pink Paislee Portfolio range. Im sorry but it slipped my mind :( , so here it is today.

My sister was given for her birthday a voucher from all her friends to bungy jump in Queenstown.  Probably not what most of us would love for our birthdays lol but she was stoked with it, and off she went for a girlie weekend away with some friends.  She asked me when she came back if I would make her a mini album to keep the photos in, but there were rules to go with it!  No flowers! At all!!  If you know me, you would know that was going to be challenge lol I even asked at one stage during the process if I could put some in but no amount of pleading helped, so I had to stop whinging and get on with it!  Here it is:


I have cut up the portfolio packet the photos came in to use for my title and front page embellishments.  The cover is also randomly stamped over the top of a hexagon stencil from WOW - I toned down the yellow Glimmermist with white tissue paper.  Ive also thrown in leftover bits and pieces from Kaisercrafts Pack Your Bags collection - yes thats quite old! :)
I was pleasantly surprised by just how versatile this paper range became, it also came in very handy for covering notebooks, and diaries for a portfolio Ive put together for my husband for Christmas which Ive stored in a Heidi Swapp Memory Box - theres some of these still in the shop. Ive used mine to pop all my husbands car photo expeditions in, using the portfolios, brilliant space saver!
The idea for the type of album Ive made has come from an album Heidi did.  The pattern is purchased from Paper Phenomenon, its an awesome site of great patterns for OTP! Go check it out.

Happy Scrapping Everyone!
Megan

Monday, 15 October 2012

Simple Stories Handmade - Continued

Yay - another post to share the next couple of pages of my December Daily book.

Day 3 and 4


I used the Handmade Holiday Paper - Handcrafted paper as my base and then created a little black mat for a small photo on the page, and added some of the gorgeous Fundamental stickers to finish the page off.


For Day 4, I decided to use a pre-cut tag which Adrienne cut out for me using her Huge Accucut Diecut Machine, so day 4 will just have some journalling on it at the back, nice and simple.

Day 5

I used the half circle page for Day 5, covered it with Red Dot/Santa List paper, and to add a little difference, used one of the Photo Mat & Quotes papers, but putting it landscape instead of vertical.


Day 6 and 7

For the base of Day 6 I used the other side of the Red Dot/Santa List paper and again used one of the Vertical Journal Tags to give the page a little difference.


Day 7 was pretty plain, as I thought I would add a photo on it, so used the Handcrafted paper as the base
and added a Fundamental stickers on it but added some foam tape underneath to give it a little dimension.


Day 8 and 9

Pretty simple pages, I used the back side of the Flash Card paper, made a little banner and added the number 8 sticker on it, again I used some Dimensional Magic to go over the top of the number eight to give it a little shine and dimension.  I created a little journal pocket using the left overs from the Holiday Cheer Paper and added a little journal tag inside it from the Sn@p - 3 x 4" Journal Cards book, so Day 8 will all be about journalling about that day.

Page 9 was even simplier as I used one of the  Photo Mat & Quotes papers as my page, so I can add a small 2x3 photo on it and add a little journal on top.


So there you go ladies, some more pages to get you inspired to complete your December Daily Book.

As you can see there are different ways to use those Photo Mat & Quotes papers and Vertical Journal Tags .

See you soon for another long post displaying some other pages.


Saturday, 6 October 2012

Simple Stories - Handmade

I was so excited when Adrienne gave me the pre-cut Mix 'n Max chipboard album as part of my design team kit this month.  I had purchased the Simple Stories Handmade Holiday Kit, so this was just perfect for what I had in mind using these papers.

I decided to do up a December Daily Album all ready for December.  I actually managed to use every single piece of paper in the kit and even had to go back to get an extra couple of papers just to complete the whole album.  So this month I will be sharing my December Daily pages with you, to inspire you to create your own or even give it as a gift to someone.


I popped into the shop to cut all the papers so all I had to do was glue them down and decorate each page individually, I have created some little tags and even a triangle page to add a different look to the album, no two pages are the same.

For the cover I used Handmade Holiday Paper - Page Elements paper as the base page,  and then added my title using the Expressions Sticker Sheet, and outlined the tape pattern on the Elements paper using a black pen just to make it pop our a little.  To give a little dimension to the Alpha's I added some Dimensional Magic over the word DAILY.  I have actually used Dimensional Magic over most of the Numbers in the album, it gives them a nice glossy look.


Day 1 and 2


I have used the Winter Wonderland Paper which is double sided - so it was just perfect and matched together beautifully.


On page 1, I added a Vertical Journal Card and then placed a Transparency over the top. When you buy the full Kit it comes with six 6x4 Transparencies which fit perfectly over the top of the Journal Cards.  The Journal cards are great to use as a matt for your photo's.  Here a before and after look using the transperancy.

BEFORE TRANSPARENCY 
AFTER THE TRANSPARENCY


To add a little special Christmas feel to it I painted the chipboard Santa Hat with Rustic Glimmer Glam, and then added some Dimensional Magic over the top.  For the white piece of the Santa Hat, I inked it with White Stazon - allowed it to dry and then embossed it and before it dried  then added some Diamond Dust over the top to give it dimension and a little sparkle and this allowed the Diamond Dust to dry and get hard with the Embossing Powder.


On page 2, I just added the Number 2 from the black sticker sheet and then added some black Distress Stickles on top of it to give it a some sparkle.  I did the same over the top of the of the flowers on the paper but it didn't come out very well it was too pink although I used a red Distress Stickle, so I painted some Rustic Glimmer Glam over the top which worked perfectly.


 So there are my first two pages plus my front cover, I will show you the rest of the album during the month, I hope this has inspired you to create your own little album.

TFL & Happy Scrapping
Heidi

Saturday, 28 July 2012

More Amy Tangerine......

Well this is my last post for the month, and I have to say I just loved working with the Amy Tangerine Lines from American Craft.

When my best friend & sister came out at the end of last year, we went to the Container Mall in Christchurch City, and the bright vibrant colours of the containers just suited these papers perfectly.


We took so many photo's and I wanted to have them all on one layout, so I decided to do a little mini Flip Album on the page to hold all the photo's taken on the day.


To hold the little album together I just used some Baker's Twine and a button and then a little Brad to twirl the twine around to keep it closed. 


I hope I have inspired you to try this papers out, the range is full of lovely bright vibrant colours, and will suit any type of layout whether it be birthday, boy, girl or seaside photo's - give it a try you won't be disappointed.

Products used in this layout


Amy Tangerine Paper - Oh My Galosh
Amy Tangerine Paper - Hanging Out
Amy Tangerine Foam Thickers - Lovely Blue
Amy Tangerine - Remarks Stickers - Alphas
Various colours of WASHI TAPE

TFL & Happy Scrapping 
Heidi

Thursday, 12 July 2012

Making your own Poloroid Frames

Poloroid photo's are making a comeback big time, especially the little mini ones, they are so cute.  I was blog surfing the one day and came across someone who had made their own ones, so I decided to give it a go, but instead of using the usual white frame I decided to go with Black.


Here is a little frame I made and embellished using the Amy Tangerine Sketchbook - Remarks - Doodle embellishments.  They are really easy to make and it's something different to try on your layout,


Firstly you will need to get some cardstock (choose any colour) and cut it to measure approximately 3.5inch wide by 4.5inch long, using a corner rounder, shape each of the edges.


Next you need to measure a square in the middle to measure approx 2.5 x 2.5inch and cut it out


Turn the frame around and adhere some double sided tape as shown in the picture below, and attach your photo.  Embellish the frame as you wish, you can doodle around the frame, add some bling, emboss it through the cuttlebug to give it texture, or even just leave it plain,


Your frame is now complete and ready to place on your layout.  I made another one which was slightly smaller (measured 3inch wide by 4inch long).  I have doodled around the inner edge of the square to add a little something extra.


here is the full layout using the GORGEOUS Fun Filled, bright coloured papers from the Amy Tangerine Sketch Range of papers.  I think the black frames really compliment the colours of the papers really well and draws your eye to the photo's but the colours really make it look soooo FUNKY.


Here are a couple of close up shots to show off those gorgeous embellishments.... I cannot rave enough about them ladies, honestly they are just FABBO.....

 
 I think this is by far my most favorite range of papers at the moment, I absolutely LOVE the colour hues, the washed paint look, the funky patterns and the brightness of them, and combined with all the little nick nacks which come with the range, you will have well balanced GORGEOUS pages which you are extremely proud of.

TFL & Happy Scrapping

LinkWithin

Related Posts Plugin for WordPress, Blogger...