Showing posts with label Kaisercraft. Show all posts

Saturday, 24 November 2012

Imaginisce Stamps

Hi everyone!

Today my card features a cute Christmas Tree stamp from Imaginisce. I love Imaginisce stamps.


  • They are the perfect size for cardmaking and they're easy to store away
  • Feature so many cute images
  • They are clear stamps which I prefer over mounted stamps. This way you get a clear vision of where you're stamping your image. To use you just pop the clear stamp on an acrylic block and away you go
  • They are so affordable! They're usually around $3 each with 1 stamp in each package. 


I'm starting to build my own little Christmas collection as you can see below. I've used the top stamp on my card.


My card using the Very Merry range from Echo Park...


Thanks for stopping by!

x Lana

Supplies used: Imaginisce Christmas Cheer Candle Tree stamp, Very Merry papers by Echo Park, Kaisercraft Pearls in red.

Sunday, 12 August 2012

Product Focus: Diecut Papers!

Good morning everybody!! So glad you stopped by today to check out my product focus for this month, which is Die Cut Papers!! You know- those big shaped papers included in many of our favorite manufacturer paper collections...most people simply stick them on a sheet of paper and use them as their background. But today, I'm going to show you that these papers can be used for so much more!

So here we go...

This month, I was sent die cut papers from two different KaiserCraft collections: Tiny Woods & Technologic. Let's take a look first at the Tiny Woods die cut:
To me, it was obvious what to do with this one! I'm a fussy cutter, so I simply cut out the tree shape to use as a large embellishment on my page. Additionally, I trimmed the scalloped section remaining and used it to create a banner:


Now, let's have a peek at the Technologic die cut:
I decided I'd cut up the die cut in pieces and layer them at the top of my layout. To break up the pattern a bit, I also used it as a stencil and traced its shape onto some of the solid color papers and layered them in there too :)...


Far more interesting and fun than just sticking the die cut onto a background paper, huh?

If you've loved what you've seen here and feel inspired, check out the Scrappin' Patch store today!! See my product list for direct links if you're looking to pick up these particular products!! Thank-you for checking in and letting me share with you!!!! Take care :)

Products Used:

Wednesday, 21 March 2012

Kaisercraft: Little Toot

Jessica Toulmin here again for you today. This is my second and last post using the Kaisercraft: Little Toot range (sorry I can't link to the first one because for some reason it isn't there anymore).

I have thoroughly enjoyed being able to play with this line. It is full of red, orange, green and blue – but they’re not really bright and crisp colours, they are more muted which means they match so many more photos. And the vehicle images are adorable!

Today I have for you a layout, and four cards made using some of the scraps.

Stop and Wonder

To replicate this layout you will need:
white textured cardstock; Kaisercraft: Little Toot - Bang, Cruise, Honk and Road Trip (specialty) papers; Kaisercraft: Little Toot - chipboard elements; Echo Park: A Boy’s Life - alpha cardstock stickers; May Arts: celery and scarlet 3/8 grosgrain ribbons; clear and light blue rhinestones, like these ones from Melissa Frances; double sided tape, foam dots/ tape, white and blue ink pens.


To make the caravan journaling spot:

 
1. Take the car and caravan from the chipboard set.
2. Remove the strip from the caravan with a craft knife.
3. Trace around the caravan, and cut inside the line – so the paper is slightly smaller than the caravan. Then cut a half circle for the wheel well.
4. After writing on the journaling spot, attach it to the caravan with foam dots/ tape. Finally, add a rhinestone for the wheel. Attach to the layout with double sided tape.

Now for the cards.


All four of these cards were made with left-overs after making the layouts.

To replicate this cards you will need:
one sheet of 12x12, textured, white cardstock; Kaisercraft: Little Toot Bang, Honk and Road Trip (specialty) left over paper strips; Echo Park: A Boy’s Life - alpha cardstock stickers; Fancy Pants: Tradition buttons; Green Tara: gold fringeribbon; double sided and foam tape/ dots, thread.

Next month I will have projects for you using Echo Park and 7 Gypsies.

Until then, take care.

Wednesday, 7 March 2012

Kaisercraft Inspiration

This is my first post as a Guest Designer for Scrappin’ Patch. I am very happy to be chosen as part of the Scrappin’ Patch team for 2012. Thank you Adrienne.

I was given some of the Kaisercraft Little Toot range to design with. This is such a fun line for little boys, but would also work wonderfully for road trip and holiday projects as it is travel and transport based.

Sunshine & Success

To replicate this layout you will need the following: off-white cardstock, like this one from Bazzill; Kaisercraft Little Toot ‘Bang’, ‘Honk’ and ‘Road Trip’ (specialty) papers; Kaisercraft Little Toot chipboard elements; Imaginisce Berrylicious die-cut phrases; Fancy Pants buttons; Green Tara ‘Sage’ fringe ribbon; double sided tape, foam dots/ tape, blue ink pen.


Usually I try to match the theme of the layout to the photograph. But for this layout, I decided to use the Little Toot ‘Honk’ paper and take the theme of the travelling for a more meaningful layout for a change. Sometimes doing something different than (your) usual is not only a challenge, but ends up with a great result.


A bit of dimension always makes a layout more pleasing to the eye. You don’t have to go overboard, just a few dimensional elements will do.

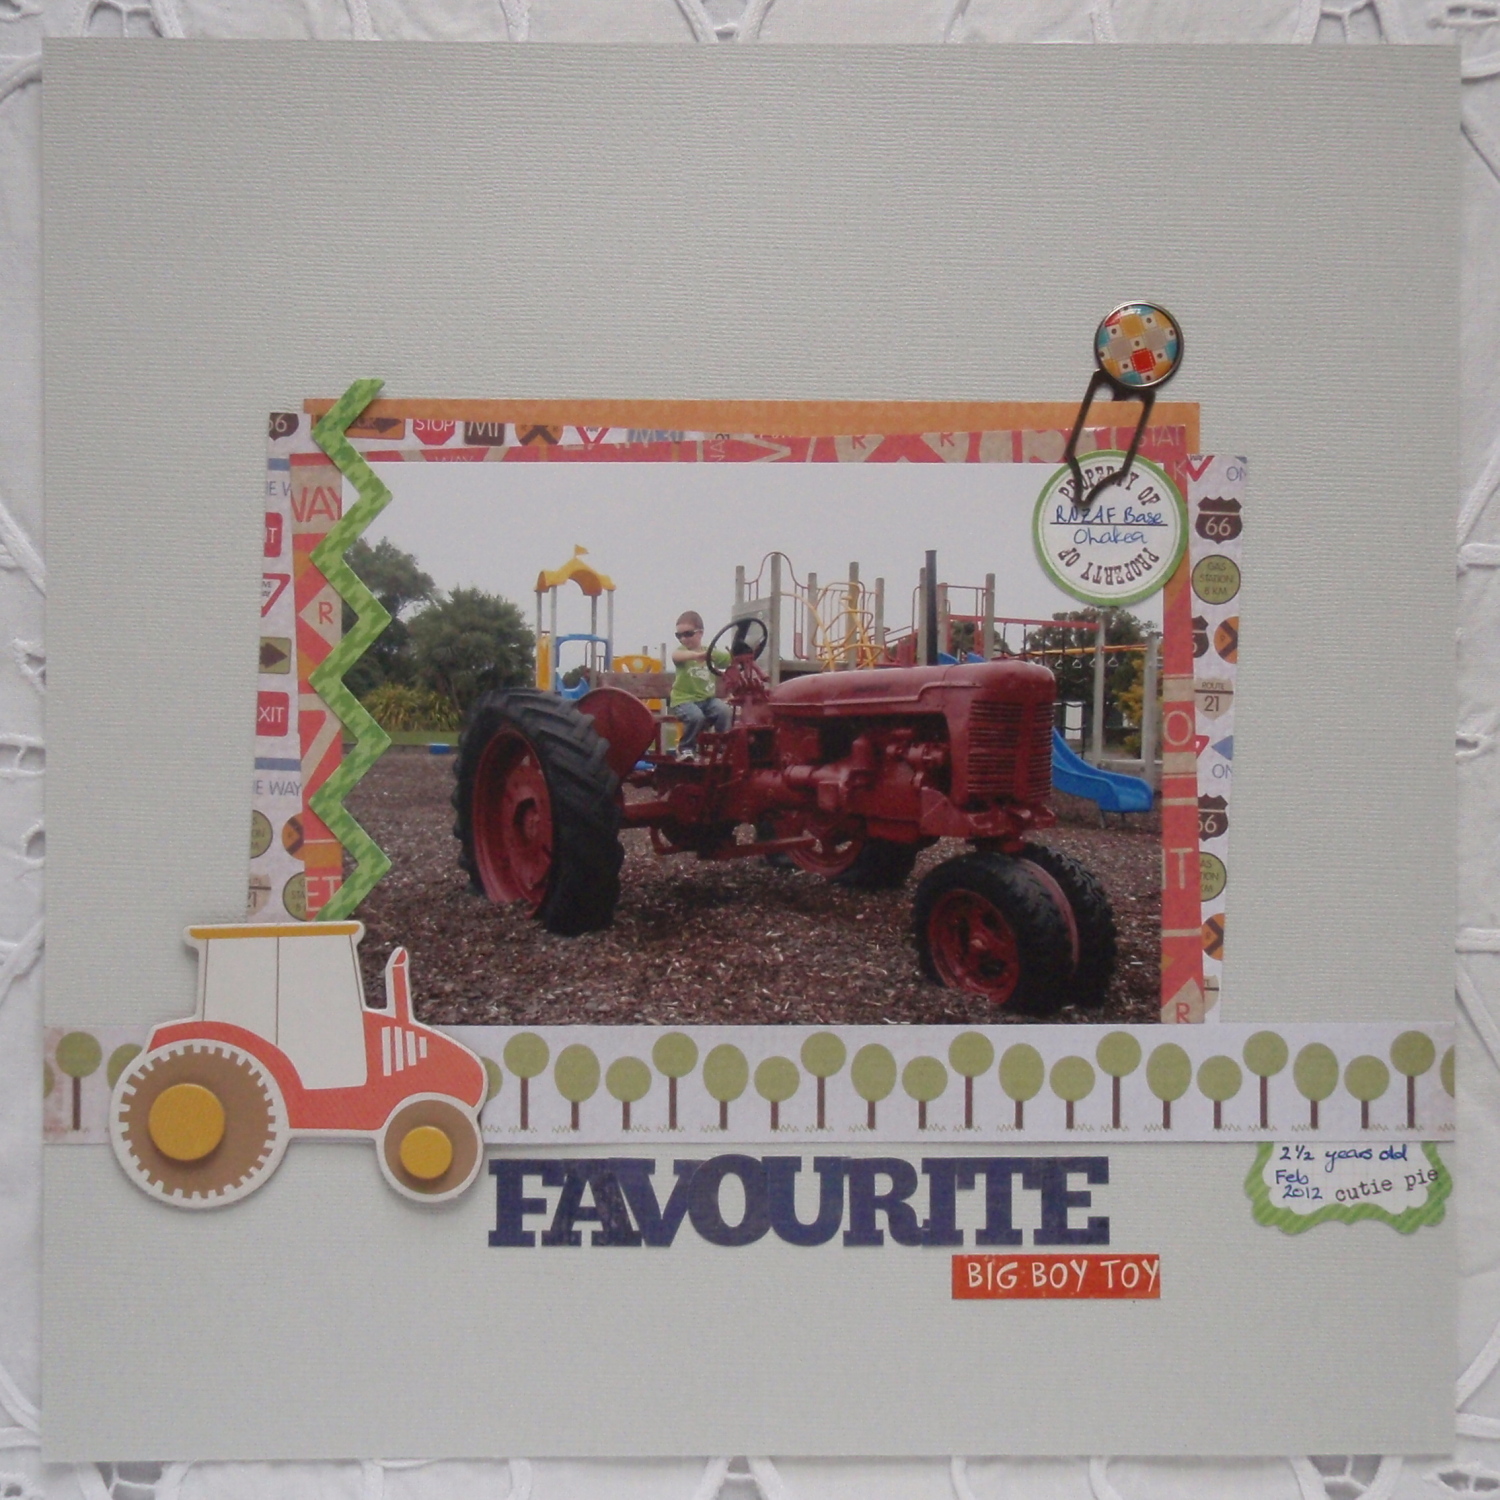
Favourite Big Boy Toy

For this layout I used a 5x7 photo, but a standard 4x6 would work equally as well.

To replicate this layout you will need the following: off-white cardstock, like this one from Bazzill; Kaisercraft Little Toot ‘Bang’, ‘Honk’ and ‘Road Trip’ (specialty) papers; Kaisercraft Little Toot chipboard elements; Echo Park A Boy’s Life cardstock stickers; My Minds Eye Lime Twist (Fly A Kite ‘Spring’) cardstock stickers; a paper clip, like these ones from Basic Grey; double-sided tape, blue ink pen.

If you are using large mats or blocks of paper that are going to get covered, it is a good idea to cut the centre of the paper out to be used on another project, like this:


Here is a little ‘how to’ for this layout:


Layer and adhere the photo mats, then adhere the photo.


Adhere the embellishments, starting with the zig-zag strip down the left, then the journaling spot and paper clip on the top right.


Adhere the paper strip, then chipboard shape. Adhere letter stickers.


Adhere phrase sticker and half journaling spot to finish.

Thanks for looking.

In a couple of weeks I will have two more projects from the Kaisercraft Little Toot range for you. Until then, take care.


Friday, 2 March 2012

NEW STOCK!!!!

Is falling through the door at the moment - Graphic 45, Kaisercraft, Glitz Designs, Prima, Tim Holtz.......


Kaisercraft Tiny Woods

Kaisercraft - These Days

 Kaisercraft - Wood Shapes - priced from $4.90 each.


Monday, 19 December 2011

Christmas Ornaments

Hi everyone!

I wanted to show you this very cool Christmas decoration I whipped up.  The original idea is not one of my own.  I first saw them on www.2gypsygirls.com last year and then they popped up again in Stamping and Papercraft magazine, Vol 16 no 8.  I had wanted to make them last year but just ran out of time, but this year I was determined to give them a crack!

Heres my two decorations and then I will write up the basic instructions to complete them.


Ok, so first of all Ive just used left over scraps of paper to make the strips, and the layered poinsettia flowers.  Ive added a glass decoration I found at the Warehouse and layered some glittered chipboard snowflakes I had in stash, from Kay & Co, to decorate.

Basic instructions:
Cut x7 20mm wide strips out of double sided patterned paper, and then trim them to the following lengths.  You could use a variety of different papers or keep them all the same.
One strip 100mm long
Two strips 115mm long
Two strips 130mm long
Two strips 140mm long

Ink the edges of all strips now if desired.

Arrange the paper strips so they descend inwards in size, with the largest two pieces on the outside edges and the smallest in the middle.

Line up all the strips at one end and staple them together.  Then line them up at the other end and staple these together too - this gives the curved effect.

Trim two 40 x 20mm strips of  co-ordinating paper and fold them in half.  Trim the short ends with scalloped scissors.  Affix these over the top and bottom of the ornaments to hide the staples.

Set an eyelet in the top of the ornament  OR just punch a hole through like I did and hide it with ribbon :), if like me you don't have eyelets.

Feed ribbon or wire through the hole you have created to hang your ornament.
Now decorate as desired!

Heres some closeups of my two examples:


Happy scrapping everyone! and Merry Christmas!

Megan

Tuesday, 6 December 2011

Christmas Gift Card Tutorial

Hi everyone,

Just a quick tutorial today on how to make another different cute little gift card. Originally, I found this idea on Pinterest but it was used to store small treats such as Hershey kisses inside but I adapted it to use it as a gift card idea suitable to for Christmas or any other occasion. Unfortunately, my pin didn't save and I can't give credit for the original idea as I can't find it!


Instructions
1. Trim a piece of patterned paper to 8.5 inches x 2.5 inches
2. Score and fold at 2 3/4 inches, 3.5 inches, 4 inches and 6 3/4 inches
3. At the left hand end, use a glass or a template to create the rounded edge.
4. Embellish the gift card part (I used a different KaiserCraft patterned paper and added To and From.
5. Punch two holes as shown and add twine (tie at the back with twine into a bow for added detail.)

6. Embellish the front as you wish. I used a scalloped border punch and some left over patterned paper. To create an edge for the flap of the gift card to slot into I added some firm Prima lace and adhered it in the centre so that the flap would sit nicely underneath the top edge and hold together. I then added a chipboard circle and button with twine to finish it off!

A fun kids idea

A great way of using up left over pieces of patterned paper and a fun idea for the kids is to create cute little packets of reindeer food. Reindeer food consists of oats and glitter and I just printed the little saying onto a piece of white cardstock and printed it out.


Instructions
1. Fill a small cellophane bag with the oats and glitter
2. Trim a piece of patterned paper to 4 inches by 4 3/4 inches (or to fit the width of your cellophane bag)
3. Score and fold in half at 2 inches to create the bag topper. Adhere to the cellophane bag.
4. Embellish as you wish and add the Magic Reindeer Food print out, I just punched out some circles, added buttons and twine to finish the look.

Thanks for stopping by...

//Michelle

LinkWithin

Related Posts Plugin for WordPress, Blogger...