Showing posts with label Teresa Collins. Show all posts

Thursday, 24 January 2013

Now & Then Mini Album

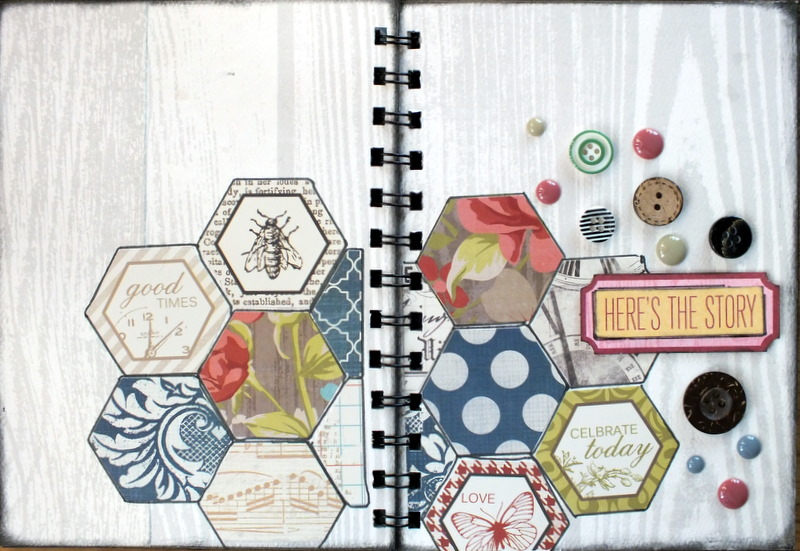
Hello girls, as promised in my last post I've created a 10 page Mini Album using the gorgeous range of Now and Then from Teresa Collins.  The whole album is made from three 12x12 sheets of papers and you have head on over here to check out how to create it.


For the Cover I used Woodgrain as my base (I just love the Woodgrain paper it's one of my favourites) and then using the hexagonals from the sticker sheet I created a little collage for the front and back so they match and embellished it with the buttons (sorry the sticker sheet & buttons are out of stock).


Here are the inside sheets showing the use of the papers and the embellishments


 Look at the little pocket to put the extra's photo's in.


So there you go girls, a nice quick and easy Mini Album which would also be perfect to use for a Nana's Brag Book as well

TFL and Happy Scrapping


Monday, 14 January 2013

Teresa Collins - Step by Step

There are more and more layouts which have alot of WHITE SPACE, so today I am going to show you how I created this layout using the gorgeous Now & Then Papers from Teresa Collins.


Products  you will need

Papers - Woodgrain Bee, Damask
Diecut Sheet, Buttons & Emerald Dots
Black Ink, Sewing machine, Black Thread

***********************************

1.  Using your sewing machine, randomly sew on the top right hand corner of the Woodgrain Paper, as well 
     as a little zig zag at the bottom
 

2.  Now cut the Damask, as well as the back of the Woodgrain to measure as shown below - 
     Ink all the edges


 3.  Do the same with the bottom two little strips which will measure the same length as your zig zag sewing


4.  Cut your photo down to size as well as the Bee Paper.  Ink around the edges, and place your photo 
     onto a spare piece of chipboard - this gives the photo a little height and dimension. 


5.  Using the little triangles from the Diecut sheet - ink around the edges and put some foam tape or dots 
      underneath each one and place under your sewing (top right hand side).  Tip:  If you don't have the 
      diecut sheet, you can just make your own triangles.


6.  Lastly place a button on the round diecut circle and place on the top of your photo as well as the Title 
     (Remember) - to tie the yellow button in I have used the yellow Emerald Dots at the bottom of the Title.


 Your layout is now done, simple right?  Hope you have enjoyed the step by step instructions, and I will be back again show casing some other layouts using this gorgeous range of paper.

TFL and Happy Scrapping
Heidi 


Saturday, 5 January 2013

Teresa Collins Now & Then

Happy New Year to all, here is hoping that 2013 is a fantastic year ahead,

This month I received the gorgeous new Teresa Collins Now & Then range to work with. The papers are really good quality and are the texture is nice and thick, and the colours are just fabbo.

My first layout I am sharing is one of our newest addition to our family, Milo - she is a border collie pup and is absolutely adorable but naughty at the same time.


I started off with Creampuff Bazzill Cardstock which goes perfectly with this range of papers.  To add a little glitz to the layout I used the silver glitter ribbon from the Border Strips.  A little Tip I always ink the edges of my papers with Black Ink this just gives the edges a lift.


I have also created my own embellishment using the Rosette Die and the Words Paper, and finishing it off with the Now & then buttons which are self adhesive so they are nice and easy to add to your layout.


 I hope you have been inspired by this layout, there are a couple more layouts to share plus a little project which I will share which doubles as a great gift to someone special.

Products used in this layout:-

CreamPuff Cardstock
Alphas - Studio Calico thickers “Winter Wonderland” red

TFL and Happy Scrapping
Heidi


Saturday, 3 March 2012

New Shoes!

Hi Everyone!

Let me just put this out there now........................................................I hate shopping for shoes!  I have size 4 feet so looking for shoes is the bane of my life, especially if I want you know really nice shoes for going out.  So why not make some?!  Sure, sounds easy when you say it quickly :) but turns out its actually quite fiddly as I soon found out.

So, I had scraps left over form a previous posting, yes I know I do have a thing about scraps at the moment lol, but instead of cards I  made new shoes!  The paper is Teresa Collins from the Notations range, and to decorate the shoes I used some cameo bling I found on sale at Diva, I just removed the chains from the necklaces and added some organza ribbon tied in a double bow.  Around the edge of the heel I punched a trip of paper with my favourite Martha Stewart punch.  The trick to making these I discovered was Tim Holtz glossy accents it dries so quick especially when its paper to paper.

When we buy shoes they come in a box too! So I found a wooden box with an ugly picture - I can't bare to cover up nice pictures so I always pick an ugly one and then I don't feel guilty - queer I know but there you have it :) - from the Warehouse for $7.  Added some rough painting around the edges and layered the top with strips of punched paper, some double layered butterflies for dimension and some Petaloo flowers from my stash.

I reckon they look quite cool!  I found the pattern on another blog I sometimes look at so I've included the link for you to get check out her tutorial. http://artfulaffirmations.blogspot.com/2010/01/elegant-shoe-tutorial.html


Go check out the tutorial and give them a go - I'd love to see them in the gallery if you do!, or better still bring them to retreat! :) Not many sleeps now!

Megan

Friday, 30 December 2011

Product Focus on Stamps


Hi everyone,

I have to apologise this post is a wee bit late this week. The short week completely threw me and I didn't realize what day we were up too and then we got a new computer and it took a bit to set up properly. But better late than never!!

I hope you all had a nice Christmas wherever you are and if you are on holidays right now are enjoying the break. We are having nice four day weekends and I am enjoying getting some stuff done around our new place.

This month I was using the clear stamp set for the Sports Edition II collection by Teresa Collins.


This particular stamp set is so versatile to have in your stash of scrapbooking products. What I love about stamping with clear stamps is that they are relatively inexpensive because you can use them more than once rather than using up store bought embellishments. You can also choose any ink colour to match in with your project and if you wish to add dimension to your projects by stamping onto card stock or patterned paper and then raising them with foam dots. Lastly, the advantage of using a clear stamp over a wooden stamp is that you can see exactly where you are going to stamp with them which ensures that your stamped image is exactly where you would like it to be.

Creating backgrounds

The first stamping technique that I am going to share which is quite trendy at the moment in the scrapbooking world is to create effective backgrounds using stamping. This can be a bit daunting as it does mean stamping directly onto your project but don't worry if you accidentally mis-stamp the image as I do this all time and it just adds to the effect. You can always add to the image by putting an embellishment in the area that was mis-stamped in the first place. There is no right or wrong way to create backgrounds using stamped images. You can either plan it out or instead if you are like me... start with one image and then add more images until you feel it is finished.

Here is an example using the TC stamps:


On this page I have added some stars to the lefthand side of the page. I have then added some of the smaller stars from one of the other stamps and raised them with foam dots and added some of the die cuts to cover where the stars haven't completely stamped.


Another background using the stamp set - this time I have created a border strip out of stamped images and I have also coloured in the stars in red to match in with the papers used on the project.

Also, I encourage you to think outside of the square when it comes to stamping! Instead of using ink on your stamps I have picked out only a small piece of the 'Play hard' circle without the rest of the stamp and used a marker pen to colour only that piece of the stamp.

Creating embellishments using stamps

I just love adding layers and dimensions to my embellishments using clear stamps. I have done this often throughout the mini album but in the photo below you can see I have added the little crest symbol to the edge of my photo on page 3 as well as another star to my photo pocket on page 4 of my album.

Also, I created a little tab using the 'Play Hard' stamp for the person reading the album to turn over the top team photo on page 5 below.


There are so many different ways you can add stamps to your projects to add interest and layers! A couple of others that come to mind are stamping using Stazon Ink onto transparency or stamping and then using embossing powders to give your stamped images a lovely glossy look to them.

I hope the above has given you a few more ideas of how stamping can feature in your projects in the future and inspired you to go shopping in the store for some clear stamps to add to your stash!

//Michelle

Wednesday, 21 December 2011

Teresa Collins Sports Edition II

Hi everyone,

Today, I want to share with you a card I made using up the left over pieces from my dt kit of the Teresa Collins Sports Edition papers. Making up cards is a great way of using up those small pieces of left over patterned papers and embellishments that don't quite make it onto our layouts! I do have a stash of scraps just for this purpose but it makes way more sense to just pull together a quick card at the end of that project so you can have there ready for when you need one.

I have created a thank you card for a sports 'coach' but it could easily be adapted to fit into another different masculine themed card to suit your gift giving occasion.


Here is how I made it:

To create the background, I used this Prima Fence Mask and Texture Paste. For anyone who hasn't used a product like this before - it is super easy. I used Jo Sonya's Texture Paste and a scraper thingey (which I got from Mitre 10 Mega).


Firstly, lay the mask over the area that you wish to add the texture paste too. Holding on to the mask so it doesn't move, scrap over a thin layer of Texture Paste. A quick tip is not to paste right to the edges of the mask otherwise you will get a square look which isn't as natural looking instead pick an area of the pattern you like the most and just paste that part. The mask I used is pretty much the same width as my card so I applied texture paste to the entire background.


I then added some Slate Glimmermist to give the paste a more grungy look.


Next, I added the left over pieces of patterned papers (Practice and Blue Numbers). I also stamped out 3 stars using the Sports Edition Stamp Set which I just love as they are perfect for using on masculine cards and layouts. Lastly, I layered a couple of the diecuts to create my sentiment and matted them onto some on a banner I created from blue numbers patterned paper.

I hope I have inspired you to use up your scraps and perhaps to try and give a product like Texture Paste a go... it is such an effective and easy way of creating that extra layer of texture to your creations.

Take care
//Michelle

Wednesday, 14 December 2011

DT Inspiration - Teresa Collins Mini Album

Hi everyone,

I'm excited to share my latest creation on the blog.

This month I have created a little keepsake for Liam using the Teresa Collins Sports Edition II Collection including Album Covers, patterned papers, clear stamps, and die cuts (see links below to actual products used).

Liam has been playing soccer for a number of years now and this collection has the perfect colours to match in with his club uniform. I used the TC Chipboard Album Covers in a landscape orientation and created inside pages for the mini album by using the covers as a template with the various patterned papers in the collection. I then set about creating the pages themselves! What I just love about Teresa Collins' collections is there are usually lots of designs in her papers that can be fussy cut out to create little embellishments and along with the die cuts and the clear stamps I was really spoiled for choice with what I could add to my pages. The bright blue, red, black and white colours in this collection are also striking to work with and would make stunning scrapbooking layouts as well.

If you wish to view larger images of the album, please click on the image for more detail..

Firstly, I liked the plain black part of the chipboard covers so I have used those sides for album covers.


The first two pages are about Liam's first year of playing soccer.

Then his second year of playing which includes a pocket for various photos.


And his third season of playing:


There are so many little details on this album which are hard to capture in photos. I always have lots of photos and not so much space for journalling so I have created lots of little pockets and hide away places for journalling and the extra photos. I hope you can see some of them in the below collage.


Next week, I am going to share some of the ways that I have used the clear stamps on the album in my product focus so please do check the blog again for my next blog post.

Thanks for stopping by..
//Michelle

Products used:
Teresa Collins Chipboard Album Covers Sports Edition II
Teresa Collins Sports Edition II Diecuts
Teresa Collins Sports Edition II Clear Stamps
Teresa Collins Sport Edition II Paper - Blue Numbers
Teresa Collins Sports Edition II Paper - Practice
Teresa Collins Sports Edition II Paper - Shields
Teresa Collins Sports Edition II Paper - Stars

Friday, 16 September 2011

OTP Inspiration with MME and Teresa Collins


Hi everyone - it's time for some inspiration using the MME Lush 2 range and Freestyle by Teresa Collins. These two ranges work so well together! The set I created is giving me a bit of a circus vibe which is SO hot right now!

This gift set would be perfect for a teen girl, or any girly girl really!

I started by creating a gift box. This is the perfect size for some hand cream and lipgloss or any number of small items.


If you'd like to make this box, you can find the instructions here. I decorated the box with this awesome pom pom trim and the co-ordinating ribbon as well as some Green Tara flowers. I love that flocked paper!

For me, homemade packaging is ALL about the details. Going the extra step really makes your packaging stand out. So with this box, I like to also line the inside...


This is a good way to use up those cut scraps of paper and also helps make the box even more sturdy. I have made the tag on this box removable so the box can be used for storage after the gift is taken out.


I used the same papers to create a large 5"x5" card. I layered the sentiment cut from this paper onto a flocked journalling panel. The adorable speech bubble from 2crafty (looks like they are out of stock - ask Adrienne if you need them!) was covered in the grid paper and I used a thicker number 2 to make it a little text speak funky and to tie in with the sentiment on the box tag. The ribbon is again from the Lush set.


I finished off the gift set with a little pillow box. I used a sizzix die but you can find templates for these all over the internet. This one would be perfect for another small gift or a gift card.

Have a wonderful weekend, I hope you get time to be creative!
Sarah

Monday, 29 August 2011

OTP Inspiration with Teresa Collin Noteworthy

I sooooo love this range of papers, well to be honest I just love Teresa Collins products :)  so I was absolutely stoked to see this range in my DT kit this month.

The aim was to try and give you some inspiration to use it for wedding/anniversary/engagements celebrations.  With that in mind I remembered a friends wedding that was themed around black and white so this range seemed perfect.


So, I have made a card that I have layered with black cardstock and used Spellbinders Lacey Ovals and Labels Four.  The 'greeting' is from a Basic Grey rubon from my stash.


Next are the party favour boxes.  Adrienne has an accucut machine that can diecut these for you, in a couple of different shapes.  Here Ive used the rectangle one.  The one on the right I have embossed with a Tim Holtz embossing folder and then punched out some flowers, curled the edges and stuck them together.  Ive also used a Cherry Lyn design - fanciful flourish - and some gorgeous Melissa Frances flowers.


Lastly are some wooden letters with the couples initials.  On the 'P' I have used a Kaiser wooden flourish, and on the 'R' I have used two Dusty Attic damask.  Ive also used some very cool ribbon thats available in the shop, black glittered with sequins, quite dimensional as opposed to flat, and some more MF flowers.


Hopefully this has given you some inspiration to try something a bit different for gifts.  Adrienne can order wooden letters for you easily in a variety of fonts and sizes!

LinkWithin

Related Posts Plugin for WordPress, Blogger...