Showing posts with label DT Inspiration. Show all posts

Monday, 29 April 2013

Prima - Hello Pastel with Michelle

Hi everyone!

It is so nice to be back here on the Scrappin' Patch blog with a couple of layouts using the new Prima range - Hello Pastel.

I was so lucky enough to be able to attend the SP Autumn Retreat at Glentui a couple of weeks ago and had an absolute blast.  It was so nice to put names to faces who I have spent time chatting to online and catching up with past design team members and Adrienne as well.  This was such a lovely and inviting event - everyone was so friendly and the food was well to die for!  If you are considering attending a retreat and thinking about it then I would totally recommend coming along in September!  I know bookings are coming in thick in fast so get onto it and secure your spot! 

Right back to the pretty papers!  My first layout is about my baby girl turning one!  The Hello Pastel papers worked so perfect for pretty girly pages and I just loved the pops of almost neon colour with the neutral grey.  I first sprayed my white card stock with Mister Huey's sprays Taxi and Mint Julep using my new Mister Huey's Chevron Mask.  I mixed up the patterned papers with stickers from the journalling sticker sheet to create lots of little embellishments on my page.  The other stickers are from my stash but were from Amy Tangerine's Remarks sticker book. 


My second layout using the Hello Pastel range makes use of the Parfait paper that has lots of little elements which are perfect for cutting out and using up as embellishments which is a really cost effective way of layering and embellishing your pages.  On my "Happy Bath Girl" layout I first misted a Mister Huey mask with Taxi, Mint Julep and White mists. I then added patterned papers to the right side of my photo, added a doily and then started to add the stickers from either the journalling sticker sheet or the little cut out elements from the Parfait Paper (HELLO, BEAUTIFUL).  Lastly to add balance to my layout I added a little cluster to the top left of my layout.

 You can see how I have added another layout to my HELLO and BEAUTIFUL by adding little banners from the same Parfait paper.
Products used: Hello Pastel - Stickers Journalling, Hello Pastel Paper - Cream Puff, Hello Pastel Paper - ParfaitHello Pastel Paper - Sugar CubeHello Pastel Paper - Pastry ShoppeMME Enamel Dots - Im With, Mister Huey's Masks - Sun Drifter Mask 2 Step Stencil Circles 8"x8"  and Chevron 4"x6", Mister Huey's Mist Taxi and Mint Julep, Amy Tangerine - Yes Please Roller Stamp 12 Phrases, Amy Tangerine Sketchbook - Remarks Stickers


Thanks for stopping by the blog today and hope you have been inspired to create some layouts using this gorgeous Prima range.  I will be teaching at the next SP retreat so if you are interested in learning more about layering up your embellishments and masking with mists and texture paste be sure to watch out for my class!  

Take care
Michelle

Saturday, 19 January 2013

Final inspiration

Hi everyone

Well today is my last official post as a design team member for Scrappin' Patch. I've had a lot of fun and learnt so many new techniques and I'm so grateful to Adrienne for welcoming me on the team. Thank you for all of your lovely comments too.

As this is my last post I thought I'd use my scraps from various posts throughout 2012 to make cute little gift cards. See if you can guess what each collection is :)


x Lana

Sunday, 23 December 2012

DT Inspiration - Bo Bunny Detour.

This is my last post for 2012!  Gosh, hasn't this year just flown by... I hope you have finished all your Christmas shopping and you are relaxing and enjoying a nice holiday break.

I have my last layout to share with you using the Bo Bunny Detour Range - it honestly was the perfect set of papers to do a layout on our major GPS fail when it sent us on a back road that was closed on our road trip from Brisbane to Sydney a couple of years ago now!


This layout is all about recording the memory... the road we ended up on was just horrendous and almost completely washed out in places.  It was one of those 'should we believe the GPS' moments or should we trust our gut instinct and not go the way it said we should. Over an hour round trip later... we shouldn't have trusted the GPS at all.   I created a border around my Kraft cardstock using the globetrotting patterned paper.  I then accented my photos using the chipboard pieces, fussy cut out the detour sign and finished off with some shipping tags which I just love for journalling.  

I have really enjoyed using the Bo Bunny Detour Range.  If you have some travel photos to scrapbook it is definitely one to have a look at in the shop!  

That's all from me for the year... I hope you have a Merry Christmas and a relaxing New Year!

//Michelle


Saturday, 15 December 2012

A DIY Christmas Decoration

Hi everyone,

Tonight I am going to share with you a cute Christmas decoration that is super easy to make.  A few years ago I started a Christmas tradition where each child gets a new Christmas decoration for the tree with the idea that when they leave home they have lots of decorations to take with them to share on their family's Christmas tree.  This year I hadn't really gotten around to going out and getting each child a new decoration when I came across this cute tutorial by Lillyella to make Christmas decorations out of old holiday cards.  I thought it would be super easy to adapt this and use up some of my Christmas paper stash instead of cards and each child could have their own homemade decoration this year. 


One of the finished decorations on the tree!

To make one of these decorations you will need - 
  • 20 circles.   I used a circle punch to punch out my circles.  The larger the circle the bigger the decoration will be.
  • You need an equilateral triangle, the size of your circles.  Lillyella has templates you can print out  that fits into 1", 1.5" and 2" circles here.  Unfortunately, my circle punch was an odd size so I just drew an equilateral triangle and made my own template pretty easily.  Create your template on a piece of cardstock so it is easy to trace around.
  • A bone folder and ruler
  • Glue - I used Henzo Quick Dry Adhesive which is AMAZING glue. 
  • Twine or Ribbon to create the hanging part of the ornament.
To make the decoration: 

Firstly, punch out your 20 circles from your patterned paper.  I found that having 5 different patterns worked really well as it gave you variety without getting two matching papers joined together when the decoration is finished.  

Then using your equilateral triangle template - score a triangle shape onto the back of each circle.  The scored line needs to be on the back especially if you are marking it with pencil as you don't want to see this on the finished decoration.  Note, I didn't bother using a pencil as I found it was just easier to skip straight to the scoring stage.  When scoring your triangle onto the circle, make a note (I used a little T) to indicate the top point of the triangle.  This is useful later when assembling the decoration. 

Using the above score lines, fold the three lines up so that the reverse side (with the pencil lines is on the inside and hidden)

Next, adhere 5 circles together so that the top points of the equilateral triangle are all pointing together.  Before the glue dries, loop a piece of twine through the top points and tie a knot.  This forms the top of the decoration.  (as shown) 


Repeat above step with another 5 circles to create the bottom half of the decoration (without the twine)

Glue the last 10 circles side by side with the top points in opposite ends and then join them together to form the middle part of the decoration.  (as shown) 


To finish the decoration - glue the three pieces together!


These look really amazing on the tree.  I am just loving the handmade look and I may well start a new tradition of making each child a Christmas tree decoration instead of buying one.  Thanks for stopping by and I hope I have inspired you to make your own Christmas decoration!!

//Michelle 


Monday, 10 December 2012

DT Inspiration

Hi everyone!

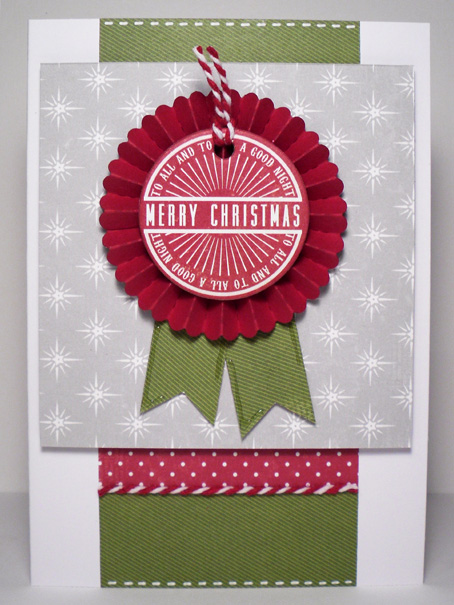
Today I'm sharing some more Christmas card inspiration using the Very Merry papers from Echo Park.

This card was actually made from scraps so going into it I was a bit unsure as to how it would turn out, but I'm really happy with the result.


My main feature of the card is a rosette I made using the Tim Holtz Rosette Die (large). I finished the rosette off with a chipboard sentiment from the My Mind's Eye Winter Wonderland Chipboard Elements sheet and I had a bit of cut off baker's twine laying around so I tied that to the top. I then added some banner details behind the rosette to make it pop.

This is my last post before the big day so I hope you all have an amazing Christmas with those close to you and I'll see you in the new year!

x Lana

Saturday, 8 December 2012

Bo Bunny Detour Collection

Hi,

It's Michelle here, tonight I'm going to share with you another layout I have created using the Bo Bunny Detour Collection.  


To create this layout I first sprayed with Granite Glimmermist and then I have used the tags and circle pieces from the reverse of arrow patterned paper below to create layers beneath my photo.  I just love how easy it is to fussy cut out the shapes and it really made creating my simple layout easy but still interesting to the eye at the same time.  


Thanks for stopping by the blog today and I hope you have enjoyed seeing another layout using the Detour range.

Have you checked out the massive storewide online sale?  You can get lots of products including whole of the Bo Bunny Detour range at 40% discount.  What amazing value!!   

Take care
//Michelle


Thursday, 22 November 2012

DT Inspiration - Christmas!

Hi everyone!

Well it's getting very close to my favourite time of year - Christmas! I just love making Christmas cards every year with a spot of Christmas music in the background to get me in the spirit. This week was no different. With the Diana Krall Christmas album in the background I made these 2 cards using Very Merry papers from Echo Park.


Make sure you stop by in the weekend to see some cute Christmas stamps that I'll be sharing. 

x Lana


Monday, 12 November 2012

Step By Step - Kiwi Christmas

Hi everyone!

Today I'm going to show you how to make a Christmas card with a kiwi twist. I've been making this card for years, it's one of my favourites and one of my most popular cards at my craft market stall.

Let's begin!

STEP ONE:
I grabbed some scrap paper and did a freehand sketch of a jandal and the part where you slip your foot through. (Comment on this post if you would like a template for this and I can post one on the Scrappin' Patch Facebook page). Cut your shapes out. You only need one of each.


STEP TWO:
Trace around the shapes onto your chosen cardstock, flipping the shapes over to get the other jandal. Assemble your jandal by attaching the thong to the base. I used glue at the ends of the thong and then some dimensional adhesive at the top to make it pop a little.


STEP THREE:
Cut some small circles and leaves out for your holly. These don't need to be perfect. I actually prefer them when they're a little bit rough.


STEP FOUR:
Attach your holly to the jandals with some glue and dimensional adhesive. To give the berries a little shine, I covered them with some Glossy Accents.


STEP FIVE:
Add your Christmas jandals to your card base, include a message and there you have it - a fun kiwi Christmas card!


Hope you enjoyed this tutorial. I can't wait to share more Christmas cards with you this month :)

x Lana


Saturday, 10 November 2012

Bo Bunny Detour DT Inspiration

Hi everyone,

Today I have a layout to share with you that includes some of the fabulous Bo Bunny Detour Collection .

This collection fits perfectly with all things 'travel'  from that overseas holiday to road trip adventures  around NZ.  I had a few ideas of layouts that I wanted create with this collection but it was only after starting to work with it did I realise how it could easily be used for fun boyish layouts as well.   

My first layout is some action shots of my family on the log flume ride at Movie World.  I really like how the pop of the colour red and blue work really well with the neutral tones in my photos.  I couldn't resist adding some texture paste with my new mask from Crafter's Workshop and adding a fun accent 'awesome' cut using the Cameo.  

Products used:
October Afternoon - Sticky Keys Alphas
Amy Tangerine - Remarks Alphas
Crafter,s Workshop Mask - Awesome/Arrows
Silhouette Cameo - Title Awesome
Studio Calico - Wood Veneer Stars/camera


Small details:


That's all from me for November but I have some more DT inspiration coming in December using the same collection.

Have a great weekend !
//Michelle

Saturday, 3 November 2012

DT Inspiration

Hi everyone!

This month I have the pleasure of working with the Little Boy Blue range from Crate Paper. I had already purchased the Little Bo Peep range which I had fallen in love with. This range is just so adorable!  I love the retro/vintage style and the colours and illustrations.

My first card uses one of my favourite colour combinations - red and powder blue. I love the main illustration of the boy on his push bike. This is from the tag cuts sheet that features a whole heap of different tags - perfect for layouts or cards.


My second card features cute peg details on some yellow baker's twine. I'm really into chevron type patterns at the moment so I used the yellow and white chevron as my base against the natural card.


I hope this provided you some inspiration for your next project.

x Lana

Saturday, 20 October 2012

DT Inspiration

Hi everyone!

Today I'm sharing some final My Mind's Eye inspiration from my last kit - the School Daze range and the Miss Caroline Howdy Doody range.

I loved the main pattern on my first card so I wanted to show a lot of it and make it the main feature. This card also shows off a lot of my favourite design elements - rounded corners, faux stitching and a rosette and not to mention the simple design. For a little bit of effect I put some glossy accents on the apples to create a bit of shine.


My second card also features one main element and that is the Miss Caroline rub-on flowers. Rub-ons are so quick and easy to use and most come with a tool of some sort to help 'rub-on'. The Miss Caroline Rub-ons include a range of flowers and decorative pieces in a few different styles. I thought the flowers I choose would be just perfect for an anniversary card so I finished the card off with an anniversary sentiment.


I hope you all have a wonderful and safe long weekend. Keep an eye out on the blog today for your next ingredient for the long weekend challenge!

x Lana

Supplied used: My Mind's Eye School Daze, My Mind's Eye Miss Caroline Howdy Doody Lovely Mum's Paper, My Mind's Eye Miss Caroline Howdy Doody Happy Rub-on Transfers. 

Saturday, 6 October 2012

Simple Stories - Handmade

I was so excited when Adrienne gave me the pre-cut Mix 'n Max chipboard album as part of my design team kit this month.  I had purchased the Simple Stories Handmade Holiday Kit, so this was just perfect for what I had in mind using these papers.

I decided to do up a December Daily Album all ready for December.  I actually managed to use every single piece of paper in the kit and even had to go back to get an extra couple of papers just to complete the whole album.  So this month I will be sharing my December Daily pages with you, to inspire you to create your own or even give it as a gift to someone.


I popped into the shop to cut all the papers so all I had to do was glue them down and decorate each page individually, I have created some little tags and even a triangle page to add a different look to the album, no two pages are the same.

For the cover I used Handmade Holiday Paper - Page Elements paper as the base page,  and then added my title using the Expressions Sticker Sheet, and outlined the tape pattern on the Elements paper using a black pen just to make it pop our a little.  To give a little dimension to the Alpha's I added some Dimensional Magic over the word DAILY.  I have actually used Dimensional Magic over most of the Numbers in the album, it gives them a nice glossy look.


Day 1 and 2


I have used the Winter Wonderland Paper which is double sided - so it was just perfect and matched together beautifully.


On page 1, I added a Vertical Journal Card and then placed a Transparency over the top. When you buy the full Kit it comes with six 6x4 Transparencies which fit perfectly over the top of the Journal Cards.  The Journal cards are great to use as a matt for your photo's.  Here a before and after look using the transperancy.

BEFORE TRANSPARENCY 
AFTER THE TRANSPARENCY


To add a little special Christmas feel to it I painted the chipboard Santa Hat with Rustic Glimmer Glam, and then added some Dimensional Magic over the top.  For the white piece of the Santa Hat, I inked it with White Stazon - allowed it to dry and then embossed it and before it dried  then added some Diamond Dust over the top to give it dimension and a little sparkle and this allowed the Diamond Dust to dry and get hard with the Embossing Powder.


On page 2, I just added the Number 2 from the black sticker sheet and then added some black Distress Stickles on top of it to give it a some sparkle.  I did the same over the top of the of the flowers on the paper but it didn't come out very well it was too pink although I used a red Distress Stickle, so I painted some Rustic Glimmer Glam over the top which worked perfectly.


 So there are my first two pages plus my front cover, I will show you the rest of the album during the month, I hope this has inspired you to create your own little album.

TFL & Happy Scrapping
Heidi

Thursday, 4 October 2012

Inspiration can be the sweetest thing...

Hi girls, where have these months gone? It's my turn to share some scrapbooking love with you already! Naturally I was thrilled to receive from Adrienne a beautiful selection from My Minds Eye The Sweetest Thing Bluebell collection, I love that fact that it's blue and flowery, so great for not only little girls pages but also for those sweet little men too! This range is still available in store so get your hands on it before it fly's.. hope you like this sweet wee page of Master Louie and his gorgeous cousins.


Love Belinda

Saturday, 29 September 2012

October Afternoon - here & now Album

Hi again,

It is time for me to share with you the finished pages of my mini album I have been working on over the last few weeks.  I am not a big mini album fan usually but can I say WOW... I think I may have been converted by the October Afternoon Here & Now Mini Album (OA MA).

It was so easy to pull together but today I wanted to share with you how I go about creating an album like this from it's conception to the finish project.  Not a blow by blow way of 'doing it' but more of what sort of things I think about when I am creating a mini album. 

Album Concept 

Sometimes I get layout or project inspiration from the photos themselves but other times creativity flows from the product itself which definitely happened with the OA MA.  I specifically, loved the 'word' themes that are on the front cover 'today' and 'play' and liked how these words worked in with capturing the moment.  

I also loved the colours in the October Afternoon Woodland Chapters that accompany the OA MA.  The colours in this collection were perfect for outdoorsey themes and specifically in this case for 'the beach'.   When I am creating a mini album - I like to use a specific event such as a family holiday where I usually take lots of photos that tell a story rather than beautiful portraits which I may prefer to highlight on a layout.  

A mini album is the perfect way to 'document' an event and a mini album provides the perfect backdrop to tell stories and traditions which is why I chose to document our last family holiday in Hahei.

The goal of the MA 

Next step in the process is to think about what I want to achieve in creating the MA.  Firstly, it is to hold all those photos but secondly as we travel and spend a week camping at the same spot each year, I wanted to document what happened on this specific year.  This year we had four members of our family on holiday so I thought that the chapter dividers would be perfect to record the favourite aspects of our holiday.  The lined pages of the mini album were perfect to use as a journalling page for each family member.  I used alphabet stamp to write the journalling prompts.


Organising Supplies

Next, I gathered all the supplies I thought would work with the album colours.  I really liked the OA Here & Now Chapters as they had really cool patterns and designs which I thought could be used as embellishments as well as background papers.  This makes the chapters and the OA MA good value for money as I had a lot to create with.   Some of them had beautiful detail on them, like the butterfly page above which I decided to leave blank to create white space and I felt it didn't need anything else on that page at all.   Other pages I fussy cut out pieces of them to use as embellishments on other pages.

Once I have my supplies, my photos and everything in one place then this is sometimes where I have trouble taking the plunge... but honestly, just get started.. there is no wrong way to put together the album.  To create flow and a story I have grouped my photos into different mini themes - like getting there and camp set up,  different aspects of general camp life and beach scenes.  In fact, one of the telling aspects of the whole holiday which was highlighted when I put together the OA MA is that there were less photos of Liam in general because the main thing he did on holiday was hang out with friends and not with us... slightly awkward!  But another important aspect for me is to create balance of pages between the different family members that were on holiday.  Something I need to work on for next  time is taking more photos of ME!  

Putting the Album Together

Right, now the fun part, I have used a mix of photo sizes in my OA MA from teeny tiny to 6 x 4 inches.  I wanted to create lots of texture, layering and interest on my album pages.  To do this, I have layered some of the busier patterned papers with the ruled lined paper and incorporated little plain tags to create pockets of interest and depth.  A lot of the time, it was working the colours in the papers in with the colours in my photos.  The bluey tones were perfect for the beach shots and I just loved the greens and pops of colour with the greenery of the campsite and our tent colours.  The sunshiney yellows remind me of the lovely weather we had and also worked well with the shots of the beach too.  

I also used a lot of 'word' embellishments instead of journalling throughout the album.  I love how you can buy sticker sheets with lots of different words and phrases which make summarising my thoughts super easy without having to actually journal on the pages.  This is super fast and of course great for someone who doesn't like to write a lot on their pages.

So that is pretty much how I created it!  Here are the rest of the pages...


Thanks for stopping by today, I hope you have enjoyed seeing the last of the OA MA as much as I have enjoyed creating it.  

Thanks
//Michelle


Thursday, 20 September 2012

My Mind's Eye - School Daze

Hi everyone

I'm back to show you a little inspiration using the School Daze paper pad from My Mind's Eye. This pad is super-CUTE! I love the colour palette and pretty much every pattern - as is the case with most MME collections :)

Education and schooling has been a hot topic in the Canterbury region this past week so I thought I'd make a card to say thanks for all the hard work our wonderful teachers do at all levels.


I love the way it's turned out. Bright and colourful with some texture, dimension and a hint of gloss using Glossy Accents on the little hand-cut arrow details. I used some Thickers from the Amy Tangerine range to say 'THANKS'.  I love how the letters aren't perfect so they have a handwritten effect - perfect for this sort of card! I used Doodlebug Design Inc Teensy Type to say 'teacher'. I love these alphas too. So darn cute and a fantastic price.


My second card is a 5th birthday card. I've used green and yellow as my 2 main colours which I think can suit both a boy and a girl. I made a polaroid to frame 'Happy birthday!' and I left a space on the polaroid to include the name of the birthday boy or girl. The stars are from FabScraps and I just covered them with cardstock to give them some quick colour. This card also has a lot of dimension as all of my cards do! I don't think I've ever made a flat card. I just love how the dimensional stickers just give that instant pop.


Thanks for stopping by. Don't forget to check out the Scrappin' Online store for these goodies and so much more including some gorgeous new product from Teresa Collins, Prima, Bo Bunny and more!

x Lana

Products used: My Mind's Eye School Daze Paper Pad, FabScraps Chipboard Stars, Doodlebug Design Inc. Teensy Type Alphas White, Amy Tangerine Journal Thickers White, Glossy Accents.

LinkWithin

Related Posts Plugin for WordPress, Blogger...